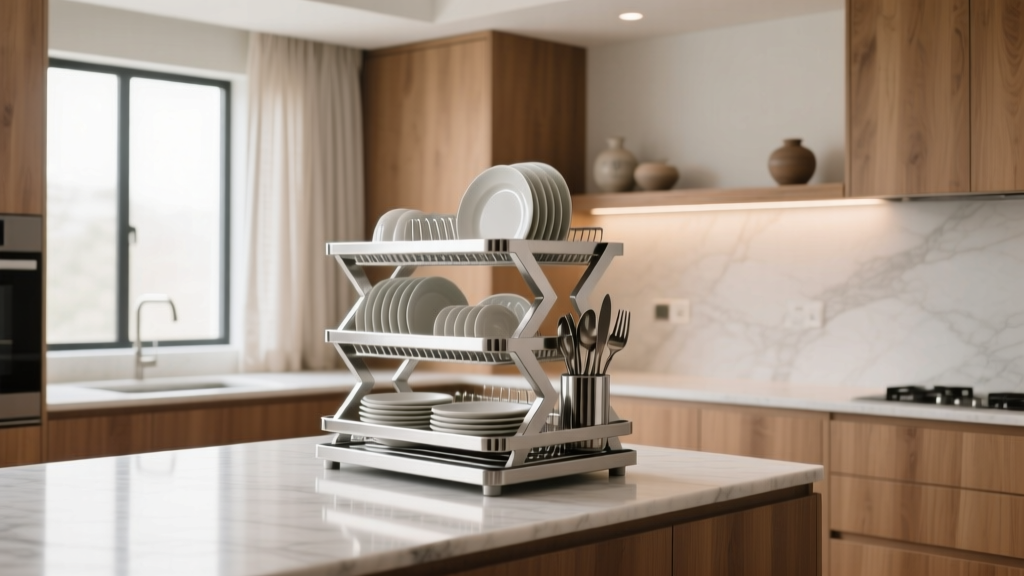
Best Kitchen Dish Drying Rack Solutions - The Decor Mag
A dish drying rack is one of those deceptively small kitchen decisions that can shape your daily routine. If your rack is always in the way, drips onto your countertop, or traps grime in hard-to-clean corners, it quietly chips away at the joy of a well-designed kitchen. On the other hand, the right drying solution can keep counters clear, protect your surfaces, and make cleanup faster—especially in busy households or kitchens without a dishwasher.
For homeowners planning a kitchen renovation (or simply upgrading organization), dish drying is also a layout question: Where does water go? How close is it to the sink and dishwasher? Can it disappear when you want a clean, minimalist look? Today’s kitchen design trends—integrated storage, streamlined countertops, and hygienic materials—make drying racks smarter, sleeker, and more customizable than ever.
How to Choose the Right Dish Drying Rack (Before You Buy)
Start with your sink zone workflow
Most functional kitchens treat the sink area as a “wet zone” with a clear sequence: scrape/rinse → wash → dry → put away. Your drying rack should sit within easy reach of the sink and, ideally, allow water to drain without pooling.
- Best placement: adjacent to the sink or over the sink (so water drains directly into the basin).
- Ideal distance: within 12–24 inches of the faucet to avoid drips across the counter.
- If you have a dishwasher: consider a rack near the dishwasher for hand-wash items, or a compact option that stores away.
Measure your space (and your dishes)
Racks fail when they’re sized for the counter, not for real life. Before choosing a countertop, over-sink, or in-cabinet option, measure these essentials:
- Counter depth: standard is 24 inches; many racks work best at 12–18 inches front-to-back.
- Sink width: common sizes are 24–36 inches. Over-sink racks typically adjust between 26–40 inches.
- Height clearance: allow 17–20 inches from counter to bottom of cabinets if using a tall rack or over-sink frame.
- Plate size: dinner plates are often 10–12 inches; ensure the rack slots fit without wobbling.
Think about what you actually wash by hand
Your rack should match your everyday items, not an idealized version of your kitchen. If you frequently wash large pans, baby bottles, wine glasses, or cutting boards, prioritize adjustable components and vertical storage.
Best Dish Drying Rack Types for Modern Kitchens
1) Over-the-Sink Dish Drying Racks (Best for small counters)
Over-the-sink racks are a favorite in space-conscious kitchen organization because they free up countertop real estate and drain directly into the sink. Many models include hooks, utensil cups, and cutting board holders—turning the sink into a compact drying station.
Best for: apartments, galley kitchens, minimalist countertops, busy households
Look for these specs:
- Adjustable width to fit your sink (commonly 26–40 inches)
- Non-slip feet or silicone sleeves to protect sink edges
- Stainless steel frame (304 stainless resists rust best)
- At least one flat shelf for bowls and cups plus a vertical slot section for plates
Cost range: $50–$180 depending on size, accessories, and steel quality.
Design tip: In renovated kitchens with statement faucets, choose a slim-profile rack in matte black or brushed stainless to coordinate with hardware and lighting.
2) Countertop Dish Racks with Drainboards (Best all-around choice)
The classic countertop dish rack is still the most common solution—especially if you want portability and flexibility. The key is choosing one with a well-designed drainboard that channels water back into the sink (instead of letting it puddle under the rack).
Best for: homeowners who want a simple upgrade without installation
Recommended features:
- Sloped drainboard with a spout that directs water into the sink
- Removable utensil caddy (easy to clean and reposition)
- Non-scratch feet (silicone or rubber)
- Expandable frame if your washing volume changes day-to-day
Cost range: $25–$120.
Practical measurement guideline: A rack around 16–20 inches wide fits most sinks and leaves space for prep. If your sink run is tight, a compact rack (12–15 inches wide) plus a foldable drying mat can handle overflow.
3) Roll-Up Drying Racks and Drying Mats (Best for flexible, hidden storage)
Roll-up racks sit across the sink and can be rolled away when not needed—ideal for homeowners chasing a clean-counter look. Drying mats provide a soft landing for glassware and can be tucked into a drawer.
Best for: minimalist kitchens, entertaining-ready spaces, secondary drying needs
Material recommendations:
- Silicone-coated steel roll-up racks: durable and heat-resistant; can double as a cooling rack
- Microfiber drying mats: absorbent but must be washed frequently to avoid odor
- Diatomaceous stone mats: fast-drying and sleek, great for modern kitchen design aesthetics
Cost range: $15–$60 for roll-up racks; $10–$40 for mats; $30–$100 for diatomaceous stone.
Maintenance tip: If you use a mat daily, buy two so one can be in the wash. Wash microfiber mats weekly (or more often) in hot water and air dry thoroughly.
4) In-Cabinet or Wall-Mounted Dish Drying Racks (Best for renovation planning)
If you’re renovating, integrated dish drying racks can give you the best of both worlds: efficient drying and a clear countertop. The most popular approach is a dish drying cabinet above the sink with a drip tray and drainage channel—common in Scandinavian kitchen design and increasingly popular in modern renovations.
Best for: full kitchen remodels, European-inspired kitchens, households wanting clutter-free counters
Design approaches to consider:
- Upper-cabinet dish rack insert: installed inside a wall cabinet above the sink
- Wall-mounted rack: open shelving aesthetic; works well in industrial or modern farmhouse kitchens
- Pull-down racks: accessible for shorter users while keeping storage high
Cost range:
- Cabinet insert systems: $80–$300 (plus cabinet modifications if needed)
- Custom integrated solutions during renovation: $300–$900+
- Wall-mounted racks: $50–$250
Key measurement: If installing in an upper cabinet, plan for a cabinet depth of 12 inches (standard) and confirm the rack fits the interior width. For comfortable daily use, install above the sink at a height that allows you to see and reach—often 18–20 inches above the countertop, depending on ceiling height and user comfort.
5) Sink-Integrated Drying Accessories (Best for compact, tidy sink zones)
Many modern sinks—especially workstation sinks—offer built-in rails for sliding accessories like drying racks, colanders, and cutting boards. This trend is strong in 2025 kitchen renovation planning because it consolidates tasks into one organized station.
Best for: homeowners upgrading the sink, avid cooks, streamlined kitchen workflows
Cost range: $200–$1,500+ for workstation sink upgrades; accessories often $40–$200 each.
Design tip: If you’re already replacing countertops or plumbing, upgrading to a workstation sink can eliminate the need for a countertop rack entirely.
Materials That Perform Best (and Look Great Doing It)
Stainless steel (top choice for longevity)
- Pros: rust-resistant (especially 304), sturdy, modern look, easy to sanitize
- Cons: can show water spots; cheaper grades may rust at weld points
- Best for: high-use households, modern kitchens, near-sink humidity
Powder-coated steel (good style, moderate durability)
- Pros: trendy finishes (matte black, white), cohesive with hardware
- Cons: coating can chip over time; avoid abrasive cleaners
- Best for: design-forward kitchens where the rack is visible
Bamboo and wood accents (warm, but higher maintenance)
- Pros: cozy, organic look; pairs well with Japandi and modern farmhouse design trends
- Cons: can stain or warp if left wet; needs regular drying and oiling
- Best for: light hand-wash loads and disciplined upkeep
Plastic (budget-friendly, but watch for wear)
- Pros: low cost, lightweight, often dishwasher-safe parts
- Cons: may discolor, scratch, or trap odors; can look dated in renovated kitchens
- Best for: temporary solutions, secondary racks, rental properties
Layout Recommendations for a Cleaner, More Efficient Sink Area
Countertop zone planning (small changes, big impact)
Even without a remodel, you can improve kitchen organization by assigning specific zones:
- Wet zone: sink + drying rack + soap (keep within a 24-inch span)
- Prep zone: 18–36 inches of clear counter for chopping and mixing
- Put-away zone: place the rack on the side closest to where dishes are stored (usually near the dishwasher or upper cabinets)
Best side of the sink for your rack
- If you’re right-handed: many prefer the rack on the right, leaving the left side for washing/rinsing (but match it to your dish storage location).
- If your dishwasher is to one side: place the rack on the same side as the dishwasher to reduce drips and steps.
- If you entertain often: choose a rack that can be stored away and use a roll-up rack during parties for a cleaner look.
Product and Design Recommendations (What Works in Real Kitchens)
Best overall setup for most homeowners
- Stainless steel countertop rack (16–20 inches wide)
- Sloped drainboard with direct spout to sink
- Removable utensil holder + knife-safe slot (or separate knife block to reduce clutter)
- Optional add-on: roll-up rack for oversized pots and pans
Best setup for small kitchens
- Over-the-sink rack with adjustable width
- Foldable or roll-up drying rack stored in a slim drawer
- Wall-mounted rail with hooks for brushes and towels to free up counter space
Best setup for renovations and custom kitchens
- Upper-cabinet dish drying insert above the sink with drip tray
- Workstation sink with sliding drying rack accessory
- Integrated pull-out trash/recycling under sink to keep the wet zone contained and efficient
Budget Considerations: What to Spend (and Where to Save)
- Under $30: compact plastic or basic metal racks; best as short-term or low-use solutions.
- $30–$80: the sweet spot for many countertop racks with drainboards and better utensil holders.
- $80–$180: premium over-sink racks and sturdier stainless steel options with modular accessories.
- $200–$900+ (renovation upgrades): cabinet-integrated drying systems and workstation sink solutions.
Where to invest: stainless steel quality, stable construction, and drainage design. A cheaper rack with poor drainage can damage countertops over time—especially around seams and backsplash caulk lines.
Maintenance and Cleaning: Keep Your Rack Hygienic
Dish racks live in a damp environment, so maintenance matters for both longevity and kitchen hygiene.
- Daily: empty the drainboard (if it holds water) and wipe standing puddles.
- Weekly: wash the rack and utensil caddy with warm soapy water; scrub corners with a bottle brush.
- Monthly: descale with a 1:1 vinegar-water solution if you have hard water; rinse and dry thoroughly.
Water-spot prevention: If stainless steel shows spotting, wipe it down with a microfiber cloth after heavy use. For matte black finishes, avoid abrasive sponges to protect the coating.
Common Mistakes to Avoid
- Buying for looks alone: a beautiful rack that wobbles or drains poorly becomes daily frustration.
- Ignoring drainage: flat drainboards that trap water lead to mildew, countertop staining, and unpleasant odors.
- Oversizing the rack: a rack that dominates the counter competes with prep space—one of the biggest kitchen layout mistakes.
- Placing it far from the sink: drips across stone, laminate, or wood surfaces can cause damage over time.
- Choosing rust-prone materials: low-grade metal or poorly coated steel often fails at joints and welds first.
- Neglecting cleaning: utensil cups and drain spouts collect grime quickly; choose designs that disassemble easily.
FAQ: Kitchen Dish Drying Rack Solutions
What’s the most hygienic type of dish drying rack?
A stainless steel rack with good airflow and a drain system that doesn’t allow standing water is typically the most hygienic. Look for removable parts (utensil cups, drainboards) so you can clean them thoroughly.
Are over-the-sink drying racks safe for heavy dishes?
Yes, if the frame is sturdy and properly sized. Check weight capacity (many handle 20–40 lbs), ensure non-slip supports, and avoid overloading one side with cast iron or large stacks of plates.
Will a dish drying rack damage my countertop?
It can if water pools underneath. To protect countertops—especially butcher block, laminate seams, and natural stone—choose a rack with a drainboard that channels water into the sink and wipe the area dry regularly.
What size dish rack do I need for a family kitchen?
For frequent hand-washing, a 2-tier rack or a countertop rack around 18–22 inches wide works well. If counter space is limited, pair a compact rack with an over-sink roll-up rack for overflow items like pans and cutting boards.
How do I prevent rust on a metal dish rack?
Choose 304 stainless steel when possible, dry the rack after deep cleaning, and avoid leaving wet sponges or steel wool pads sitting on it. If you see rust at joints, clean it promptly and consider upgrading to a better grade of stainless.
Are dish drying cabinets worth it in a renovation?
If you want a clutter-free countertop and you wash dishes by hand regularly, yes. A cabinet-integrated drying rack above the sink is a timeless, functional upgrade that fits today’s streamlined kitchen design trends.
Next Steps: Upgrade Your Sink Zone with Confidence
Start by measuring your sink and counter space, then choose a drying solution that supports your real kitchen habits. If you’re renovating, consider integrated options like a dish drying cabinet insert or a workstation sink to keep counters clean and workflows smooth. For quick upgrades, prioritize drainage design, durable materials, and easy-to-clean parts—those details pay off every day.
For more renovation-ready kitchen organization ideas, layout guidance, and on-trend design inspiration, explore the latest articles at thedecormag.com.
More Articles
 Kitchen Natural Stone Backsplash Guide - The Decor Mag
 Kitchen Counter Materials for Your Lifestyle (2026)
 Safety-First Bedroom Inspiration: Essential Design Principles, Verified Products, and Measured Layouts
 Kitchen Reeded Glass Cabinet Ideas - The Decor Mag
 How to Design a Kitchen for Entertaining - The Decor Mag
 Best Kitchen Trash and Recycling Drawer - The Decor Mag
 Heirloom Kitchen Design: Timeless Ideas for 2026
 Small Alternatives to Spaces: Smart, Space-Saving Kitchen Solutions That Actually Work
 Best Kitchens for Functional Design: Layouts, Brands, and Ergonomic Principles That Work Every Day
 Kitchen Backsplash Pattern Scale: How to Choose (2026)