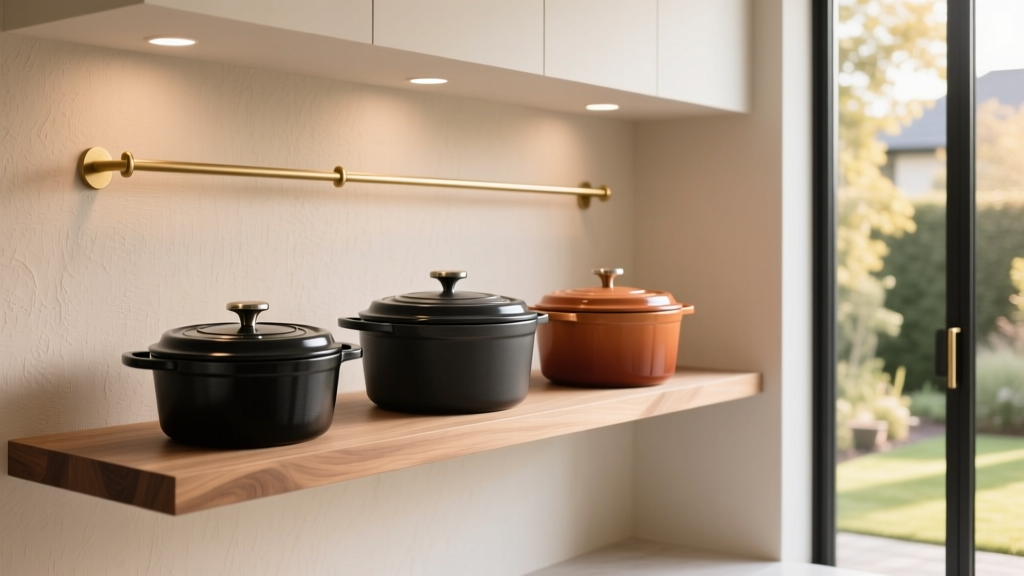
Best Kitchen Dutch Oven Storage Ideas - The Decor Mag
A Dutch oven is one of the hardest-working pieces of cookware in a well-designed kitchen—equally at home simmering sauces on the stovetop or braising in the oven. It’s also one of the most awkward to store. Heavy cast iron, wide footprints, domed lids, and enamel finishes that can chip if knocked around all make Dutch oven storage a real design consideration, not an afterthought.
For homeowners planning a kitchen renovation (or simply refining organization), smart Dutch oven storage can protect your investment, improve workflow, and reduce daily frustration. The best solutions balance modern kitchen design trends—like concealed storage and clean lines—with timeless functionality principles: safe lifting heights, easy access near the cooking zone, and durable materials that hold up to weight and heat.
Below are practical, design-forward Dutch oven storage ideas with measurements, material recommendations, budget ranges, and common mistakes to avoid—so your kitchen stays beautiful, efficient, and easy to live in.
Plan First: What Makes Dutch Ovens Tricky to Store?
Before choosing a cabinet insert or shelf, understand the functional requirements. A typical 5–7 quart Dutch oven weighs:
- Cast iron (bare): ~12–18 lb (5.4–8.2 kg)
- Enameled cast iron: ~11–16 lb (5–7.3 kg)
- With lid: add ~3–6 lb depending on size
And common dimensions:
- Diameter: 10.5–12.5 in
- Height (with lid): 6–8 in
- Handles add width: plan for 13–15 in overall clearance
From a kitchen layout perspective, Dutch ovens are best stored:
- Below counter height (less risk when lifting heavy cookware)
- Near the range or prep area for efficient cooking zones
- On surfaces that won’t scratch enamel and won’t sag under load
Best Cabinet & Drawer Solutions for Dutch Oven Storage
1) Deep Drawers with Heavy-Duty Slides (Best All-Around Choice)
Deep base drawers are a current kitchen design trend for good reason: they’re ergonomic, visually clean (no door clutter), and ideal for heavy cookware storage. A Dutch oven stored in a drawer can be lifted with a straight back and minimal twisting.
Recommended specs:
- Drawer depth: 21–24 in (standard base cabinet depth)
- Drawer internal height: 8–10 in for one Dutch oven; 10–12 in if storing stacked cookware (use separators)
- Load rating: choose slides rated 90–120 lb for cookware drawers
- Drawer width: 24 in works; 30–36 in gives room for organizers and lids
Materials that perform well:
- Birch plywood drawer boxes (durable, stable)
- Solid wood dovetail (premium and long-lasting)
- Bottom panel thickness: aim for 1/2 in plywood (or reinforced 3/8 in) for heavy pots
Budget range:
- DIY organizer add-ons: $20–$80
- Upgraded drawer slides (installed): $150–$400 per drawer
- New custom drawer base cabinet: $600–$2,000+ depending on brand/finish
Pro tip: Line the drawer with a non-slip, cushioned mat (EVA or felted liner). It prevents enamel scuffs and stops the pot from sliding when you open/close the drawer.
2) Roll-Out Shelves in Base Cabinets (Great for Existing Kitchens)
If you’re not replacing cabinets, adding roll-out shelves (pull-out trays) can transform a standard base cabinet into an easy-access Dutch oven storage zone.
Recommended specs:
- Tray depth: 18–22 in usable (allow clearance for hinges and hardware)
- Weight rating: at least 75 lb per shelf
- Side rails: 2–3 in high keeps cookware from tipping
Material guidance:
- Plywood trays outperform particleboard for heavy cookware
- Soft-close slides reduce slamming and enamel chipping risk
Budget range: $80–$250 per shelf for quality kits; $200–$600+ installed depending on cabinet modifications.
3) Dedicated “Cookware Garage” Cabinet Near the Range
For renovation planning, consider a dedicated base cabinet for heavy cookware storage—Dutch ovens, stockpots, and cast-iron pans—placed within one step of the range. This supports a functional “cooking zone” layout and keeps your prep cabinets lighter and less cluttered.
Layout recommendations:
- Location: within 24–48 in of the range if possible
- Cabinet width: 30–36 in is ideal for multiple pieces
- Storage style: 2 deep drawers or 1 deep drawer + 1 roll-out shelf
Design trend pairing: Use minimalist slab fronts or Shaker cabinetry with concealed storage for a clean, modern look—while keeping daily-use cookware immediately accessible.
Open & Display Storage: Beautiful, But Use Carefully
4) Open Shelving with Safe Load Planning
Open shelving is still popular in kitchen renovation projects for its airy, styled look. Dutch ovens can look stunning on display—especially colorful enameled versions—but only if the shelf is engineered for weight.
Safety and construction guidance:
- Shelf thickness: 1 1/2 in thick wood (or a reinforced floating shelf system)
- Bracket spacing: every 16 in (typical stud spacing) with heavy-duty brackets
- Shelf depth: 12–14 in to fully support the pot footprint
- Placement height: keep heavy Dutch ovens no higher than 54 in from the floor (roughly chest height for many adults)
Best materials:
- White oak (hard, trend-forward, warm)
- Walnut (luxury look, good durability)
- Powder-coated steel brackets (stable and low maintenance)
Budget range: $150–$600+ depending on shelf length, wood species, and bracket system.
Maintenance tip: Dust and grease collect faster on open shelves near the range. Choose a wipeable finish (matte polyurethane or hardwax oil) and keep the shelf at least 18–24 in away from direct cooking splatter zones.
5) Pot Racks & Hanging Storage (Best for Lightweight Lids, Not Heavy Pots)
Ceiling pot racks are timeless in classic kitchens and still appear in modern farmhouse and transitional designs. For Dutch ovens, however, hanging can be impractical due to weight and lifting risk. A smarter compromise: hang lids or lighter pieces, and store the Dutch oven base in a drawer.
Best use cases:
- Hanging Dutch oven lids with padded hooks
- Displaying a single frequently used Dutch oven only if ceiling structure supports it
Budget range: $80–$400 for racks; installation may add $150–$500 if ceiling reinforcement is needed.
Smart Lid Storage Ideas (No More Clanking or Scratches)
Lids are often the real problem. They’re bulky, slippery, and prone to enamel chips if stacked carelessly.
6) Vertical Lid Dividers in a Deep Drawer
- Best for: households with multiple Dutch ovens and sauté pans
- Divider spacing: 1.5–2.5 in per slot depending on lid knobs
- Material: coated steel or sealed wood dividers; add a soft liner under lids
Budget range: $15–$60 for dividers; $100–$250 for custom insert systems.
7) Door-Mounted Lid Racks (Use Only with Solid Doors)
- Best for: base cabinets with roll-out shelves
- Check clearance: allow 1–2 in between rack and pull-out tray to avoid collisions
- Hardware: choose adjustable racks with rubber-coated contact points
Budget range: $20–$80.
Protecting Enameled Cast Iron: Liners, Spacers, and Handling
Enameled Dutch ovens are durable, but the finish can chip if metal hits metal. A few low-cost add-ons prevent long-term damage.
Recommended protective accessories:
- Non-slip drawer liners (EVA or textured rubber): $10–$25
- Felt or silicone pan separators (for stacking): $10–$30
- Soft silicone handle covers (optional for grip): $10–$20
Handling best practices:
- Store the lid slightly ajar (use a folded towel or spacer) if the pot is fully dry—this helps prevent odor buildup.
- Don’t stack heavy pots directly on enamel. If stacking is necessary, place a thick felt separator between pieces.
- Keep Dutch ovens away from areas where they’ll be knocked by small appliances or pantry items.
Renovation-Ready Design Moves (If You’re Redoing the Kitchen)
8) Prioritize Base Storage Over Upper Cabinets for Heavy Cookware
One of the most practical kitchen renovation choices is shifting heavy items down. Use uppers for lighter dishes and pantry goods; reserve bases for cookware.
Ergonomic guideline: Store Dutch ovens between knee and waist height whenever possible—this reduces strain and feels better day-to-day.
9) Consider a Wider Drawer Base Instead of a Blind Corner
Blind corners are notorious for wasted space. If your layout allows, a wider drawer base (30–36 in) can outperform a corner cabinet for daily function.
Cost consideration: Reworking corner cabinetry can add $500–$2,500+ depending on layout changes, countertop modifications, and cabinet brand—but it often pays off in usability.
10) Add Heat-Resistant Landing Space Nearby
Storage works best when paired with a place to set hot cookware. If you’re renovating:
- Include 15–18 in of counter landing space adjacent to the range.
- Consider a quartz or porcelain slab surface for easy wipe-down (use trivets for hot cast iron).
Material Comparisons: What Holds Up Best?
- Plywood vs. particleboard: Plywood resists sagging and screw pull-out better—recommended for pull-outs and heavy drawers.
- Solid wood vs. MDF fronts: Both can look premium; for durability, prioritize quality drawer construction and slides over door material alone.
- Steel organizers: Powder-coated steel resists rust and cleans easily; avoid thin chrome that can pit over time.
- Shelf finishes: Matte polyurethane is easy to wipe; oil finishes look natural but need periodic refresh.
Common Mistakes to Avoid
- Storing Dutch ovens in upper cabinets: lifting 12–18 lb above shoulder height increases accident risk and can damage counters if dropped.
- Using low-rated slides: cheap slides wear quickly, rack, and slam—bad for heavy cookware storage.
- Overcrowding a shelf: enamel chips often happen when items rub or knock together.
- Forgetting handle clearance: cabinet interiors may be wide enough, but handles can catch on face frames or dividers.
- Ignoring ventilation: putting away a slightly damp pot with the lid sealed can lead to odors and staining.
- Placing open shelves too close to grease: styling looks great until frequent cleaning becomes a chore.
Budget Guide: Choosing the Right Upgrade Level
- Under $100: drawer liners, felt separators, basic lid rack, DIY dividers
- $100–$400: one quality roll-out shelf kit, upgraded heavy-duty drawer slides, small organizer system
- $400–$1,500: multiple roll-outs, a new drawer base cabinet insert package, custom drawer interiors
- $1,500+ (renovation scope): new base cabinetry with deep drawers, optimized cooking zone layout, updated corner solutions
FAQ: Kitchen Dutch Oven Storage
What’s the best place to store a Dutch oven in the kitchen?
A deep base drawer near the range is the most ergonomic and protective option. It keeps the pot at a safe lifting height and reduces the chance of knocking the enamel against cabinet frames.
Can I stack Dutch ovens to save space?
You can, but use thick felt or silicone separators between pots and lids. Avoid direct enamel-to-metal contact, and keep the heaviest pot on the bottom to prevent chips and stress on the finish.
How much weight should drawer slides support for Dutch oven storage?
Aim for slides rated 90–120 lb for drawers holding multiple heavy items. For a single Dutch oven, 75 lb may work, but higher ratings feel sturdier and last longer.
Are open shelves safe for storing cast iron Dutch ovens?
Yes if the shelf is properly anchored and designed for load. Use thick shelves (around 1 1/2 in wood or a rated floating system) and place heavy pots at or below chest height.
How do I prevent scratches or chips on enameled Dutch ovens in storage?
Use non-slip liners in drawers, avoid overcrowding, and add separators between stacked pieces. Soft-close drawers and pull-outs also reduce impact damage over time.
What’s the simplest upgrade for better Dutch oven storage without renovating?
Add a roll-out shelf to an existing base cabinet and use a door-mounted lid rack. It dramatically improves access and organization with minimal disruption.
Next Steps: Turn Dutch Oven Storage Into a Kitchen Upgrade
Start by measuring your Dutch oven’s footprint (including handles) and identifying the cabinet closest to your cooking zone that can be converted to deep-drawer or pull-out storage. If you’re renovating, prioritize heavy-duty drawers and smart layouts over more upper cabinets—you’ll feel the difference every time you cook.
For more kitchen renovation tips, storage plans, and decor-forward organization ideas, explore the latest guides on thedecormag.com.
More Articles
 Kitchen Drawer Organization That Lasts (2026)
 Wood for Beginners: A Practical Guide to Choosing, Storing, and Using Hardwood for Smoking and Grilling
 Kitchen Checkerboard Floor Revival - The Decor Mag
 Kitchen Natural Light Design Tips (2026)
 Cheap vs Premium Bedroom: What You’re Really Paying For — A Kitchens Kitchen Specialist’s Analysis
 Kitchen Unlacquered Brass Hardware Patina - The Decor Mag
 Kitchen Stainless Steel Appliance Guide - The Decor Mag
 Open Concept Kitchen Renovation: Pre-Demolition Guide
 Kitchen Honed Marble Countertop Beauty - The Decor Mag
 Best Kitchen Cleaning Supply Storage - The Decor Mag