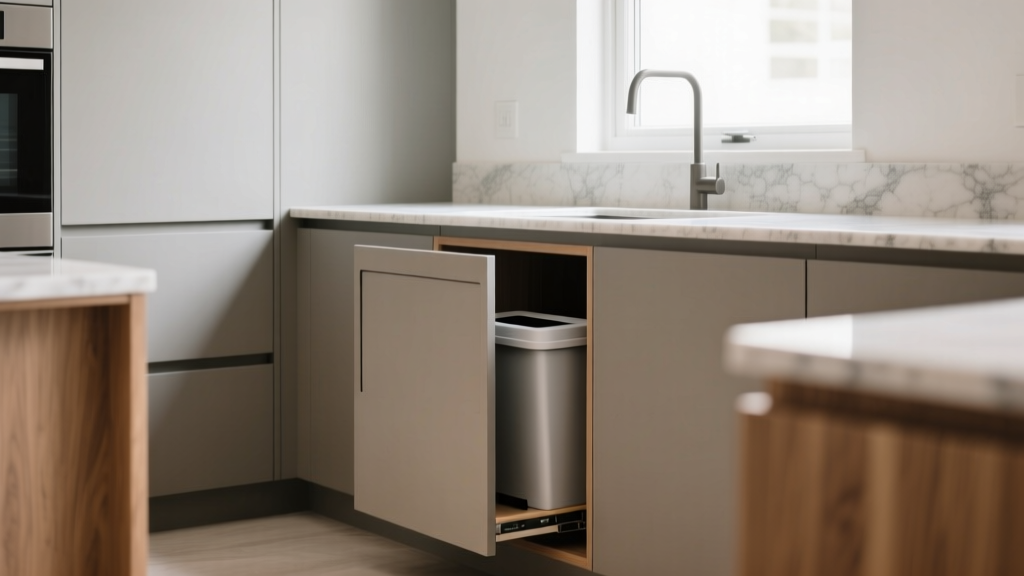
Best Kitchen Trash Can Hideaway Solutions - The Decor Mag
A well-designed kitchen feels effortless: counters stay clear, traffic flows smoothly, and everything has a place. Yet one of the most frequently used items in the room—your trash and recycling—often ends up as the biggest visual disruption. A freestanding bin can break the line of beautiful cabinetry, steal precious floor space, and contribute to lingering odors (especially in busy family kitchens).
Smart kitchen trash can hideaway solutions solve multiple renovation headaches at once. They support cleaner sightlines (a key trend in today’s streamlined, “quiet luxury” kitchens), improve hygiene, and make everyday routines more efficient. The best setups also plan for real-life needs: composting, recycling rules, pet-proofing, and easy bag changes—without forcing you to sacrifice storage.
Whether you’re planning a full kitchen renovation or simply upgrading organization, these practical, design-forward options will help you hide the trash can—without hiding convenience.
What Makes a Great Trash Can Hideaway?
Before choosing a solution, evaluate how your household actually uses the kitchen. A hideaway that looks great but frustrates daily routines won’t last.
Key features to prioritize
- One-step access: Ideally you can open it with a pull, a toe-kick tap, or a gentle push (especially when hands are messy).
- Odor control: A lid, a tight-fitting drawer front, and washable liners reduce smells.
- Easy bag changes: Look for a frame that holds bags securely and allows quick removal.
- Cleaning-friendly materials: Non-porous bins and smooth cabinet interiors wipe down fast.
- Right sizing: Fit your waste volume so you’re not taking out trash twice a day—or letting it overflow.
Common kitchen trash can sizes (quick guide)
- 13-gallon (49–50L): Most common for household trash; fits standard tall kitchen bags.
- 8–10 gallon (30–38L): Great for smaller households or under-sink spaces.
- Dual 2 x 8–10 gallon: Popular for trash + recycling in one pull-out.
- Compost caddy 1–2.5 gallon (4–10L): Best on counter or inside a door for daily emptying.
Most Popular Kitchen Trash Can Hideaway Options (and When to Use Them)
1) Pull-Out Trash Drawer (Base Cabinet)
This is the gold-standard choice in kitchen design: the trash can disappears behind a cabinet front and slides out on heavy-duty rails. It’s clean-looking, ergonomic, and easy to integrate into new cabinetry or many existing base cabinets.
Best for: Renovations, busy households, kitchens aiming for a seamless, modern look.
Recommended layout placement
- Near the sink: The most functional location for food prep and dish cleanup. Many designers place it within 18–36 inches of the sink base.
- Near the main prep zone: If your prep happens on an island, consider an island pull-out.
Practical measurements
- Typical cabinet width: 12", 15", or 18" base cabinets are common for pull-outs (wider = easier dual-bin setups).
- Minimum interior depth: Often 19–22" for standard frames, but verify your specific hardware requirements.
- Ideal drawer slide rating: 75–100 lb soft-close slides for durability (especially for recycling).
Materials and hardware recommendations
- Bin material: High-density polypropylene (durable, non-porous, easy to rinse).
- Frame: Powder-coated steel for stiffness and rust resistance.
- Slides: Soft-close, full-extension for easy access to the back of the bin.
Cost range
- Retrofit kit (hardware + bins): $80–$250
- Cabinetry modification/installation labor: $150–$500+
- Custom integrated trash drawer in new cabinetry: $300–$900+ depending on brand and finish level
2) Tip-Out (Tilt) Trash Cabinet
Tip-out fronts (often used for sponge trays) can also work for a small trash bin, typically mounted behind a sink cabinet front. It’s a subtle option, but capacity is limited.
Best for: Small kitchens, minimalist households, or as a secondary bin (coffee pods, tea bags, food scraps).
What to expect
- Capacity: Usually 1–3 gallons—too small for primary kitchen waste in most homes.
- Maintenance: Needs frequent emptying; choose a removable liner that rinses easily.
Cost range
- Tip-out kit: $30–$120
- Installation: DIY-friendly, or $75–$200 labor
3) Under-Sink Pull-Out (With Plumbing Workarounds)
Under-sink storage is prime real estate, but plumbing can complicate a trash hideaway. The right pull-out can still fit, especially if you choose a U-shaped frame or a narrower bin beside the trap.
Best for: Kitchens without space in adjacent base cabinets, homeowners wanting trash hidden near cleanup zone.
Design tips for under-sink success
- Measure around obstacles: Note the location of the garbage disposal, shutoff valves, and drain lines.
- Choose moisture-resistant finishes: Under-sink areas see leaks and condensation—use washable bins and consider a waterproof cabinet liner.
- Ventilation: If odors build up, add a discreet vent grill in the toe-kick or use odor-absorbing inserts designed for cabinets.
Cost range
- Under-sink pull-out kit: $100–$300
- Optional plumbing tweaks: $150–$600 if you relocate lines to improve fit (varies widely)
4) Toe-Kick Drawer Trash Can (Ultra-Hidden)
A toe-kick drawer uses the recessed space beneath base cabinets for a shallow pull-out tray—sometimes with a small trash bin. It’s visually sleek and very “designed,” aligning with current trends toward concealed storage.
Best for: Secondary trash, compost, or recycling sorting; kitchens where every inch counts.
Measurements and limitations
- Typical toe-kick height: 3.5"–4.5" (varies by cabinet style)
- Usable drawer height: Often shallow—plan for small bins only.
- Access: Better for light waste than heavy, bulky trash.
Cost range
- Hardware kit: $150–$400
- Custom carpentry (if not prebuilt): $300–$900+
5) Appliance Garage-Style Door or Pocket Door Waste Center
If you prefer a freestanding, lidded bin (or want to use a premium stainless model), consider creating a hidden “waste center” behind a pocket door or tambour-style door within tall cabinetry.
Best for: Larger kitchens, households with multiple waste streams (trash, recycling, compost), and homeowners who want the easiest bin removal for cleaning.
Design approach
- Use a tall pantry end or utility cabinet: Create a dedicated zone with bins, extra liners, and cleaning supplies.
- Add a washable base tray: A pull-out tray with a lip catches drips and keeps the cabinet floor cleaner.
- Consider ventilation: A discreet vented panel or charcoal filters can help in enclosed tall cabinets.
Cost range
- Door hardware (pocket/tambour): $200–$800+
- Cabinet modifications or new tall unit: $800–$3,000+ depending on cabinetry line
Material Comparisons: What Holds Up Best in a Busy Kitchen?
Bins: Plastic vs. Stainless
- Plastic (polypropylene): Best inside cabinets—lightweight, quiet, easy to rinse, won’t dent. Can absorb odors over years if not cleaned regularly.
- Stainless steel: Looks premium when left out, resists odor absorption, but shows fingerprints and can dent. Not always necessary when the bin is hidden.
Cabinet interiors and protective liners
- Melamine interiors: Common, budget-friendly, easy to wipe; avoid standing moisture.
- Plywood boxes with clear coat: Durable and stronger for hardware mounting; great for pull-out systems.
- Waterproof base liners: Highly recommended under sinks and for recycling; choose a removable, raised-edge tray.
Slides and hardware
- Soft-close slides: Reduce slamming, extend cabinet life, feel high-end.
- Full-extension slides: Make bag changes easier and prevent “gunk zones” behind the bins.
- Weight rating: Choose 100 lb if you recycle glass or keep heavy cans.
Kitchen Layout Tips: Where Your Hidden Trash Should Live
The best kitchen organization is based on how you move through the space. Trash is part of prep, cooking, and cleanup, so placement matters more than people expect.
Most functional placements
- Prep zone pull-out: Place in the cabinet directly under or adjacent to your main chopping surface.
- Sink-adjacent pull-out: Ideal for packaging, rinsing recyclables, and post-meal cleanup.
- Island pull-out (for open layouts): Perfect when the island is the primary work surface—just ensure there’s clearance for seating and traffic.
Clearance guidelines
- Walkway clearance: Aim for 36" minimum in work aisles; 42"–48" is more comfortable in busy kitchens.
- Drawer pull-out clearance: Make sure the opened trash drawer doesn’t block the dishwasher door or a main pathway.
- Door swing conflicts: Avoid placing the pull-out where it collides with adjacent cabinet doors or appliance handles.
Product and Design Approach Recommendations (By Budget)
Budget-Friendly (Under $150)
- Basic single-bin pull-out kit for a 12" or 15" base cabinet
- Tip-out trash for small waste streams
- DIY cabinet base tray liner to protect existing cabinetry
Best for: Quick upgrades, rentals (with permission), or small kitchens.
Mid-Range ($150–$500)
- Soft-close dual-bin pull-out (trash + recycling) with a steel frame
- Under-sink pull-out designed to work around plumbing
- Add-on compost caddy mounted inside a door or on a slide-out frame
Best for: Most homeowners improving kitchen organization without replacing cabinets.
High-End ($500–$2,000+)
- Custom drawer-front waste cabinet that matches surrounding drawers for a seamless look
- Integrated waste + recycling + compost station with labeled bins and storage for liners
- Tall cabinet waste center with pocket door and easy-clean pull-out base
Best for: Full kitchen renovations, custom cabinetry, luxury finishes, and long-term functionality.
Maintenance and Odor Control: Keep the Hidden Area Fresh
Hidden doesn’t mean maintenance-free. The good news: a few small habits keep your kitchen waste center clean and odor-neutral.
Weekly and monthly care checklist
- Weekly: Wipe the cabinet face and pull handle; crumbs and drips build up quickly around trash drawers.
- Every 2–4 weeks: Remove bins and wash with warm water and dish soap; dry fully before reinstalling.
- Quarterly: Vacuum the cabinet floor and rails; check screws and slide alignment.
Odor-control strategies that actually work
- Use a lidded bin inside the pull-out if you toss food scraps frequently.
- Deodorizing liners or charcoal filters placed near the cabinet base can reduce persistent smells.
- Compost daily emptying: If you compost, choose a smaller caddy and empty it often—this is the biggest difference-maker.
- Protect the cabinet floor: Use a removable drip tray with a raised lip.
Common Mistakes to Avoid
- Choosing capacity based on looks, not lifestyle: A tiny bin in a high-volume household leads to overflow and odors.
- Installing weak slides: Low-rated rails sag over time, especially with recycling. Prioritize quality hardware.
- Placing the trash too far from the prep zone: If you have to cross the kitchen with scraps, it won’t stay tidy.
- Ignoring door and appliance conflicts: Trash drawers commonly collide with dishwashers and corner cabinets if not planned.
- Skipping washable protection: Without a tray or liner, small leaks can damage cabinet interiors and create smells.
- Forgetting about compost and recycling needs: Many renovations plan for trash only, then scramble later for a recycling solution.
FAQ: Kitchen Trash Can Hideaway Solutions
What size cabinet do I need for a pull-out trash can?
Many pull-outs fit in a 12" wide base cabinet, but 15" or 18" is more comfortable—especially for a dual-bin trash and recycling setup. Always measure the interior opening (not just the cabinet label size) and confirm the hardware’s required depth.
Is it better to place the trash pull-out next to the sink or in the island?
Next to the sink is the most universally functional for cleanup. An island pull-out can be ideal if the island is your main prep surface—just verify aisle clearance and avoid conflicts with seating or the dishwasher.
Can I install a trash pull-out in existing cabinets?
Often, yes. Retrofit kits are designed for standard base cabinet sizes. Confirm that the cabinet box is sturdy enough to hold the slides and that you have the required interior depth. If your cabinet is particleboard, use the correct fasteners and consider reinforcement for long-term durability.
How do I control odors in a hidden trash cabinet?
Use a lidded bin, clean the bins regularly, and protect the cabinet floor with a washable tray. For stubborn odors, add charcoal filters or deodorizing inserts, and keep compost in a smaller container that gets emptied daily.
What’s the best solution for households that compost and recycle?
A dual-bin pull-out (trash + recycling) paired with a small compost caddy is a practical, high-function setup. In larger kitchens, a tall “waste center” cabinet can handle three streams with room for liners and cleaning supplies.
Are toe-kick trash drawers worth it?
They’re excellent for secondary waste or compost, especially when you want an ultra-minimal look. For most households, toe-kick drawers don’t replace a primary 13-gallon bin due to limited height.
Next Steps: Choose the Right Hideaway for Your Kitchen
Start by tracking your kitchen waste for a week: how often you take out trash, how much recycling you generate, and whether composting is part of your routine. Then measure the cabinet spaces you can dedicate—especially near the sink and primary prep zone. With those details, you can confidently select a pull-out, under-sink system, or tall waste center that matches both your renovation style and your daily habits.
If you’re planning a kitchen renovation, ask your cabinet supplier or designer about integrated waste solutions early—trash storage is easiest to perfect when it’s designed into the layout from the beginning.
For more kitchen design, renovation, and organization ideas, explore the latest on thedecormag.com.
More Articles
 How to Design a Kitchen for Multiple Cooks - The Decor Mag
 Coffee Station Ideas for Kitchens (2026)
 Best Kitchen Prep Bowl Collection Display - The Decor Mag
 Kitchen Arched Range Hood Design Ideas - The Decor Mag
 Kitchen Book-Matched Stone Backsplash - The Decor Mag
 Kitchen Cabinet Fillers for Gaps (2026)
 10 Sustainable Kitchen Swaps for 2026
 Kitchen Integrated Look Appliance Paneling - The Decor Mag
 Kitchen Window Treatments for Steam & Grease (2026)
 Statement Kitchen Lighting Design (2026)