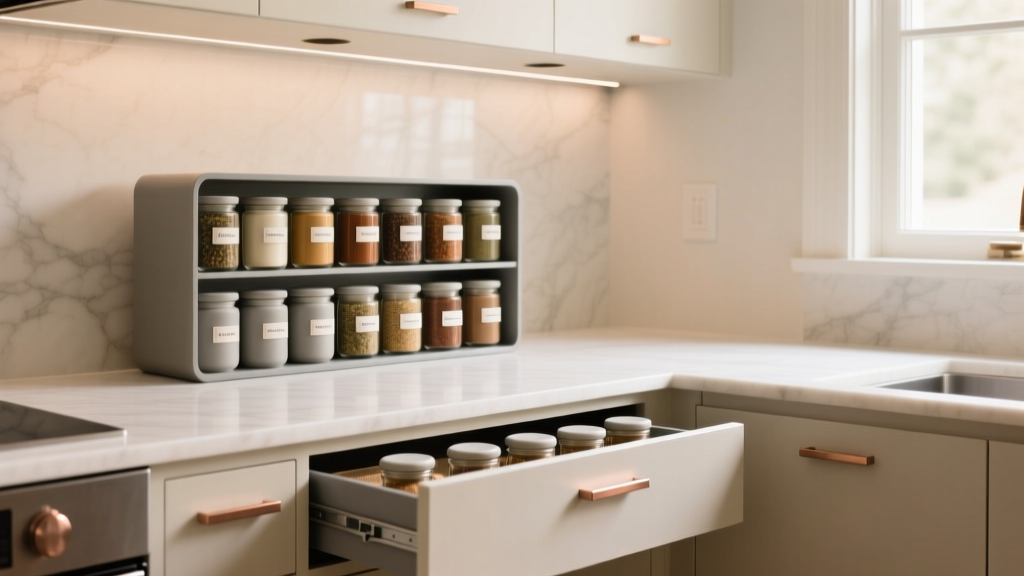
Best Kitchen Spice Organization Solutions - The Decor Mag
Spices are small, but the way you store them has an outsized impact on how your kitchen feels and functions. When jars topple out of a cabinet, labels vanish into the shadows, or you buy duplicates because you can’t see what you already own, cooking becomes slower and more frustrating than it needs to be.
Thoughtful kitchen spice organization is also one of the highest “return-on-effort” upgrades you can make during a kitchen renovation—or a weekend refresh. The right layout keeps your most-used seasonings within arm’s reach of the cooktop, protects flavor and freshness, and creates a clean, intentional look that aligns with today’s kitchen design trends: streamlined storage, integrated organization, and clutter-free countertops.
Below are the best spice organization solutions—ranging from budget-friendly inserts to custom cabinetry—plus practical measurements, material recommendations, cost ranges, and common mistakes to avoid.
Start With a Quick Spice Inventory (Before You Buy Anything)
The best storage plan begins with what you actually own and how you cook. Spend 15 minutes and you’ll avoid costly organizers that don’t fit.
- Count categories: everyday basics (salt/pepper/garlic), blends (taco, curry), baking spices, international, and bulk refills.
- Note container types: tall grinders, short jars, packets, tins.
- Decide “prime real estate” spices: the 10–20 you use weekly should sit closest to the prep zone and cooktop.
Key Measurements to Know
- Typical spice jar: 4–4.5 in tall, 1.75–2 in diameter (standard round jar).
- Square spice jar: 4–4.25 in tall, ~1.5–1.75 in wide (space efficient).
- Allow shelf clearance: 5 in height minimum for standard jars; 6–7 in if you store grinders.
- Drawer depth for labels on top: 3–4 in is usually sufficient for lying jars down in angled inserts.
Best Places to Store Spices (Layout Rules That Work in Any Kitchen)
Great kitchen organization follows timeless functionality: store items where you use them. For spices, that means a location that’s close to cooking but not exposed to heat, steam, or direct sunlight.
Ideal Locations (Ranked)
- Drawer near the cooktop or prep zone: fastest access, best visibility, clean look.
- Pull-out cabinet next to the range: excellent capacity, works well for larger collections.
- Upper cabinet with tiered risers: good for smaller kitchens; inexpensive upgrade.
- Pantry section away from heat: best for bulk spices and backstock.
Locations to Avoid
- Above/next to the range without protection: heat accelerates flavor loss.
- On the countertop by the stove: looks cluttered and collects grease.
- Near a sunny window: UV light degrades spices and fades labels.
Top Spice Organization Solutions (With Pros, Cons, and Costs)
1) Drawer Spice Inserts (Best for Renovations and Everyday Cooking)
Spice drawers are a leading kitchen design trend because they look seamless and keep everything visible at once. They’re also highly ergonomic—no bending into deep cabinets.
Best for: homeowners doing a kitchen renovation, or anyone with a drawer within 2–4 feet of the cooktop.
- Recommended drawer width: 12–18 in works for most households; 24 in for serious cooks.
- Recommended drawer depth: 18–21 in standard base cabinet drawers.
- Insert style: angled tiers so labels face up.
Materials to choose:
- Bamboo: warm look, budget-friendly, light; may swell if repeatedly wet.
- Hardwood (maple/walnut): premium feel, durable; higher cost.
- Metal wire: easy to wipe, modern; jars can rattle if not snug.
- Acrylic: visually light, easy cleaning; can scratch over time.
Cost range:
- $15–$60: adjustable bamboo or plastic inserts (DIY-friendly).
- $75–$200: higher-quality wood or custom-fit inserts for specific drawer sizes.
- $250–$600+: custom cabinetry solutions integrated into new drawer systems.
Pro tip: If you’re redesigning cabinetry, ask your kitchen designer to allocate a dedicated “spice drawer” near your primary prep zone. It’s a small detail that makes a luxury-level difference in daily use.
2) Pull-Out Spice Racks (Best Use of Narrow Gaps)
These slim vertical pull-outs often fit in 3–9 inch wide base cabinet gaps—perfect for turning dead space into high-function storage.
- Common widths: 3 in, 6 in, 9 in.
- Best placement: on the cooktop side of your prep area or right next to the range (but not immediately adjacent to high heat if possible).
- Design detail: look for rails tall enough to prevent tipping (at least 1.5–2 in).
Material recommendation: powder-coated metal frames or solid wood with sealed finish for easy wipe-down and durability.
Cost range:
- $80–$200: retrofit pull-out units (DIY installation varies).
- $250–$800+: cabinet-integrated pull-outs with soft-close slides (typical in mid-to-high-end kitchen renovations).
Maintenance advice: vacuum crumbs from the bottom track monthly and wipe shelves with a degreasing spray to prevent sticky buildup from cooking oils.
3) Tiered Cabinet Risers (Fastest Budget Upgrade)
If you’re not ready to alter cabinetry, a simple step shelf in an upper cabinet instantly improves visibility and reduces the “double row” problem.
- Best for: small spice collections (up to ~25 jars) and renters.
- Measure first: ensure at least 10–12 in of cabinet depth to accommodate a 2–3 tier riser comfortably.
- Choose non-slip surfaces: prevents jars from sliding when opening doors.
Cost range: $10–$40 for plastic or metal; $25–$75 for bamboo/wood options.
Design approach: Keep labels facing forward and group by cuisine (Italian, Mexican, baking) to mimic a “mini pantry zone.”
4) Door-Mounted Spice Racks (Great for Tight Kitchens, With Caveats)
Mounting spices on the inside of a pantry or cabinet door frees shelf space and keeps items accessible.
- Best for: kitchens with limited drawer space.
- Mind the clearance: you need enough space so the door closes without jars hitting shelves. As a guideline, allow at least 2.5–3 in between the door rack and the nearest shelf contents.
- Choose sturdy mounts: screw-in hardware is more reliable than adhesive strips for long-term use.
Cost range: $20–$120 depending on size and material.
Timeless functionality tip: Reserve door racks for lightweight jars and packets; store heavy grinders elsewhere to reduce strain on hinges.
5) Countertop Spice Stations (Best When Done Intentionally)
Countertop storage is trending in curated, minimalist kitchens—when it’s edited and styled. The key is limiting it to daily essentials and selecting containers that coordinate with your kitchen design.
- Best for: 6–12 most-used seasonings.
- Preferred material: stainless steel, ceramic, or sealed wood; avoid porous unfinished wood near the stove.
- Placement: near prep, but outside the direct splatter zone of the cooktop.
Cost range: $15–$80 for lazy Susans and caddies; $80–$200 for higher-end matching canister sets.
Maintenance advice: wipe containers weekly to prevent grease film; consider running labels through a quick check for smudging.
6) Pantry Bins and Bulk Storage (Best for Value and Freshness)
If you buy spices in refill bags or larger containers, pantry bins keep everything tidy and reduce visual clutter.
- Use airtight containers: keeps humidity out and extends flavor.
- Label refills clearly: include purchase month/year.
- Recommended bin depth: 10–14 in deep bins work well on standard pantry shelves.
Cost range: $10–$40 per bin depending on material and size; $20–$60 for quality airtight containers.
Choosing the Right Spice Containers: Material Comparisons
Standardizing containers is one of the cleanest ways to elevate kitchen organization. It improves storage efficiency and makes your spice area feel like a designed feature, not an afterthought.
- Glass jars: best for cleanliness and odor resistance; dishwasher-friendly (lids vary). Store away from light to protect potency.
- Stainless steel tins: block light completely; durable; harder to see contents unless labeled well.
- Plastic: inexpensive and lightweight; can absorb odors and stain (not ideal for turmeric or smoked paprika).
Recommendation for most homeowners: square glass jars with shaker tops for efficient drawer or riser storage, paired with a simple label system.
Labeling That Stays Readable
- Top labels: best for drawers (read at a glance).
- Front labels: best for shelves, risers, and pull-outs.
- Include dates: add a small “opened” date to reduce wasted, flavorless spices.
Budget Planning: What to Spend and Where It Pays Off
- Under $50: tiered riser + basic labels; quick win for cabinet visibility.
- $50–$200: drawer insert + standardized jars for a cohesive, renovation-ready look.
- $200–$800: pull-out rack upgrades and soft-close hardware—high function per dollar in kitchen remodels.
- $800+: custom spice drawers/pull-outs integrated into new cabinetry (ideal when you’re already investing in a kitchen renovation).
Where to prioritize spending: slides and hardware (smooth, durable movement), and containers that seal well. A fancy rack won’t help if jars spill or go stale.
Common Spice Organization Mistakes to Avoid
- Storing spices over heat: reduces potency quickly; relocate to a nearby drawer or pull-out.
- Keeping duplicates “just in case”: leads to overstuffed storage—use a refill bin system instead.
- Choosing an organizer before measuring: always confirm drawer width, interior depth, and door clearance.
- Mixing jar shapes and sizes: wastes space and looks messy; standardize where possible.
- Overloading door racks: causes hinge strain and crooked doors over time.
- Ignoring cleaning needs: spice areas collect grease and dust; choose wipeable materials and plan a simple routine.
Maintenance and Freshness: Keep Spices Tidy and Flavorful
- Monthly: wipe racks/inserts; check for sticky lids and residue.
- Quarterly: review what’s clumping (humidity exposure) and relocate to airtight containers.
- Every 6–12 months: audit spices you rarely use; discard those that smell flat or look faded.
Storage best practice: keep spices in a cool, dry, dark space. If you love the look of matching glass jars, make sure they live in a drawer or closed cabinet rather than open shelving in bright light.
FAQ: Kitchen Spice Organization
What’s the best way to organize spices in a small kitchen?
Use a drawer insert if you have even one spare drawer near the cooktop. If drawers are limited, add a tiered riser in an upper cabinet or a door-mounted rack on a pantry door—just confirm clearance so the door closes properly.
How far should spices be from the stove?
Aim for nearby but not directly above or beside high heat. A drawer or pull-out 1–4 feet from the range is ideal. Avoid storing spices where they’ll be exposed to steam and heat daily.
Are spice drawers better than pull-out racks?
Spice drawers offer the quickest visibility and a clean, built-in look—excellent for kitchen design and everyday cooking. Pull-out racks hold more per inch in narrow spaces and are a smart choice when you have a small gap cabinet available.
Should I decant spices into matching jars?
For most homeowners, yes—especially if you’re aiming for a cohesive, renovated look. Choose airtight glass jars and a clear labeling system. Keep refill bags or bulk containers in a separate pantry bin to avoid clutter.
How do I keep spice labels from peeling or smudging?
Use waterproof labels or clear label tape over printed labels. Clean jar surfaces with rubbing alcohol before applying labels, and avoid placing labeled jars where they’re frequently wiped with wet cloths.
What’s a realistic cost for a spice organization upgrade during a kitchen renovation?
Plan $250–$800 for a quality cabinet pull-out or a dedicated spice drawer setup, depending on cabinetry and hardware. If you’re already replacing cabinets, integrating spice storage is usually more cost-efficient than retrofitting later.
Next Steps: Build a Spice System That Matches Your Kitchen
Choose your spice location first (drawer, pull-out, cabinet, or pantry), then measure, select a material that suits your kitchen style, and commit to a simple labeling plan. Even a modest organizer can make a kitchen feel more custom—especially when it supports the way you cook every day.
If you’re planning a kitchen renovation, bring these spice storage measurements and options to your cabinet designer and allocate space early. You’ll get a cleaner layout, better workflow, and a kitchen that feels intentionally designed from the inside out.
For more kitchen organization ideas, renovation guides, and design trends, explore the latest inspiration on thedecormag.com.
More Articles
 Kitchen Textured Backsplash Tile Trends - The Decor Mag
 Kitchen Countertop Overhang Rules (2026)
 Kitchen Integrated Look Appliance Paneling - The Decor Mag
 How to Design a Kitchen That Feels Collected - The Decor Mag
 Warm & Inviting Kitchens: Design Tips (2026)
 Kitchen Terrazzo Floor Tile Guide - The Decor Mag
 Best Kitchen Baking Ingredient Organization - The Decor Mag
 Best Kitchen Herb Garden Window Ideas - The Decor Mag
 Textiles on a Budget: Smart, Stylish, and Sustainable Kitchen Linen Solutions
 Safety-First Bedroom Inspiration: Essential Design Principles, Verified Products, and Measured Layouts