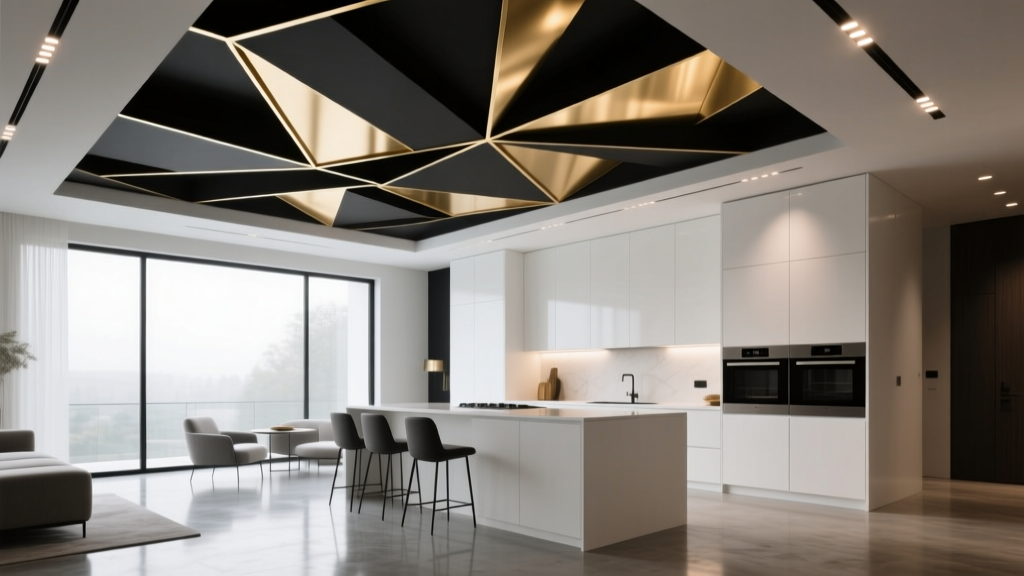
Kitchen Statement Ceiling Design Ideas - The Decor Mag
When homeowners plan a kitchen renovation, they naturally focus on cabinets, countertops, and appliances. Yet the ceiling is often the largest uninterrupted surface in the room—and one of the most powerful ways to shape how the kitchen feels. A statement ceiling can make a standard kitchen look custom, improve lighting, define zones in an open-plan layout, and even distract from awkward architecture.
Today’s best kitchen design balances trend-forward style with timeless function. Statement ceilings are trending for good reason: they can add warmth, texture, and architectural interest without sacrificing storage or workflow. Whether you’re working with an 8-foot ceiling in a compact kitchen or a vaulted ceiling in a great room, the right ceiling treatment can elevate the entire renovation.
This guide breaks down practical statement ceiling design ideas—materials, layouts, cost ranges, measurements, and maintenance—so you can choose a ceiling that looks intentional, performs well, and fits your budget.
What Makes a Kitchen Ceiling a “Statement” Ceiling?
A statement ceiling is any ceiling design that intentionally becomes a focal point. It can be bold (patterned tile, high-contrast paint) or subtle (warm wood planks, refined coffers). The key is that it supports the kitchen’s layout and lighting plan.
Kitchen ceiling features that create impact
- Color contrast: a deeper or brighter ceiling color than the walls
- Texture: wood planks, beadboard, plaster, or slatted panels
- Architectural geometry: beams, coffers, tray ceilings, or vaulted elements
- Pattern: tin tiles, wallpaper, or painted motifs
- Lighting integration: layered recessed, pendants, cove lighting, or statement fixtures
Quick measurement check before you commit
- Typical ceiling heights: 8 ft (common), 9–10 ft (newer homes), 12+ ft (custom/vaulted)
- Ideal clearance above a kitchen island: 30–36 in from countertop to pendant bottom (adjust for ceiling height and sightlines)
- Recessed lighting spacing: roughly half the ceiling height (e.g., 4 ft spacing for 8 ft ceilings), then refine around task areas
- Minimum headroom: keep finished ceiling height comfortably above 7 ft where possible; avoid lowering ceilings too much with heavy build-downs
Trend-Forward, Timeless Ceiling Design Directions
1) Wood Plank Ceilings (Real Wood, Veneer, or PVC)
Wood ceilings remain a top kitchen design trend because they soften hard surfaces like quartz and tile. They work beautifully in modern farmhouse, Scandinavian, transitional, and organic modern kitchens.
Best for: adding warmth, defining a kitchen zone in open layouts, complementing white or two-tone cabinetry.
Material options and comparisons
- Solid tongue-and-groove wood (pine, cedar, oak): authentic look; can be stained or painted. Higher cost, needs acclimation and proper sealing.
- Engineered wood or wood veneer panels: stable, often faster to install; consistent finish. Ensure edges and seams are planned carefully.
- PVC “wood-look” planks: moisture-resistant; easy maintenance. Best for humidity-prone kitchens or near ranges with heavy cooking.
Cost range (installed): $8–$25 per sq ft depending on species, finish, and ceiling complexity. Custom staining, extra blocking, or working around recessed lighting can push higher.
Practical tip: If your kitchen has an island, consider running planks perpendicular to the island’s long side. It visually “widens” the room and emphasizes the work zone.
Maintenance: Use a microfiber duster monthly. For grease-prone kitchens, choose a satin or semi-gloss sealed finish that can be wiped gently with a mild soap solution.
2) Beams and Faux Beams (Rustic to Modern)
Beams instantly add architectural character. In renovated kitchens, faux beams are often the smartest approach—lighter weight, less structural complexity, and usually less cost.
Best for: large kitchens, vaulted ceilings, open-concept spaces, and homes with traditional or Mediterranean architecture.
Design approaches
- Single feature beam: use one substantial beam to align with the island or define the kitchen boundary.
- Parallel beams: creates rhythm and can guide the eye toward a window or range wall.
- Beam + lighting strategy: integrate small adjustable downlights between beams for task lighting.
Cost range: $300–$1,500+ per faux beam (material and length dependent) plus installation. Real structural beams vary widely and can become a major remodel item.
Measurement guidance: In 8–9 ft kitchens, keep beam depth modest (often 4–6 in) to avoid a “heavy” ceiling. In 10–12 ft spaces, deeper beams (8–12 in) can look more proportional.
Maintenance: Dusting is key. Choose finishes that don’t hold grime—open-grain rustic stains can show cooking residue over time.
3) Coffered and Tray Ceilings for Classic Structure
Coffered ceilings bring a tailored, high-end look, while tray ceilings add subtle depth without as much framing. Both suit traditional, transitional, and contemporary kitchens when done with clean lines.
Best for: 9 ft or higher ceilings, homeowners wanting a built-in architectural upgrade.
Budget considerations
- Simple tray ceiling: generally less labor-intensive than a full coffer.
- Full coffered ceiling: higher carpentry and finishing cost; best when ceiling height can “spare” the depth.
Cost range: Tray ceilings often start around $1,500–$5,000 installed depending on size and trim detail. Coffers frequently run $4,000–$15,000+ depending on grid complexity, crown molding, and paint finish level.
Lighting recommendation: Coffers pair well with a combination of:
- Recessed lights placed within select coffers (not every square)
- One central statement fixture over the island or table
- Optional LED strip in a tray’s perimeter for soft ambient light
Maintenance: Painted coffers should be cleaned gently with a dry microfiber cloth; avoid soaking seams where caulk lines could soften.
4) Bold Paint, Color Drenching, and High-Contrast Ceilings
Paint is one of the most cost-effective statement ceiling ideas. A deep, moody ceiling (charcoal, navy, olive) can make cabinetry pop and hide minor ceiling imperfections better than flat white.
Best for: budget-friendly kitchen updates, smaller kitchens that need personality, and homeowners who want a reversible design choice.
Practical paint guidance
- Finish: Matte or flat hides flaws but is harder to clean; eggshell/satin is more washable for kitchens.
- Color strategy: Match undertones to your countertop and backsplash (warm vs cool) to avoid clashing.
- Two-tone approach: Use the ceiling color on a range hood or island base for a coordinated look.
Cost range: DIY paint can be under $100–$250 in materials. Professional painting varies by region, but ceilings often run $1–$3 per sq ft for labor and prep, more if repairs are needed.
Maintenance: Use a washable paint if you cook frequently. Spot-clean with a damp cloth and mild detergent; avoid abrasive sponges that burnish the sheen.
5) Ceiling Wallpaper (Yes, in Kitchens) and Patterned Treatments
Ceiling wallpaper is a growing interior design trend, especially in transitional and eclectic kitchens. The key is selecting the right product and placing it strategically—over a breakfast nook, coffee station, or a kitchen area with good ventilation.
Best for: adding pattern without changing cabinets, creating a “designed” look in eat-in areas, and emphasizing a ceiling tray.
Product recommendations
- Vinyl-coated wallpaper: more wipeable and humidity-resistant than paper-only options.
- Peel-and-stick: convenient for rentals or commitment-shy homeowners; choose reputable brands to reduce edge lifting.
Cost range: $2–$10+ per sq ft for materials depending on brand and pattern; professional installation often adds $3–$8 per sq ft.
Maintenance: Prioritize a washable surface. Keep a range hood properly vented to reduce airborne grease that can dull patterns.
6) Metal, Tin, or Faux-Tin Ceiling Tiles
Tin-inspired ceiling tiles can bring vintage charm, Art Deco flair, or an industrial edge. They’re especially striking in older homes where you want to nod to the era while modernizing the kitchen layout.
Best for: bungalow and Victorian renovations, industrial kitchens, bar areas, and butler’s pantries.
Installation approaches
- Direct to ceiling: works when the ceiling is flat and sound.
- Drop-in grid systems: useful if you need access to wiring or want to cover an uneven ceiling.
Cost range: $5–$20 per sq ft for tiles; installed costs vary with ceiling prep, cutting around fixtures, and finishing trims.
Maintenance: Wipe with a soft cloth; avoid harsh chemicals that can strip protective coatings. Consider a finish that resists fingerprints if the ceiling is within reach (for example, in soffit-like areas).
7) Slatted Wood Panels and Acoustic Ceilings (Modern + Functional)
Slatted ceilings and acoustic panels are trending in contemporary kitchens—especially in open-concept homes where sound control matters. They also conceal minor ceiling flaws and can integrate linear lighting.
Best for: echo-prone spaces, minimalist kitchens, and open plans with hard flooring and tall ceilings.
Product and layout tips
- Choose acoustic-backed panels if your kitchen opens to living and dining areas.
- Run slats toward the focal wall (often the range wall) to direct attention and “pull” the room together.
- Pair with linear LED lighting for a clean, architectural look.
Cost range: $10–$30 per sq ft installed depending on acoustic rating, veneer quality, and lighting integration.
Maintenance: Dust with a soft brush attachment. Avoid greasy buildup by ensuring your ventilation hood is correctly sized and vented outdoors.
How to Choose the Right Statement Ceiling for Your Kitchen Layout
Open-concept kitchens: define zones without walls
- Use a wood plank “ceiling rug” over the kitchen footprint only.
- Add beams aligned with the island to visually anchor the cooking zone.
- Use a tray ceiling above the island and recessed lighting around the perimeter for balanced illumination.
Galley kitchens: add interest without lowering the space
- Try high-contrast paint or a subtle patterned wallpaper.
- Use slim beadboard panels for texture with minimal thickness.
- Keep lighting simple and bright—recessed lights or low-profile surface fixtures work well.
Small kitchens: prioritize brightness and scale
- Choose lighter wood tones or a satin painted ceiling for reflectivity.
- Avoid overly deep coffers that can make the ceiling feel lower.
- Use one hero element (pattern OR beams OR bold color) to prevent visual clutter.
Budget Planning: Where to Spend and Where to Save
Smart places to invest
- Lighting plan: A statement ceiling looks best when lit intentionally. Allocate budget for dimmers, layered lighting, and quality fixtures.
- Ventilation: A properly sized, ducted range hood protects any ceiling finish from grease and moisture.
- Professional finish work: Coffers, beams, and paneling look premium only when seams, caulk, and paint are crisp.
Places to save without sacrificing style
- Paint: The highest impact per dollar for a statement ceiling.
- Faux beams: Get the look without structural changes.
- Feature-zone treatments: Apply a ceiling upgrade over the island area rather than the entire room.
Common Mistakes to Avoid
- Ignoring ceiling height: Deep beams and heavy coffers can make an 8-foot kitchen feel cramped. Scale details to the room.
- Under-lighting the ceiling: Dark ceilings and textured materials need adequate ambient light and dimmer control to avoid a gloomy feel.
- Overcomplicating patterns: If you already have bold countertops, busy backsplash tile, or dramatic veining, keep the ceiling calmer (or vice versa).
- Choosing the wrong finish for maintenance: Flat paint and porous wood can stain in heavy-cooking kitchens without proper sealing and ventilation.
- Not planning around fixtures: Decide on recessed lights, speakers, sprinklers, vents, and pendants before finalizing panel layouts or coffers.
- Skipping a sample test: Always view paint, stain, tile, or wallpaper under your kitchen lighting—day and night.
Maintenance and Longevity Tips for Kitchen Ceilings
- Use a vented range hood: Duct outdoors when possible. This reduces grease film that dulls paint and wood finishes.
- Choose washable finishes: Satin paint, sealed wood, and vinyl-coated wallpapers are more forgiving.
- Dust regularly: Statement ceilings often add grooves and ledges that show dust sooner.
- Address moisture fast: If you notice peeling paint or lifting wallpaper seams, check for humidity issues and improve ventilation.
- Plan access: If you’ll need future access to wiring, consider removable panels or a strategic access point.
FAQ: Kitchen Statement Ceiling Design Ideas
What is the most affordable way to create a statement ceiling in a kitchen?
Paint is usually the most budget-friendly option, especially if your ceiling is in good condition. A high-quality satin paint in a contrasting or coordinating color can transform the space for a few hundred dollars DIY, or more with professional prep and painting.
Do wood ceilings work in kitchens with grease and moisture?
Yes, if the wood is properly sealed and your kitchen has strong ventilation. Choose a durable topcoat (often satin) and keep up with dusting. In heavy-cooking kitchens, consider PVC wood-look planks for easier wipe-down.
Will a dark ceiling make my kitchen look smaller?
Not always. Dark ceilings can feel sophisticated and cocooning, especially with sufficient lighting and lighter cabinetry. In very small kitchens with limited light, a mid-tone or warm neutral may be a safer choice.
How do I coordinate a statement ceiling with cabinets and countertops?
Use undertones as your guide. Warm woods and creamy whites pair well with warmer ceiling finishes; crisp whites, grays, and cool marbles generally look best with cooler ceiling tones. If your countertop has strong veining, choose a simpler ceiling texture or color.
Are coffered ceilings practical in kitchens?
They can be, especially in 9-foot or higher ceilings. Plan lighting carefully and be realistic about cleaning—coffers add ledges that collect dust. A simpler coffer grid with fewer, larger panels tends to look cleaner and is easier to maintain.
Should the ceiling treatment cover the entire kitchen or just the island zone?
Either can work. In open-plan layouts, treating only the kitchen zone (often over the island and prep area) helps define the space without overwhelming adjoining rooms. Whole-room treatments look cohesive in enclosed kitchens or when the ceiling height supports it.
Next Steps: Planning Your Kitchen Statement Ceiling
Start by measuring ceiling height, mapping your lighting and ventilation, and choosing one main ceiling idea that complements your kitchen layout and renovation goals. Order samples (paint, stain, wallpaper, tile) and view them under your kitchen’s day-to-night lighting. If you’re doing a major kitchen remodel, coordinate the ceiling plan early—before electrical and HVAC work—so fixtures align cleanly with beams, panels, or coffers.
For more kitchen renovation inspiration, layout tips, and organization ideas, explore the latest guides and design features on thedecormag.com.
More Articles
 Kitchen Backsplash Pattern Scale: How to Choose (2026)
 Best Kitchen Appliance Cord Management - The Decor Mag
 How to Incorporate Color in a White Kitchen - The Decor Mag
 Best Kitchen Rug Options for Comfort - The Decor Mag
 Sustainable vs. Kitchen: Rethinking Design, Appliances, and Daily Habits for Real Environmental Impact
 Heirloom Kitchen Design: Timeless Ideas for 2026
 Kitchen Warm Neutral Cabinet Colors - The Decor Mag
 Kitchen Countertop Edge Profiles: Best Choices (2026)
 Kitchen Window Treatments for Steam & Grease (2026)
 How to Design a Kitchen with an Eat-In Area - The Decor Mag