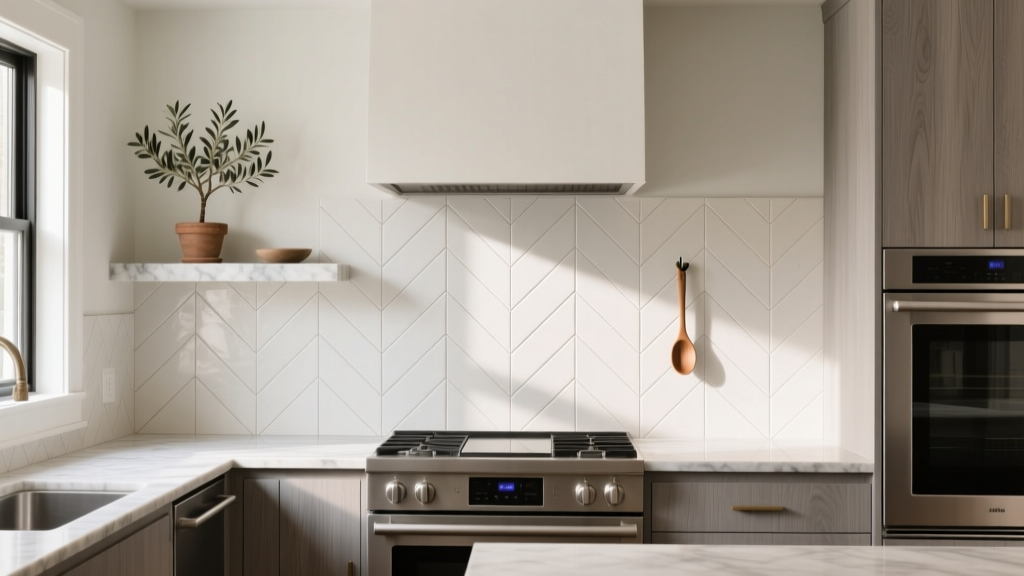
Kitchen Herringbone Backsplash Installation - The Decor Mag
A kitchen backsplash does more than protect your walls from splashes and splatters—it sets the tone for the entire space. When homeowners want a statement that feels both current and classic, a herringbone backsplash is one of the most reliable upgrades. The pattern adds movement, texture, and a custom look, whether you’re renovating a full kitchen or refreshing a tired cooking zone.
Herringbone backsplashes are especially popular in today’s kitchen design trends because they bridge the gap between “timeless” and “on-trend.” They work beautifully with modern flat-panel cabinets, warm transitional kitchens, and even traditional spaces that need a crisp update. The key is getting the installation details right: layout planning, tile choice, grout decisions, and precise cutting.
This guide walks you through herringbone backsplash installation step-by-step with practical measurements, material recommendations, budget ranges, and the most common mistakes to avoid—so you can get a polished result that performs well for years.
Why Choose a Herringbone Backsplash?
Herringbone is essentially a zigzag layout created by rectangular tiles set at right angles. It’s visually dynamic without being overly busy, and it can make a kitchen feel more elevated than a basic running bond subway tile.
Design benefits homeowners love
- Movement and depth: The pattern adds energy, especially in neutral kitchens.
- Pairs with many styles: Works with marble-look porcelain, classic ceramic subway, glass, zellige, and even wood-look tile.
- Camouflages minor wall imperfections: The busy geometry is forgiving compared to large-format tile (though flat walls still matter).
- Custom feel: Even affordable tile looks more high-end in a herringbone layout.
Where herringbone works best
- Behind the range as a focal point (especially when framed by a hood)
- On a full backsplash wall for a cohesive, designer look
- As a “feature strip” above the range with simpler field tile elsewhere
Planning Your Herringbone Layout (Before You Buy Tile)
Herringbone rewards careful planning. The pattern has more cuts than standard layouts, and small layout errors become obvious fast. Start with measurements and a layout strategy.
Measure the backsplash area
Measure width and height in inches and calculate square footage:
- Square feet = (Width in inches ÷ 12) × (Height in inches ÷ 12)
Typical kitchen backsplash heights:
- Standard counter-to-cabinet: 18 inches
- Full-height backsplash: Countertop to ceiling (often 8–10 feet)
- Behind range: Often 30–36 inches wide (or the width of the range/hood) and 24–30 inches high, unless you go full height
How much extra tile to order
Herringbone needs more waste factor due to cuts and pattern matching:
- Order 15% extra for straightforward areas
- Order 20% extra for full-height installations, multiple corners, outlets, or diagonal starts
Pick the herringbone orientation
Your layout choice affects both the look and the amount of cutting.
- Vertical herringbone: Draws the eye upward—great for lower ceilings or compact kitchens.
- Horizontal herringbone: Makes walls feel wider—ideal for narrow kitchens or long runs of countertop.
- 45-degree (diagonal) herringbone: Most dramatic, also the most cutting and planning.
Pro layout tip: Choose a visual “center” (often the centerline of the sink or range) and plan to make the pattern symmetrical there. If symmetry isn’t possible, hide the smaller cuts in less noticeable corners.
Best Materials for a Herringbone Backsplash
Not all tile behaves the same in a herringbone pattern. Rectangular tiles need crisp edges and consistent sizing for clean alignment.
Tile material comparison
- Ceramic subway tile: Affordable, easy to cut, great for DIY. Slight variation can exist; choose a well-rated brand for consistent sizing.
- Porcelain tile: Dense, durable, and excellent for busy kitchens. Harder to cut; a quality wet saw helps.
- Natural stone (marble, travertine): High-end look, but requires sealing and careful maintenance. Marble can etch near cooking areas.
- Glass tile: Reflective and brightening, but shows lippage and needs the right trowel/adhesive to avoid shadowing.
- Zellige-look tile: Handmade-style variation is trendy and warm. Real zellige has irregular edges; expect a more organic, less “perfect” herringbone.
Recommended tile sizes for herringbone
- 2" x 8" or 2.5" x 10": Balanced scale for most kitchens
- 3" x 12": Modern and elongated, great for larger kitchens
- 1" x 4": Detailed and classic, but labor-intensive and grout-heavy
Trending and timeless design pairings
- Warm whites + greige grout: Soft contrast and easy maintenance
- Marble-look porcelain + champagne brass: Upscale, durable alternative to real stone
- Moody green or navy cabinets + crisp white herringbone: A current kitchen renovation favorite
- Natural wood cabinets + creamy handmade-style tile: Warm, organic, and timeless
Tools and Supplies Checklist
Having the right tools is half the battle—especially with the extra cuts herringbone requires.
- Tile (plus 15–20% extra)
- Thinset mortar (or mastic rated for backsplash use; see guidance below)
- Notched trowel (often 1/4" x 1/4" for subway tile; check tile specs)
- Tile spacers (1/16" to 1/8" are common)
- Level and/or laser level
- Measuring tape, pencil, and straightedge
- Wet saw (recommended), tile cutter, and tile nippers
- Rubber grout float and sponges
- Caulk (100% silicone for changes of plane)
- Outlet extenders and longer screws (often needed after tile adds thickness)
- Sealer (if using natural stone or porous grout)
Thinset vs. mastic for backsplash
- Thinset mortar: Best for wet areas, heavier tile, porcelain, and long-term durability.
- Mastic: Convenient for small ceramic backsplashes in dry areas; avoid behind ranges with heavy heat exposure unless the product is rated for it.
Step-by-Step: Kitchen Herringbone Backsplash Installation
1) Prep the wall for a flat, clean surface
- Turn off power to outlets at the breaker.
- Remove outlet covers and note screw lengths.
- Clean walls to remove grease and dust.
- Patch holes and sand flat; herringbone highlights uneven walls.
- If needed, prime glossy paint for better adhesion.
2) Establish reference lines (your “success lines”)
Use a level or laser to draw:
- A horizontal line at the top of the first full tile course (often just above the countertop).
- A vertical centerline at the focal point (sink center, range center, or the middle of the main backsplash wall).
Practical tip: Countertops are not always level. Rather than following the countertop, follow a level line and use a slightly larger caulk joint at the counter if needed to disguise small gaps.
3) Dry-lay a small section to confirm spacing and pattern
On a table or the countertop (protected), assemble 6–10 tiles in the herringbone pattern with spacers.
- Confirm the look at your chosen grout joint (common: 1/16" for crisp, modern; 1/8" for a more classic look or slightly irregular tile).
- Check for tile size variation; adjust spacers if needed.
4) Start at the focal point and work outward
For the cleanest look, begin at the centerline and build the herringbone pattern symmetrically. Many installers create a “spine” (a center column of the pattern) to keep alignment consistent.
- Apply thinset in small sections (about 2–3 square feet at a time) so it doesn’t skin over.
- Comb thinset with the notched side of the trowel, then lightly flatten ridges if using translucent tile to prevent trowel lines from showing.
- Press tile firmly and check alignment frequently with a level.
5) Manage cuts around outlets, cabinets, and corners
Expect more cutting than standard subway tile. Plan cuts so the smallest pieces land in the least visible areas.
- Outlets: Keep cuts clean and avoid tiny slivers. Use outlet extenders after tiling.
- Inside corners: Leave a 1/8" gap at changes of plane for flexible caulk (not grout).
- End runs: Consider a finished edge: bullnose tile, a matching trim piece, or a metal profile (brushed nickel and matte black are popular).
6) Let tile set, then grout
- Wait the adhesive cure time recommended (often 24 hours).
- Choose grout type:
- Cement grout: Budget-friendly; may need sealing depending on product.
- High-performance grout: Better stain resistance and color consistency; great for busy kitchens.
- Epoxy grout: Highest stain resistance; more expensive and faster-setting (less forgiving for DIY).
- Apply grout diagonally with a rubber float to pack joints.
- Clean with damp sponges in light passes; avoid over-washing, which can weaken grout color.
7) Caulk the edges and reinstall outlets
- Use 100% silicone caulk where tile meets countertop and in corners.
- Install outlet extenders so outlets sit flush with the new tile surface.
- Reinstall cover plates and restore power.
Budget and Cost Ranges for Herringbone Backsplashes
Costs vary widely based on tile material, the complexity of the herringbone layout, and labor rates in your area. Herringbone typically costs more to install than straight-set tile because of the extra cuts and time.
Typical material costs (per square foot)
- Ceramic subway tile: $2–$8
- Porcelain: $4–$15
- Glass tile: $8–$25
- Natural stone: $10–$35+
- Setting materials (thinset, grout, spacers, caulk): $1.50–$4
Typical labor costs (installation)
- Standard backsplash install: $10–$25 per sq ft
- Herringbone install: $15–$35 per sq ft (higher in complex layouts or premium markets)
Budget example: A 30 sq ft backsplash area (common in many kitchens) can range from $450–$1,200 for DIY-friendly materials and supplies, or $900–$2,500+ with professional installation and mid-range tile.
Where to spend vs. where to save
- Spend on: consistent tile quality, stain-resistant grout, a good wet saw rental, and proper edge finishing.
- Save on: using ceramic instead of marble, limiting full-height tile to one statement wall, or choosing a simpler trim profile.
Common Mistakes to Avoid
- Skipping dry layout: Leads to awkward cuts, misaligned pattern “drift,” and visible slivers.
- Starting from the countertop without leveling: If the counter is out of level, your pattern will look crooked.
- Under-ordering tile: Dye lots can vary; reordering later may not match.
- Using grout in corners: Corners and counter transitions need flexible silicone caulk to prevent cracking.
- Ignoring outlet depth: Outlets must be brought flush to meet electrical code and safety expectations.
- Choosing the wrong grout color: High contrast emphasizes every tiny alignment issue; mid-tone grout is often more forgiving for herringbone.
Maintenance and Cleaning Tips for a Long-Lasting Backsplash
- Daily/weekly cleaning: Use a pH-neutral cleaner or mild dish soap with warm water; wipe dry to prevent streaks.
- Avoid harsh abrasives: Especially on glass and polished stone.
- Seal as needed:
- Natural stone often needs sealing every 6–12 months depending on product and use.
- Some cement grouts benefit from sealing; high-performance grouts may not.
- Address stains quickly: Tomato sauce, turmeric, wine, and oils can discolor porous grout if left too long.
- Check caulk lines annually: Replace peeling or cracked silicone to keep moisture out.
FAQ: Kitchen Herringbone Backsplash Installation
Is herringbone backsplash hard to install for DIY?
It’s more challenging than a standard subway layout because alignment and cutting matter more. Confident DIYers can do it with patience, a level/laser, and a wet saw. If your kitchen has many outlets, corners, or a full-height backsplash, hiring a pro can be worth it.
What’s the best grout joint size for herringbone tile?
For crisp, modern results, 1/16" joints are popular with rectified tile. For tiles with slight size variation or handmade looks, 1/8" is more forgiving and reduces the chance of uneven joints.
Should the herringbone pattern be centered behind the stove or sink?
Centering behind the range creates a strong focal point, especially with a statement hood. If your sink wall is the main visual wall (open shelving or a big window), centering there may make more sense. Choose one main “hero” centerline and keep symmetry where the eye lands first.
What tile is best for a backsplash behind the range?
Porcelain and ceramic are reliable for heat and easy cleaning. Natural marble is beautiful but can etch and stain more easily near cooking. If you love the marble look, marble-look porcelain gives similar elegance with lower maintenance.
Do I need to seal my herringbone backsplash?
Seal natural stone and any grout that requires it per the manufacturer. Many modern high-performance grouts are stain resistant and don’t need sealing, which is a smart choice for busy family kitchens.
Next Steps: Get a Herringbone Look That Feels Custom
Start by measuring your backsplash area, choose a tile size that suits your kitchen’s scale, and decide where the pattern should be centered for the strongest impact. Order enough tile (with a 15–20% buffer), plan your reference lines, and prioritize clean edge finishing and the right grout choice for easy maintenance.
If you’re still deciding between layouts, materials, or kitchen renovation finishes, explore more backsplash ideas, kitchen organization upgrades, and design trend guidance on thedecormag.com.
More Articles
 Science for Beginners: Clear, Kitchen-Tested Principles You Can Use Today
 Kitchen Fluted Wood Range Hood Cover - The Decor Mag
 Personality in Kitchen Design: Ideas for 2026
 Best Kitchen Baking Sheet Organization - The Decor Mag
 Kitchen Wood Beams Ceiling Design - The Decor Mag
 Kitchen to Outdoor Flow Design (2026)
 Professional Kitchen Design: Tips for 2026
 Best Kitchen Utensil Holder Picks - The Decor Mag
 Best Kitchen Serving Tray Storage - The Decor Mag
 Best Kitchen Under-Sink Organization - The Decor Mag