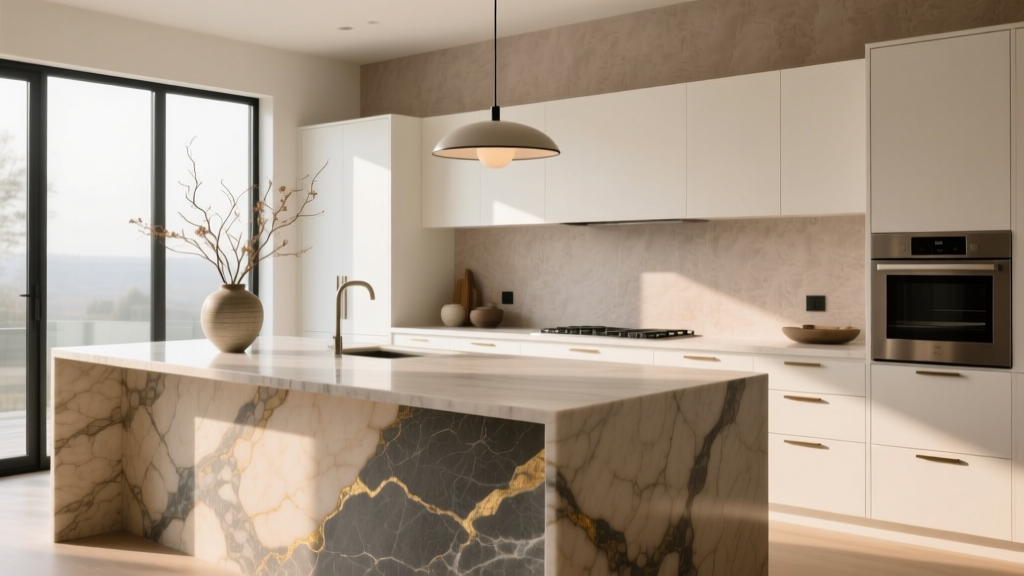
Kitchen Statement Stone Slab Island - The Decor Mag
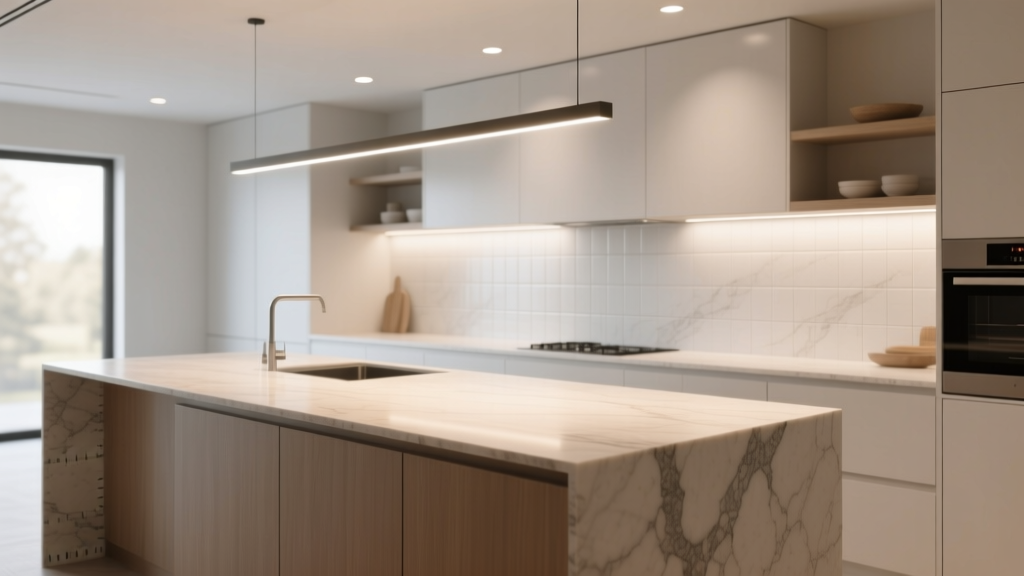
A kitchen island is already the heart of most renovations—where meals are prepped, kids do homework, guests gather, and everyday life happens. A statement stone slab island takes that idea further by turning the island into a true centerpiece: one continuous surface (and often waterfall sides) that looks like sculptural furniture while offering serious durability.
Homeowners are gravitating toward bolder, more character-rich materials as kitchens become more open to living and dining areas. A full-height slab in marble, quartzite, granite, or porcelain can visually anchor an open-plan layout, add “designer” impact without excessive décor, and increase perceived value. Done well, it’s not just eye candy—it improves workflow, seating comfort, and storage efficiency.
This guide breaks down the best materials, layouts, measurements, and budget planning for a stone slab island that fits your space and your lifestyle—plus common mistakes to avoid so your kitchen renovation pays off long-term.
What Makes a Stone Slab Island a “Statement”?
A statement island typically features one or more of these design moves:
- Large-format slab surface with minimal seams and dramatic veining or patterning
- Waterfall edges (stone continues down one or both sides)
- Mitered “thick” edge that looks substantial (often 2"–4" thick appearance)
- High-contrast pairing (light stone on dark cabinetry, or vice versa)
- Integrated features like prep sink, hidden outlets, or a downdraft/flush cooktop
Current kitchen design trends lean toward organic warmth and tactile finishes—think honed stones, soft matte cabinetry, and mixed metals—while timeless functionality still demands generous clearances, easy maintenance, and seating that doesn’t feel cramped.
Choosing the Best Material: Marble vs Quartzite vs Granite vs Quartz vs Porcelain
Your island gets the most action, so material selection should balance looks, performance, and maintenance. Here’s how the most popular options compare.
Marble (Classic, luminous, high maintenance)
- Look: Iconic veining; unmatched depth and softness—perfect for a luxury, European-inspired kitchen design.
- Best for: Bakers (cool surface for dough), homeowners who love patina.
- Watch-outs: Etching from acids (lemon, vinegar), staining if not sealed and cared for.
- Finish tip: Choose honed for a softer look and less visible etching; polished shows etching more.
Quartzite (Natural stone, dramatic, typically more durable than marble)
- Look: Often resembles marble with stronger durability; stunning veining and movement.
- Best for: Busy households that want natural stone without marble’s vulnerability.
- Watch-outs: Quartzite varies—confirm it’s true quartzite (not mislabeled marble/dolomite). Seal regularly.
Granite (Durable, varied, cost-flexible)
- Look: Speckled, patterned, or subtle options; can read traditional or modern depending on the slab.
- Best for: Low-fuss longevity and strong resistance to heat/scratches.
- Watch-outs: Busier patterns can clash with open-plan spaces; sample in your lighting.
Engineered Quartz (Consistent, low maintenance, not heatproof)
- Look: Uniform patterning; many marble-look designs; predictable from slab to slab.
- Best for: Families who want easy care and consistent aesthetics.
- Watch-outs: Heat can damage resins—use trivets under hot pans and slow cookers.
Porcelain Slab (Ultra-thin, modern, highly resistant)
- Look: Sleek, contemporary; can mimic marble, concrete, or metal with large continuous visuals.
- Best for: Modern kitchens, waterfall edges with a crisp profile, high stain/UV resistance.
- Watch-outs: Requires experienced fabricators; edges/chips can be an issue if poorly handled.
Quick Material Recommendation Guide
- Want natural movement + durability: Quartzite or granite
- Want iconic luxury + don’t mind patina: Marble
- Want low maintenance + predictable look: Quartz
- Want sleek modern performance: Porcelain slab
Layout & Measurements: Designing a Statement Island That Functions
The most beautiful slab island can still feel frustrating if clearances and proportions are off. Use these practical kitchen planning measurements as a starting point.
Recommended Clearances (Comfort + Workflow)
- Minimum clearance around island: 36" (tight but workable)
- Ideal clearance for two cooks: 42"–48"
- Behind seating (stools) for traffic: 44"–54" from island edge to nearest obstruction
- Work triangle awareness: Keep fridge, sink, and cooktop paths clear; don’t make the island a traffic barrier.
Island Size Guidelines
- Small kitchens: 24"–30" deep x 48"–60" long can still be impactful with the right slab and edge detail.
- Most renovations: 36"–42" deep x 72"–96" long is a comfortable, multi-use size.
- Large kitchens/open plan: 42"–54" deep x 96"–120"+ long (often with seating plus prep zone).
Seating Comfort Measurements
- Overhang for stools: 12" minimum; 15" is more comfortable; 18" for deeper knee space (requires support).
- Seat width per person: 24" (30" if you want generous elbow room).
- Counter height vs bar height: Standard counter is ~36"; bar height is ~42". Many homeowners prefer 36" for a cleaner, more inclusive layout.
Waterfall Edge: When It Works Best
Waterfall slabs are trending because they read like furniture and visually “finish” the island in open layouts. They work best when:
- The island is visible from living/dining spaces
- You want to highlight stone veining continuity
- You’re pairing with simple cabinetry so the slab can star
Skip or limit waterfall edges if you need maximum storage access on the ends, have a tight walkway, or are working with a strict budget.
Design Approaches That Make the Slab Feel Custom (Not Cookie-Cutter)
1) Bookmatched or Vein-Matched Slabs
For dramatic stones (marble-look quartzite, Calacatta-style marble, porcelain with movement), ask your fabricator about bookmatching so the pattern mirrors at the seam. This can elevate the island from “nice countertop” to true statement piece.
2) Thick-Edge (Mitered) Profiles
A standard stone thickness is often around 2–3 cm, but a mitered edge can create a 2"–4" thick look. This feels substantial and high-end, especially on large islands.
3) Two-Tone Island Base + Standout Stone
One of today’s most reliable kitchen renovation strategies is pairing:
- Perimeter cabinets: warm white, greige, or light oak
- Island base: charcoal, deep green, navy, or stained walnut
- Stone slab: the “bridge” that ties both together
4) Integrated Storage for Real Kitchen Organization
A statement island shouldn’t sacrifice organization. Include:
- Deep drawers for pots/pans (wider is better: 30"–36" drawers are incredibly functional)
- Pull-out trash and recycling near prep zone
- Tray dividers for cutting boards and sheet pans
- A concealed charging drawer or pop-up outlet (plan power early)
Specific Product & Feature Recommendations (Practical, Renovation-Friendly)
- Undermount workstation sink (if you prep at the island): Look for integrated ledges for cutting boards/colanders to keep clutter down.
- Flush or low-profile cooktop (if you cook at the island): Pair with a powerful, well-planned ventilation strategy to prevent odor migration in open layouts.
- Hidden outlets: End-panel outlets, under-counter power strips, or pop-up units—avoid cords across the slab.
- Lighting: Two to three pendants centered over the island, typically hung so the bottom is about 30"–36" above the countertop (adjust for ceiling height and sightlines).
Cost Ranges & Budget Considerations
Costs vary widely by region, slab rarity, edge details, and fabrication complexity. Use these ranges to build a realistic kitchen remodeling budget.
Stone Slab Island Cost Ranges (Installed, Typical)
- Granite: $60–$150 per sq ft installed
- Quartz (engineered): $70–$170 per sq ft installed
- Quartzite: $90–$250+ per sq ft installed
- Marble: $100–$300+ per sq ft installed
- Porcelain slab: $80–$200+ per sq ft installed (fabrication skill matters)
What Drives the Price Up
- Waterfall edges: Adds material + labor (often +$1,000–$4,000 depending on size and stone)
- Mitered thick edges: Typically +$500–$2,000+
- Seam/vein matching: More planning and potentially more waste material
- Cutouts: Sinks, cooktops, and outlet grommets add fabrication costs
- Exotic slabs: High demand and limited availability can spike costs quickly
Smart Ways to Save Without Losing Impact
- Use a standout slab only on the island and choose a simpler, durable counter for the perimeter.
- Do a single waterfall side (visible side) rather than both.
- Choose a honed finish for a softer, modern look that can mask everyday wear.
- Keep the island shape simple (rectangular is most fabrication-friendly).
Maintenance Advice: Keep Your Slab Island Looking New
Daily Care
- Wipe spills quickly—especially wine, coffee, oils, citrus, and tomato sauces.
- Use a pH-neutral stone cleaner or mild soap and water; avoid harsh degreasers unless approved for your surface.
- Always use cutting boards; stone can dull knives and micro-scratches can show on darker polished finishes.
Sealing Guidelines (Natural Stone)
- Granite/quartzite/marble: Many need sealing every 6–18 months depending on porosity and use.
- Test: Put a few drops of water on the surface. If it darkens within a few minutes, it’s time to reseal.
Heat & Impact Tips
- Quartz: Use trivets—hot pans can discolor or crack resins.
- Porcelain: Heat resistant, but edges can chip—avoid banging heavy cookware on corners.
- Waterfall corners: Consider slightly eased edges to reduce chipping in high-traffic family kitchens.
Common Mistakes to Avoid
- Ignoring clearance needs: An oversized island that pinches walkways will make the entire kitchen feel stressful.
- Choosing marble for a zero-maintenance lifestyle: If etching will bother you, select quartzite, granite, or porcelain instead.
- Not reviewing the actual slab: Stone varies dramatically. Approve the slab in person and request a layout template for seams and veining direction.
- Forgetting outlet planning: A gorgeous island with no power becomes a daily annoyance (and encourages messy extension cords).
- Overdoing pattern everywhere: If the island slab has bold movement, keep backsplash and perimeter counters quieter for balance.
- Under-supporting overhangs: Large seating overhangs may require hidden brackets or corbels—plan this with your fabricator and cabinetmaker.
FAQ: Kitchen Statement Stone Slab Islands
What’s the most durable stone for a kitchen island?
Many homeowners find granite and quartzite offer an excellent balance of durability and natural beauty. If you want a highly resistant, modern surface, porcelain slab is also a strong contender.
Are waterfall edges worth the cost?
If your island is visible from living spaces or you want a high-end, furniture-like look, a waterfall edge can be worth it. For tighter budgets, consider a single waterfall side where it will be seen most.
How big should an island be to seat three people comfortably?
Plan for about 72" of seating length (24" per person). Depth depends on your layout, but a common comfortable size is 36"–42" deep with a 12"–15" overhang for stools.
Does quartz stain or scratch?
Quartz is generally stain resistant, but it can scratch with heavy abuse and can be damaged by heat. Use cutting boards and trivets for everyday protection.
Should the island match the perimeter countertops?
Not necessarily. A popular kitchen design approach is making the island the focal point with a statement slab, then using a simpler, quieter surface on the perimeter for cohesion and cost control.
What finish is best for a busy family kitchen—polished or honed?
Honed finishes are trending for their soft, modern look and their ability to disguise minor wear. Polished finishes are glossy and classic but can highlight etching on marble and fingerprints on darker stones.
Next Steps: Plan Your Statement Island Like a Pro
Start by measuring your room and marking clearances (36" minimum, 42"–48" ideal). Then choose your slab based on lifestyle first—how you cook, how you clean, and how much patina you’re willing to live with. Finally, work with your fabricator to review the exact slab and confirm seam placement, overhang support, and edge details before anything is cut.
If you’re ready to refine your kitchen renovation plan, explore more countertop guidance, kitchen organization ideas, and layout inspiration on thedecormag.com.
More Articles
 Kitchen Pantry Organization: Pro Tips (2026)
 Professional Kitchen Design: Tips for 2026
 Kitchen Matte Black Fixture Trends - The Decor Mag
 Best Kitchen Utensil Holder Picks - The Decor Mag
 Kitchen Butcher Block Countertop Care - The Decor Mag
 Kitchen Patina Brass Faucet Beauty - The Decor Mag
 Kitchen Curved Architectural Details - The Decor Mag
 How to Choose Kitchen Countertop Thickness - The Decor Mag
 Kitchen to Outdoor Flow Design (2026)
 Kitchen Layered Materials Design Guide - The Decor Mag