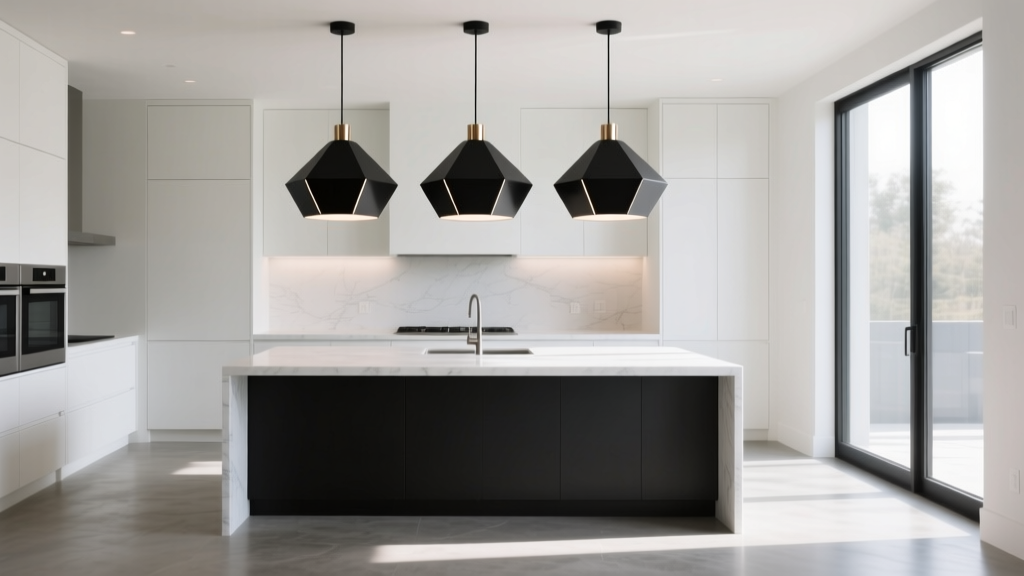
Best Pendant Lights for Kitchen Islands - The Decor Mag
Kitchen islands do more than add prep space—they anchor the entire room. The right pendant lights for a kitchen island help define the island as a “destination” for cooking, homework, entertaining, and everyday living. They also shape how your kitchen feels: warm and inviting, crisp and modern, or relaxed and coastal.
Because pendant lighting sits at eye level, it’s one of the most visible design choices in a renovation. Get it right and you’ll improve task lighting, elevate your kitchen style, and even make the space look more organized. Get it wrong and you’ll fight glare, bump your head, or end up with fixtures that look undersized (or overwhelming) against your island.
This guide breaks down the best pendant light styles, materials, and layouts for kitchen islands—plus practical measurements, cost ranges, bulb guidance, and common mistakes to avoid.
What Makes a Great Kitchen Island Pendant Light?
Function first: task lighting without glare
Kitchen renovation plans often focus on cabinetry and countertops, but lighting is what makes them usable. Over an island, pendants should provide:
- Focused downward light for chopping and prepping
- Comfortable brightness that doesn’t cast harsh shadows
- Minimal glare for seated guests and cooks moving around the island
For most kitchens, look for pendants that accept standard LED bulbs and use shades that direct light down (opaque metal, tinted glass, or a diffuser). If you love clear glass pendants, plan on using the right bulb (more on that below) to reduce glare and visible hotspots.
Scale and proportion: the quickest way to look “custom”
Well-proportioned island lighting can make a kitchen feel professionally designed. As a starting point:
- Pendant diameter: typically 8–14 inches each for average islands; 14–20 inches for large islands or statement fixtures
- Spacing between pendants: 24–30 inches on-center is a common sweet spot
- Distance from island edge: keep fixtures at least 6–12 inches in from the countertop edge to avoid bumps and visual crowding
Layered lighting: pendants aren’t the whole plan
Even the best pendant lights shouldn’t carry the entire kitchen. For functional, modern kitchen lighting design, pair pendants with:
- Recessed ceiling lights for overall ambient light
- Under-cabinet lighting for shadow-free countertops
- Toe-kick or in-cabinet lighting for a high-end, organized feel
Measurements That Matter: Placement, Height, and Spacing
How high to hang pendant lights over a kitchen island
The most reliable guideline for island pendants:
- Bottom of pendant: 30–36 inches above the countertop
Adjust within that range based on ceiling height and fixture size:
- 8-foot ceilings: often 30–32 inches above the counter
- 9-foot ceilings: often 32–36 inches above the counter
- Tall or oversized pendants: hang slightly higher so sightlines stay open
How many pendants do you need?
Use island length and fixture width to decide. Common layouts:
- 2 pendants: ideal for 5–7 foot islands or wider, larger fixtures
- 3 pendants: ideal for 7–9 foot islands with medium-size fixtures
- 4 pendants: works for 9–12 foot islands, especially with smaller fixtures (or when you want a more rhythmic, tailored look)
Quick spacing formula (practical and easy):
- Leave about 6–12 inches from each island end to the center of the first pendant.
- Space the remaining pendants evenly so you get roughly 24–30 inches between centers.
Island size, seating, and walkway clearance
Kitchen organization and flow matter as much as style. Before choosing pendants, confirm:
- Walkway clearance: aim for 36–42 inches around the island (48 inches for busy kitchens or multiple cooks)
- Seating overhang: 12 inches minimum; 15 inches is more comfortable for most stools
- Pendant placement over seating: keep fixtures centered over the usable island area, not hanging directly in a seated person’s face line
Best Pendant Light Styles for Kitchen Islands (With Practical Guidance)
1) Glass pendants: timeless and light-enhancing
Best for: smaller kitchens, darker kitchens, transitional styles, and spaces where you want visual openness.
Pros: expands the look of the room, complements most cabinet colors, works with many kitchen renovation styles.
Cons: fingerprints and cooking residue show more, bulbs are visible (glare risk).
Design tips:
- Choose seeded, smoked, or ribbed glass for a trend-forward look that also softens glare.
- Use frosted glass if you want more diffused, forgiving light.
- If using clear glass, choose a matte LED bulb or a bulb with a lower glare profile.
Typical cost range: $80–$300 per pendant; designer or artisanal glass can run $300–$900+ each.
2) Metal dome pendants: best for strong task lighting
Best for: modern farmhouse kitchens, industrial kitchens, and anyone who wants practical, focused island lighting.
Pros: excellent downlight, hides the bulb, durable and easy to wipe clean.
Cons: can feel heavy visually if oversized in a small kitchen.
Finish recommendations:
- Matte black: crisp contrast with white cabinets or natural wood tones
- Brushed brass: warm, elevated, pairs beautifully with marble/quartz
- Brushed nickel: classic, forgiving with fingerprints, works across decades of styles
Typical cost range: $90–$350 each; higher-end finishes and thicker-gauge metal often $350–$700.
3) Globe pendants: clean, modern, and balanced
Best for: contemporary kitchens, mid-century modern influences, and homeowners who want a “forever” silhouette.
Pros: timeless shape, looks good in pairs or triples, complements both slab and shaker cabinets.
Cons: clear globes can glare; very large globes can block sightlines.
Smart approach: choose opal (white) glass globes for soft, even light; pick a globe size that leaves breathing room above the counter.
Typical cost range: $100–$400 per pendant; premium opal glass and solid-brass hardware $400–$1,000+.
4) Linear suspension lights: a streamlined alternative to multiple pendants
Best for: long islands, open-concept kitchens, and minimalists who want fewer ceiling penetrations and a tailored look.
Pros: covers a wide work area evenly, looks architectural, reduces visual clutter compared to 3–4 individual pendants.
Cons: can be pricier; placement must be precise.
Sizing tip: aim for a linear fixture length that’s about 1/2 to 2/3 of the island length (leaving space at each end).
Typical cost range: $250–$1,200; high-end integrated LED linear fixtures $1,200–$3,000+.
5) Natural materials (rattan, cane, wood): warm and trend-forward
Best for: coastal kitchens, organic modern style, Scandinavian-inspired spaces, and homeowners who want softness against stone and tile.
Pros: adds texture, warms up white kitchens, pairs beautifully with wood flooring and open shelving.
Cons: needs more careful cleaning; can collect grease if placed too close to the cooktop.
Maintenance advice:
- Dust regularly with a microfiber cloth or soft brush attachment.
- In heavy-cooking kitchens, choose sealed wood or a shade with a tighter weave that wipes more easily.
Typical cost range: $120–$450 each; handcrafted pieces can be $450–$1,000+.
Material Comparisons: Choosing What Works for Your Kitchen
- Glass: brightens the room; shows smudges; best with matte/soft LED bulbs
- Metal: easiest to clean; strongest task lighting; finish choice affects maintenance (matte hides fingerprints better than polished)
- Brass (solid vs. plated): solid brass ages gracefully; plated finishes can wear over time—great for budget, less ideal for long-term durability
- Wood/rattan: adds warmth and texture; requires gentle cleaning; keep away from high grease/steam zones if possible
Bulbs, Brightness, and Color Temperature (Don’t Skip This)
Even stunning pendant lights can disappoint with the wrong bulb. For kitchen island lighting, aim for a balance of task and ambiance.
- Color temperature: 2700K–3000K for warm, inviting light; 3000K–3500K for a brighter, cleaner look (popular in modern kitchens)
- Brightness (lumens): roughly 400–800 lumens per pendant, depending on shade opacity and how many fixtures you have
- CRI (color rendering): choose 90+ CRI if you want food and finishes to look accurate (a designer-level upgrade)
- Dimmers: install a compatible dimmer and dimmable LED bulbs to shift from prep mode to entertaining mode
Pro tip: If your pendants are clear glass, choose a diffused or frosted LED to reduce glare and make the bulb less visually “busy.”
Trending Looks That Still Feel Timeless
- Mixed metals: warm brass pendants with stainless appliances; keep it cohesive by repeating each metal at least twice (faucet, hardware, stools, etc.).
- Soft curves: globes and rounded shades to balance sharp countertop edges—great in contemporary kitchen renovations.
- Statement scale (done carefully): fewer, larger pendants for a bold, uncluttered ceiling line.
- Natural textures: woven pendants and light wood tones paired with quartz and creamy cabinet colors.
- Matte finishes: matte black and satin metals that hide smudges and photograph beautifully.
Budget Guide: What Pendant Lighting Really Costs
Plan your budget with the full installation picture in mind. A realistic range depends on the number of fixtures, ceiling access, and whether you’re adding new wiring.
- Budget-friendly: $75–$150 per pendant (often plated metals, simpler glass)
- Mid-range (sweet spot): $150–$400 per pendant (better finishes, sturdier hardware, more design variety)
- Investment: $400–$1,000+ per pendant (solid brass, designer glass, artisanal craftsmanship)
Installation costs (typical):
- Simple swap (existing junction box): $100–$250 per light
- New wiring or moving boxes: $250–$800+ per light, depending on access and patching
Where to spend vs. save:
- Spend: on quality finishes (especially brass), smooth dimming performance, and shade materials that suit your cooking habits.
- Save: by choosing a timeless silhouette and upgrading bulbs/dimmers—lighting quality often improves dramatically with the right LED.
Common Mistakes to Avoid
- Hanging pendants too low: it blocks sightlines and feels cramped. Stay near 30–36 inches above the counter.
- Choosing fixtures that are too small: undersized pendants look “floating” and don’t provide enough light.
- Overcrowding the island: too many pendants can make the ceiling look cluttered and reduce functional light distribution.
- Ignoring glare: clear glass + high-lumen exposed bulbs can be uncomfortable at night.
- Mismatched finishes without a plan: mixing metals is stylish when repeated intentionally; random mixing reads accidental.
- Forgetting cleaning realities: ornate details, open cages, and textured materials collect grease and dust faster.
Care and Maintenance Tips for Long-Lasting Style
- Weekly: quick dusting with a microfiber cloth (especially on horizontal metal surfaces).
- Monthly: wipe metal shades with a damp cloth and mild soap; dry immediately to prevent spotting.
- Glass shades: remove and wash occasionally, or use a glass cleaner sprayed onto a cloth (not directly on the fixture).
- Brass finishes: avoid abrasive cleaners; use manufacturer-approved methods to preserve the finish.
- Woven shades: use a soft brush attachment and keep them away from heavy grease zones when possible.
FAQ: Pendant Lights for Kitchen Islands
How far apart should pendant lights be over a kitchen island?
Aim for about 24–30 inches on-center between pendants, adjusting based on shade size. Also keep fixtures 6–12 inches in from the island edge for comfort and safety.
What size pendant lights look best over an island?
Many kitchens do well with pendants in the 8–14 inch diameter range. Larger islands can handle 14–20 inch pendants or a single linear suspension. The goal is balanced scale without blocking views across the room.
Are two or three pendants better over a kitchen island?
Two pendants suit many 5–7 foot islands or when using larger statement fixtures. Three pendants often look best on 7–9 foot islands with medium-size fixtures, creating even light and a designer rhythm.
Should kitchen island pendants match the faucet and cabinet hardware?
They don’t have to match exactly, but the metals should feel coordinated. A reliable approach is to repeat each finish at least twice (for example: brass pendants + brass hardware, with stainless appliances as a neutral anchor).
What’s the best light color for a kitchen—2700K or 3000K?
2700K is warmer and cozier (great for open-concept kitchens that blend into living areas). 3000K feels a bit cleaner and brighter (a common choice in modern kitchen renovation projects). If you’re unsure, 3000K is a safe middle ground for most kitchens.
Next Steps: Choose Confidently and Light Your Island Like a Pro
Start by measuring your island length, confirming ceiling height, and deciding whether you prefer 2–3 pendants or a linear suspension. Then choose a material and shade style that fits your cooking habits (easy-clean metal for heavy use, softened glass for a bright airy look, or woven textures for warmth). Finish strong with the right bulb: dimmable LED, 90+ CRI if possible, and 2700K–3000K for most homes.
For more kitchen lighting ideas, renovation planning guides, and design inspiration, explore the latest at thedecormag.com.
More Articles
 Best Kitchen Cutting Board Care Products - The Decor Mag
 Kitchen Wood Beams Ceiling Design - The Decor Mag
 Best Kitchen Appliance Maintenance Schedule - The Decor Mag
 Warm & Inviting Kitchens: Design Tips (2026)
 Kitchen Book-Matched Stone Backsplash - The Decor Mag
 Best Kitchen Trash Can Hideaway Solutions - The Decor Mag
 Safety-First Bedroom Inspiration: Essential Design Principles, Verified Products, and Measured Layouts
 Kitchen Textured Cabinet Door Trends - The Decor Mag
 Small Kitchen Storage Hacks That Work (2026)
 How to Choose Kitchen Lighting Temperature - The Decor Mag