Kitchen Plaster Range Hood Organic Look - The Decor Mag
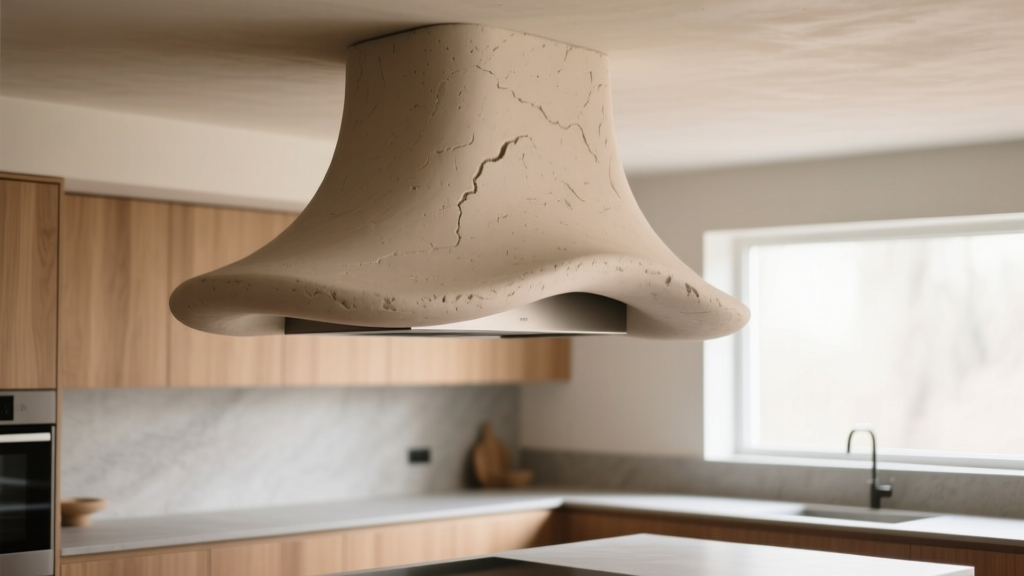
A range hood is one of the most functional pieces in a kitchen—yet it’s often treated like an afterthought. That’s changing fast. Homeowners renovating today want ventilation that works hard and also contributes to the room’s architecture. Enter the plaster range hood: sculptural, seamless, and perfectly suited to the warm, organic kitchen trend.
The “organic look” is about more than a soft color palette. It’s a design approach that favors natural materials, gentle curves, handcrafted textures, and fewer visual interruptions. A plaster hood delivers all of that in one vertical focal point. Whether your kitchen leans modern Mediterranean, contemporary farmhouse, minimal organic, or transitional, a plaster hood can make the space feel intentional—like it was designed, not assembled.
This guide breaks down how to design a kitchen plaster range hood that looks custom, functions properly, and holds up over time—plus cost ranges, material options, maintenance, and common renovation pitfalls to avoid.
Why Plaster Range Hoods Are Trending (and Why They’re Timeless)
Current kitchen design trends are pushing back against glossy, high-contrast finishes and overly busy backsplashes. Instead, designers are emphasizing texture (limewash, microcement, plaster), tone-on-tone palettes, and statement forms that feel architectural. A plaster hood checks every box:
- Seamless integration: Plaster can wrap a hood structure and blend into the wall, reducing visual clutter.
- Soft, organic texture: The finish feels hand-applied and warm, even in a modern kitchen.
- Customizable shape: From straight chimney styles to curved bell shapes and tapered forms.
- Pairs well with natural materials: White oak, walnut, honed stone, zellige tile, tumbled marble, and unlacquered brass.
Timeless functionality matters, too. A well-designed plaster hood can hide powerful ventilation (inline blowers, remote fans, baffle filters) without sacrificing aesthetics.
Planning First: Ventilation Requirements You Shouldn’t Ignore
Before you choose a shape or finish, confirm what your kitchen needs for performance. The best-looking hood in the world won’t matter if smoke and odors linger.
CFM Guidelines (Realistic Targets)
CFM (cubic feet per minute) refers to airflow. These are practical starting points for many homes:
- 30" cooktop: 400–600 CFM for typical cooking; 600–900 CFM for frequent searing/wok use
- 36" cooktop: 600–900 CFM common; up to 1200 CFM for heavy cooking
- Gas vs. induction: Gas often needs stronger ventilation due to combustion byproducts and higher heat output.
Tip: Many building codes require make-up air when hood capacity exceeds a threshold (commonly 400 CFM in parts of the U.S.). Ask your contractor early—this affects cost and duct planning.
Recommended Hood Size and Placement
- Width: Aim for a hood that is at least as wide as the cooktop; ideally 3" wider on each side (e.g., 36" cooktop → 42" hood).
- Mounting height: Typically 24"–30" above electric/induction and 28"–36" above gas (follow your hood insert specs).
- Depth (capture area): Common hood depth is 20"–24". Deeper capture helps with high-heat cooking.
Ducting Rules for Quieter, Better Performance
Plaster hoods often look minimal, so the mechanical planning has to be strong behind the scenes:
- Use smooth metal ducting (rigid) where possible; avoid flex duct except where unavoidable.
- Keep duct runs short with minimal turns. Each elbow reduces airflow.
- Match duct size to the blower requirements (often 6", 8", or 10"). Undersized ducting increases noise and reduces effectiveness.
Designing the Organic Look: Shapes, Proportions, and Styling
An organic plaster hood works best when it looks “built in” to the kitchen architecture. Proportions matter more than ornament.
Popular Plaster Hood Shapes
- Soft tapered chimney: Clean lines with subtle flare; ideal for modern organic kitchens.
- Curved bell shape: A classic for Mediterranean and rustic-inspired spaces; pairs beautifully with limestone and warm woods.
- Box with rounded corners: A transitional option—minimal but not sharp.
- Arched niche hood: Great for character kitchens; keep surrounding elements simple to avoid visual overload.
Proportion Tips That Make It Look Custom
- Align to the cooktop: Center precisely and maintain equal margins on both sides.
- Consider ceiling height: In 8' ceilings, a bulky hood can feel heavy—choose a slimmer chimney or gentle taper.
- Balance with cabinetry: If you have full-height uppers, a plaster hood becomes a focal point; keep nearby cabinet door styles simple.
- Keep the surround calm: Busy veining, high-contrast grout, and multiple materials can fight the hood’s texture.
Materials: Plaster Options and What to Use Underneath
A plaster hood is typically a finish over a built structure (not solid plaster). The system you choose affects cost, durability, and repairability.
Hood Structure (Substrate) Choices
- Wood framing + cement board: Common and cost-effective; cement board adds moisture resistance and supports plaster well.
- Metal framing + cement board: More stable in some conditions; good for larger hoods and tighter tolerances.
- Pre-made hood shells: Some companies sell ready-to-finish shells (often lightweight). Great for faster installation but may limit custom shaping.
Plaster Finish Types (Comparison)
- Traditional gypsum plaster: Smooth, classic, paint-friendly; less moisture-tolerant than lime-based options.
- Lime plaster: Breathable and naturally mold-resistant; ideal for an organic, matte look; often higher labor cost.
- Venetian plaster: Can be matte to polished; durable and elegant; tends to read more “refined” than rustic.
- Microcement / plaster-look coatings: Thin, modern, and durable; good for a contemporary organic kitchen and easier wipe-downs.
Best Sealers for Kitchen Use
Because a range hood is exposed to grease and steam, sealing is where many DIY projects fail.
- Penetrating sealer (matte): Helps maintain a natural look; good for lime plaster.
- Topcoat sealer (satin or matte): Adds stronger grease and stain resistance; can slightly deepen color.
Recommendation: Ask your plaster installer for a kitchen-rated system and test a small sample panel. The same plaster can look dramatically different after sealing.
Color and Texture: Getting That Warm, Organic Finish
The organic look usually sits in a soft, earthy range—warm whites, sand, putty, pale greige, or clay-tinted neutrals. Avoid overly bright, cool whites if you want the hood to feel handmade.
Practical Finish Recommendations
- Matte to low-sheen: Hides minor imperfections and reads more natural.
- Subtle movement: Hand trowel marks should be intentional but not dramatic—think “calm texture,” not heavy stucco.
- Warm lighting: Use 2700K–3000K lighting to bring out the plaster’s depth without making it look gray.
Pairing Ideas (Organic Kitchen Staples)
- Countertops: Honed quartzite, soapstone, honed marble (with realistic expectations), durable quartz in warm tones.
- Backsplash: Full-height slab, handmade tile, or a matching plaster backsplash for a seamless look.
- Hardware/fixtures: Unlacquered brass, aged bronze, brushed nickel, or matte black (sparingly) for contrast.
Layout Guidance: Where a Plaster Hood Shines Most
Plaster hoods create a focal point, so they work best where the range wall can “breathe.” Consider these renovation-friendly layouts:
- Classic range wall: Centered between base cabinets with a full-height backsplash. Ideal for a statement hood.
- Range in a shallow niche: Adds architectural depth; keep clearances per manufacturer specs.
- Island range with plaster hood: Possible, but more challenging due to ducting and sightlines. Often better with a ceiling-integrated hood if you want minimal visual obstruction.
Measurement tip: If you’re flanking the range with tall cabinetry, allow at least 3"–6" of breathing room between the hood mass and adjacent cabinet faces to avoid a cramped look.
Product and System Recommendations (What to Ask For)
Because plaster hoods are a combination of finish + ventilation insert, you’ll typically choose an insert liner or hood insert from a ventilation brand, then build around it.
What to Look for in a Hood Insert
- Baffle filters: Durable and effective for grease; typically dishwasher-safe.
- Remote or inline blower options: Moves noise away from the kitchen.
- Heat and lighting controls: Look for easy-to-clean controls and LED lighting with good color quality.
- Service access: Ensure filters and components can be removed without damaging the plaster surround.
Design approach: Plan a discreet access panel or ensure the insert’s standard access is fully usable. A beautiful plaster finish shouldn’t block maintenance.
Cost Ranges and Budget Considerations
Pricing varies widely based on hood size, installation complexity, region, and plaster type. Use these ranges for renovation planning:
- Vent hood insert/liner: $400–$1,500 (mid-range), $1,500–$3,500+ (premium, quieter, higher CFM)
- Blower (if separate): $300–$1,200+ (inline/remote often costs more)
- Ductwork changes: $300–$2,500+ depending on distance, elbows, roof/wall exit, and access
- Make-up air system: $800–$3,000+ (sometimes more with HVAC integration)
- Custom hood build (framing + substrate): $800–$2,500+
- Plaster finish labor: $1,200–$4,500+ (Venetian/lime and complex curves cost more)
Typical total investment: Many homeowners land between $2,500 and $8,500 for a true plaster hood system, with high-end builds exceeding that when ducting and make-up air are involved.
Where to Spend vs. Save
- Spend on ventilation performance: Proper ducting, strong capture area, and a quieter blower improve daily life.
- Save by simplifying the shape: A clean tapered form is often less expensive than a deep bell curve with multiple radii.
- Sample before committing: Do test boards for plaster color/texture; redoing plaster is costly.
Maintenance and Cleaning: Keeping Plaster Beautiful
A plaster hood can be surprisingly low maintenance when it’s sealed correctly and cleaned gently.
Weekly / Monthly Care
- Dust regularly: Use a microfiber cloth or soft brush attachment.
- Spot clean: Wipe splatters quickly with a damp cloth and mild soap if the finish is sealed for kitchen use.
- Degrease carefully: Avoid harsh degreasers and abrasive pads; they can strip sealers and burnish the finish.
Filter Maintenance (Non-Negotiable)
- Clean baffle filters every 2–6 weeks depending on cooking habits (dishwasher-safe in many models).
- Replace charcoal filters on recirculating systems as recommended by the manufacturer.
Tip: A plaster hood stays cleaner when the hood is actually used. Run it for a few minutes before cooking and for 5–10 minutes after to clear lingering moisture and grease particles.
Common Mistakes to Avoid
- Choosing looks over capture area: A shallow hood that doesn’t extend far enough over the front burners won’t vent well.
- Skipping make-up air planning: High-CFM hoods can cause backdrafting or poor performance without proper air replacement.
- Using the wrong substrate: Drywall alone is risky behind plaster in a high-moisture, high-heat zone.
- Not sealing the finish: Unsealed plaster can stain, especially near frequent frying or sautéing.
- Over-texturing: Heavy texture can trap grease and dust and may look dated faster than a calmer hand finish.
- No service access: If filters and parts aren’t accessible, you’ll dread maintenance—and performance will suffer.
FAQ: Kitchen Plaster Range Hoods
Are plaster range hoods durable in a busy kitchen?
Yes—when built on a proper substrate (cement board) and sealed with a kitchen-appropriate sealer. Durability depends more on the system and sealing than the plaster look itself.
Can I DIY a plaster hood?
Some homeowners DIY the framing and hire out the plaster coat for a professional finish. DIY plaster is possible, but expect a learning curve—especially with smooth, organic curves and consistent texture. If you want a truly custom, high-end look, a plaster pro is usually worth it.
Does a plaster hood work with a modern kitchen?
Absolutely. A simple tapered or box form with softened corners looks clean and modern, especially paired with flat-panel cabinetry, minimal hardware, and warm natural materials like white oak.
Is lime plaster better than Venetian plaster for a range hood?
Lime plaster tends to give a softer, more mineral-matte organic look and is naturally breathable. Venetian plaster can be more polished and refined. For kitchens, the “better” choice depends on the sealer system and the texture you want.
Do plaster hoods crack over time?
Hairline cracks can happen if the substrate moves, if corners aren’t reinforced, or if the plaster cures unevenly. Using stable framing, cement board, mesh tape at seams, and an experienced installer reduces the risk significantly.
What backsplash looks best with a plaster hood?
Full-height stone slabs and handmade tile are popular because they complement plaster’s texture without competing. For a calm, cohesive look, many homeowners choose a neutral backsplash with minimal grout contrast.
Next Steps: How to Plan Your Plaster Hood Like a Pro
- Start with ventilation: Confirm CFM needs, duct route, and make-up air requirements.
- Choose a shape that fits your kitchen scale: Prioritize proportion and capture area over ornate detail.
- Select a plaster system and sealer: Request sample boards and view them in your kitchen lighting.
- Coordinate surrounding materials: Keep the range wall cohesive—wood, stone, and hardware should support the hood, not compete with it.
- Build in maintenance access: Ensure filters and controls are easy to reach and remove.
A kitchen plaster range hood with an organic look brings warmth, texture, and architectural presence—without giving up the everyday practicality a renovation should deliver. For more renovation-friendly kitchen design ideas, layout guides, and organization tips, explore the latest inspiration on thedecormag.com.
More Articles
 Best Kitchen Coffee Equipment Storage (2026)
 Best Kitchen Appliance Color Matching - The Decor Mag
 How to Start Bedroominspiration: A Practical, Space-Smart Guide for Real Homes
 Pantry Organization: Fresh Produce & BBQ Storage (2026)
 The Actually For Checklist: A Precision-Driven Kitchen Readiness System for Home Cooks and Professionals
 Kitchen Leathered Quartzite Countertops - The Decor Mag
 Smart Kitchen Tech: How to Incorporate in 2026
 The Practical Kitchens Kitchen Design & Buying Guide: Space, Function, and Real-World Value
 Best Kitchen Lighting for Function & Style (2026)
 Best Kitchen Cutting Board Wall Mount Ideas - The Decor Mag