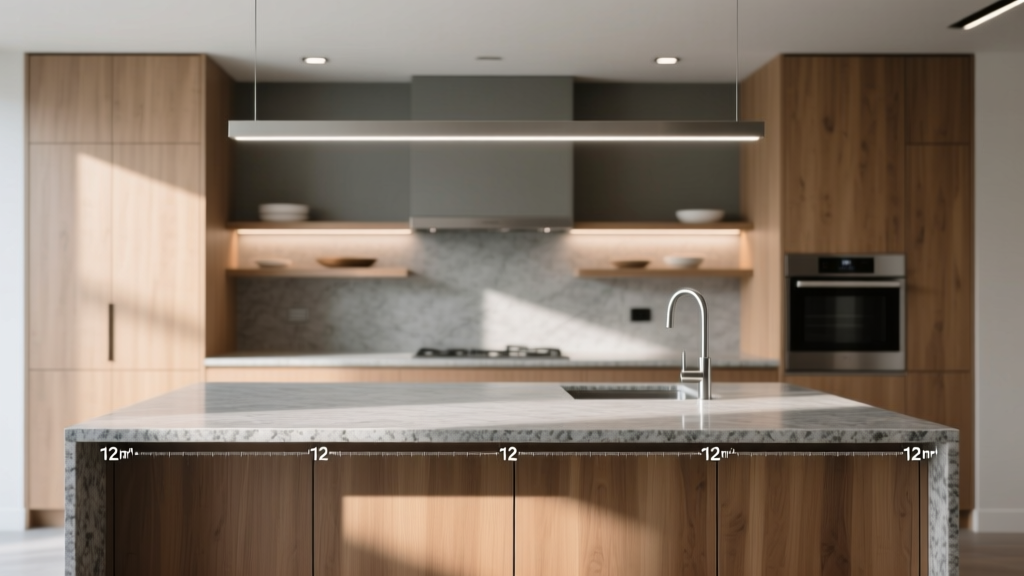
Kitchen Countertop Overhang Rules (2026)
The right countertop overhang can make a kitchen feel effortless to use—or quietly frustrating every day. It affects how comfortably you can sit at an island, whether stools tuck in neatly, how safe an overhang is for kids, and even how easy your kitchen is to clean. Yet overhang is often treated as a last-minute detail, decided after cabinets are ordered and appliances are on the way.
For homeowners planning a kitchen renovation, countertop overhang rules are where design meets real-life functionality. The “best” number isn’t universal: it depends on your countertop material, support conditions, seating needs, cabinet depth, and the way your household actually uses the space. Get it right, and your kitchen island becomes a daily gathering spot. Get it wrong, and you may end up with bruised knees, wobbly stone, or stools that never fit.
This guide breaks down practical countertop overhang measurements, support requirements by material, costs, and common mistakes—so you can choose overhang dimensions that look current, work reliably, and hold up for years.
What Countertop Overhang Means (and Why It Matters)
Countertop overhang is the portion of the counter that extends beyond the cabinet or base below. Overhang is used for:
- Edge clearance: Protecting cabinet doors and drawers from drips and crumbs.
- Comfort: Providing knee and leg room for seating at islands and peninsulas.
- Design proportion: Creating a balanced profile and a “finished” look.
- Safety and durability: Preventing cracking or tipping by using correct support.
Standard Kitchen Countertop Overhang Measurements
Most kitchens follow a few reliable standards. Use these as a starting point, then adjust based on your cabinet sizes, seating plan, and countertop material.
Standard Overhang for Base Cabinets (No Seating)
- Typical overhang: 1 to 1.5 inches
- Why it works: It protects cabinet faces and keeps spills from running down door fronts.
- When to choose 1 inch: Tight walkways, smaller kitchens, or very thick counters where you want a slimmer look.
- When to choose 1.5 inches: Traditional kitchens, rounded edges, or when extra drip protection is helpful.
Island and Peninsula Overhang for Seating
Seating overhang needs to accommodate knees and stool positioning. Here are practical ranges used in modern kitchen design:
- Minimum comfortable seating overhang: 12 inches (common for standard-height counters)
- More comfortable: 15 inches
- Deep overhang (requires added support): 18 inches
- Bar-height or raised bar: 12–15 inches is common; comfort depends heavily on stool height and footrests
Quick comfort check: If your household includes taller adults, 15 inches is often noticeably better than 12 inches for daily use.
Maximum Overhang Without Support (Rule of Thumb)
Support requirements vary by material and thickness, but as a general rule:
- Stone (granite/quartz/marble): often up to ~10–12 inches without support (depends on thickness and reinforcement)
- Wood or butcher block: can sometimes span farther than stone, but still benefits from support at seating areas
- Laminate: typically needs substrate support; large overhangs should be bracketed
When in doubt, treat 12 inches as the point where you should plan for brackets or corbels, especially for heavy materials like quartz and granite.
Choose Overhang Based on How You’ll Use the Kitchen
Countertop overhang rules are most helpful when paired with how your space functions. Before you finalize measurements, decide which role your island or peninsula will play.
If Your Island Is Mainly for Prep
- Stick close to 1–1.5 inches on working sides.
- Add seating only where it won’t interrupt the prep triangle (sink, range, refrigerator).
- Consider a waterfall edge on one side for a clean, contemporary look—popular in current kitchen design trends—while keeping working edges practical.
If Your Island Is a Casual Dining Spot
- Aim for 15 inches seating overhang for comfort.
- Plan 24 inches of linear width per stool (30 inches is more comfortable for adults).
- Allow 9–12 inches between the top of the seat and underside of the counter.
If You Need Homework/Work-From-Home Seating
- Choose 15–18 inches of overhang if possible (with proper support).
- Add outlets and USB charging under the counter or at the end panel.
- Consider a durable, low-maintenance surface (quartz, porcelain slab) that resists stains and markers.
Material Matters: Overhang Rules by Countertop Type
Different countertop materials handle overhang stress differently. Your fabricator or installer should confirm safe spans, but these comparisons help you design responsibly and avoid expensive surprises.
Quartz (Engineered Stone)
- Best for: Busy households, low-maintenance kitchen renovations, consistent patterns
- Overhang guidance: Often needs support beyond ~10–12 inches at seating areas
- Maintenance: Mild soap and water; avoid harsh chemicals and high heat directly on the surface
- Trend angle: Matte finishes and subtle veining are popular for a modern, calm look
Granite
- Best for: Natural stone lovers, high heat tolerance, unique patterns
- Overhang guidance: Similar to quartz; support recommended for larger seating overhangs
- Maintenance: Periodic sealing depending on stone type; wipe spills quickly
Marble
- Best for: Timeless elegance, baking stations, statement islands
- Overhang guidance: Needs cautious support planning; marble can chip and etch more easily
- Maintenance: Seal regularly; avoid acidic spills (lemon, vinegar, wine)
Porcelain Slab / Sintered Stone
- Best for: Ultra-durable, heat-resistant surfaces; sleek contemporary kitchens
- Overhang guidance: Depends on thickness and backing; large overhangs typically require engineered support
- Maintenance: Very low; excellent stain and heat resistance
Butcher Block / Wood
- Best for: Warm, inviting kitchens; mixed-material islands; cozy design trends with timeless appeal
- Overhang guidance: Can be forgiving, but long overhangs still need brackets to prevent sagging over time
- Maintenance: Oil routinely; wipe water promptly; use trivets near heat
Laminate
- Best for: Budget-friendly remodels, rental upgrades, wide color options
- Overhang guidance: Typically requires strong substrate support; avoid long unsupported spans
- Maintenance: Easy cleaning, but protect from heat and sharp impacts
Support Options: Brackets, Corbels, and Hidden Steel
If you’re planning a seating overhang, choose a support method that matches your style and your countertop weight. A clean overhang looks best when the engineering is integrated early in the cabinet and electrical plans.
Common Support Approaches
- Hidden steel brackets: A popular choice for modern kitchens; offers strong support with minimal visual clutter.
- Decorative corbels: Works well in traditional, farmhouse, and transitional kitchen design; requires careful spacing so knees don’t hit them.
- Steel support frames: Ideal for long spans and thin countertops; often used for waterfall islands or dramatic cantilevers.
- End panels/legs: A furniture-style island approach that adds structure and can reduce the need for multiple brackets.
Placement Tips for Comfort and Strength
- Keep supports out of the prime knee zone when possible—especially for kids’ seating.
- For multiple stools, ensure bracket spacing doesn’t conflict with leg placement.
- If your counter is thin (or looks thin with a mitered edge), plan for a stronger support system.
Layout Rules: Clearance, Walkways, and Seating Spacing
Overhang isn’t just about the counter edge—it’s tied to overall kitchen layout and organization. These spacing guidelines help your kitchen feel open and function smoothly.
Recommended Clearances
- Work aisles (between island and counters): 42 inches is a common minimum; 48 inches is more comfortable for multi-cook kitchens.
- Space behind seated diners: Aim for 36 inches minimum; 44 inches is better if it’s a major walkway.
- Stool width per seat: 24 inches minimum; 30 inches for less crowding.
Standard Counter Heights (For Planning Overhang)
- Standard counter height: ~36 inches
- Bar height (less common in new renovations): ~42 inches
Current kitchen design trends lean toward single-level islands at standard height for better flow, better accessibility, and a more streamlined look.
Edge Profiles and Overhang: Safety and Style
Your edge detail impacts both comfort and how “thick” an overhang feels.
- Eased edge: Clean and modern; comfortable for daily use and easy to wipe.
- Rounded/bullnose: Softer look, kid-friendly; can visually increase perceived overhang depth.
- Ogee edge: Traditional and decorative; usually paired with thicker-looking counters.
- Waterfall edge: A statement feature; plan carefully so it doesn’t interfere with stool placement.
Budget and Cost Ranges to Plan For
Overhang decisions can affect costs through added material, fabrication complexity, and structural supports.
Typical Cost Factors
- More material: A deeper overhang increases square footage, especially on large islands.
- Added support: Brackets, corbels, or steel framing.
- Fabrication details: Waterfall edges, mitered edges, or specialty profiles.
Realistic Budget Ranges (U.S.)
- Support brackets: $50–$200 each (basic to heavy-duty concealed styles)
- Decorative corbels: $40–$250+ each (wood, resin, custom)
- Steel support frame (fabricated): $300–$1,500+ depending on size and engineering
- Installed countertop costs (broad ranges):
- Laminate: $25–$60 per sq. ft.
- Butcher block: $50–$150 per sq. ft.
- Granite: $50–$120 per sq. ft.
- Quartz: $60–$150 per sq. ft.
- Porcelain slab/sintered stone: $70–$200+ per sq. ft.
- Marble: $80–$250+ per sq. ft.
Budget-smart approach: If you want a dramatic overhang for seating, consider spending on hidden steel support and choosing a mid-range quartz. It often delivers the “custom” look with predictable maintenance and fewer long-term worries.
Common Mistakes to Avoid
- Choosing a deep seating overhang without support: Cracks and sagging are expensive repairs.
- Forgetting stool legroom: A 12-inch overhang can feel tight for adults—test with a chair and tape measure before finalizing.
- Placing corbels where knees need to go: Decorative supports shouldn’t make seating uncomfortable.
- Ignoring walkway clearance: Overhang plus stools can choke a kitchen aisle and disrupt traffic flow.
- Not coordinating with cabinet hardware and appliance doors: A slightly larger overhang can help protect cabinet faces, but it shouldn’t interfere with pulls, dishwasher loading, or corner access.
- Skipping maintenance planning: Marble and wood can be beautiful, but they require routine care; choose intentionally.
Practical Checklist: How to Choose Your Overhang
- Define the purpose: Prep-only, casual dining, entertaining, homework station, or all of the above.
- Pick the seating plan: Number of stools, spacing (24–30 inches each), and whether you want tucked-in storage-friendly stools.
- Select the material: Match durability and maintenance to your lifestyle (quartz for low-maintenance, wood for warmth, marble for statement style).
- Decide the overhang depth: 1–1.5 inches for standard counters; 12–15 inches for seating; 18 inches only with robust support.
- Engineer the support early: Brackets/corbels/frames should be coordinated with cabinets and electrical plans.
- Mock it up: Use painter’s tape and a temporary chair to test comfort, knee clearance, and traffic flow.
FAQ: Kitchen Countertop Overhang Rules
How much overhang do I need for kitchen island seating?
Plan for 12 inches minimum, with 15 inches being more comfortable for most adults. If you want 18 inches, expect to add strong brackets or a steel support frame, especially with heavy stone.
What is the standard countertop overhang on cabinets?
Most kitchen countertops extend 1 to 1.5 inches past base cabinets. This helps protect cabinet faces from spills and provides a finished edge.
Do quartz and granite need support for overhang?
Often, yes—especially for seating. Many installers recommend adding support once overhang reaches the 10–12 inch range, depending on slab thickness, edge build-up, and the layout. Confirm with your fabricator for your exact product.
Can I do a floating or cantilevered overhang for a modern look?
Yes. A “floating” island overhang is typically achieved with hidden steel brackets or an internal steel frame. This is a common contemporary kitchen design approach, but it should be engineered and installed professionally to prevent cracking.
How do I keep an overhang easy to clean and durable?
Choose an eased edge for simple wipe-downs, use stools with glides to prevent cabinet scuffs, and follow material-specific care: seal natural stone as recommended, oil butcher block regularly, and use trivets to prevent heat damage on quartz or laminate.
Next Steps: Plan Your Overhang Like a Designer
Start by measuring your kitchen layout and deciding exactly how you’ll use your island or peninsula—prep, seating, storage, or entertaining. Choose an overhang that supports that purpose (1–1.5 inches for standard runs, 12–15 inches for seating), then match it with the right material and structural support. A quick mock-up with tape and a chair can reveal comfort issues before they become expensive changes.
For more kitchen renovation guidance, smart kitchen organization ideas, and countertop inspiration, explore the latest at thedecormag.com.
More Articles
 Best Kitchen Baking Sheet Vertical Storage - The Decor Mag
 Small Kitchen Storage Hacks That Work (2026)
 Best Kitchen Dish Drying Rack Solutions - The Decor Mag
 Kitchen Pantry Organization: Pro Tips (2026)
 Personality in Kitchen Design: Ideas for 2026
 Kitchen Honed Finish Countertop Appeal - The Decor Mag
 Kitchen Two-Tone Cabinet Ideas - The Decor Mag
 Kitchen Textured Backsplash Tile Trends - The Decor Mag
 Baking Station Ideas for Kitchens (2026)
 Kitchen Plaster Walls Organic Feel - The Decor Mag