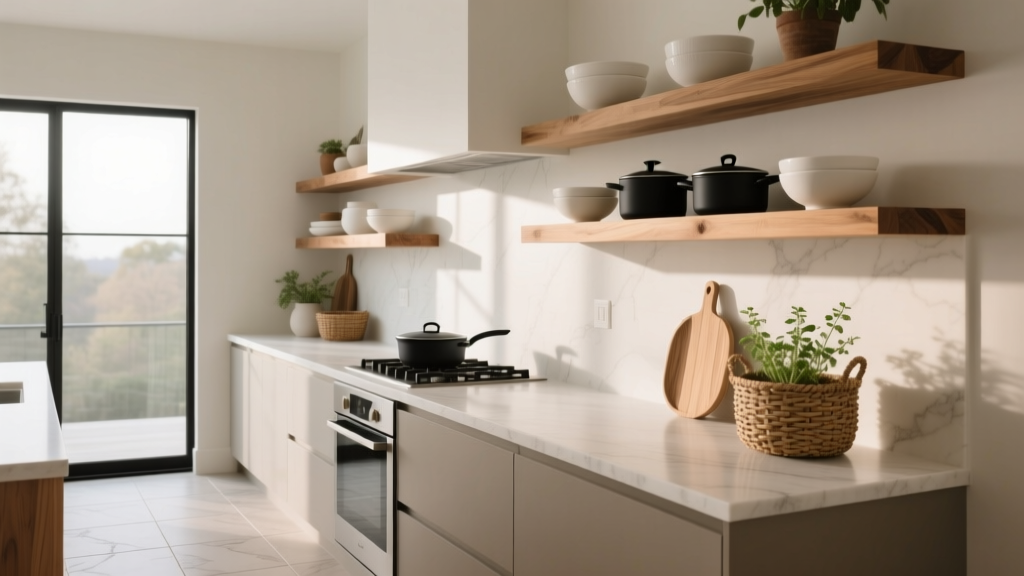
Open Shelving in Kitchens: Ideas & Tips (2026)
Open shelving has moved from “Pinterest trend” to a practical, design-forward option in modern kitchen renovation plans. Homeowners love it for the light, airy feeling it brings—especially in smaller kitchens or layouts where uppers can feel bulky. Designers appreciate it because it creates an opportunity to layer texture, highlight beautiful dishware, and make everyday essentials easier to reach.
That said, open shelves aren’t a one-size-fits-all solution. They can either elevate your kitchen design or make the space feel cluttered and high-maintenance. The difference comes down to planning: choosing the right materials, understanding what should (and shouldn’t) live on open shelves, and installing them at the right height and depth for real-life use.
This guide breaks down how to incorporate open shelving in a kitchen with specific measurements, layout strategies, material recommendations, cost ranges, and common mistakes to avoid—so your shelves look intentional, function well, and stay manageable long-term.
Why Open Shelving Works: Benefits for Design and Daily Life
Visual Benefits
- Makes kitchens feel larger: Removing bulky upper cabinets can open sightlines, which is especially helpful in galley kitchens and smaller footprints.
- Adds character: Wood grain, brackets, and curated objects introduce warmth and personality to streamlined kitchen cabinetry.
- Supports today’s kitchen design trends: Open shelves pair well with modern organic styles, Scandinavian minimalism, transitional kitchens, and mixed-material spaces.
Functional Benefits
- Everyday convenience: Frequently used items—plates, bowls, mugs, oils—can be within arm’s reach.
- Flexible storage: Shelves adjust easily over time compared to fixed cabinet interiors.
- Cost-friendly alternative (in some cases): Swapping a few upper cabinets for shelving can reduce cabinetry costs, depending on materials and labor.
Plan First: Where Open Shelving Makes the Most Sense
Successful open shelving starts with the right placement. The best layouts balance open storage with closed cabinetry so you have room for both display-worthy items and the less glamorous necessities.
Best Locations for Open Shelving
- On a focal wall: For example, around a range hood or centered over a beverage station.
- At the end of a cabinet run: Great for softening a hard stop in a galley kitchen or L-shaped layout.
- Above a coffee bar: Keep mugs, syrups, and canisters accessible without interrupting the main cooking zone.
- On a short wall where uppers feel crowded: Ideal in compact kitchens where standard wall cabinets would overwhelm the space.
Spots to Avoid (or Approach Carefully)
- Directly beside a high-output range: Grease and steam increase cleaning frequency. If you love the look, add a strong vent hood and choose easy-wipe finishes.
- Over a sink without a plan: Water splashes can spot wood and leave residue on dishware. Consider sealed materials and keep everyday dishes in a closed base cabinet instead.
- In homes that need maximum hidden storage: Busy families or avid cooks may prefer mostly closed kitchen organization with only a small open section.
Measurements That Make Open Shelving Feel Custom (Not Random)
These measurement guidelines help shelves look proportional and function comfortably for most homeowners. Always confirm with your installer and consider who uses the kitchen most often.
Open Shelf Depth
- 10–12 inches deep: The sweet spot for dinner plates, bowls, and canisters without feeling bulky.
- 8–10 inches deep: Best for spices, small glassware, and tight spaces.
- Avoid 14+ inches deep unless you’re storing larger items; deep shelves can look heavy and encourage clutter.
Height Above the Countertop
- 18 inches from countertop to the bottom of the first shelf is a reliable starting point (similar to standard upper cabinet clearance).
- 20–22 inches can feel more open and is helpful if you keep taller countertop appliances below.
Vertical Spacing Between Shelves
- 12–15 inches between shelves works for plates, bowls, and stacked mugs.
- 16–18 inches is better for tall pitchers, vases, or countertop-scale canisters.
Length and Support Rules
- 24–36 inches long: Easy to support and visually balanced.
- 36–60 inches long: Beautiful, but plan for stronger support and possible mid-span brackets.
- Bracket spacing: Typically every 24–32 inches, depending on shelf thickness and load.
Choose the Right Materials: Style, Durability, and Maintenance
Material choice affects how your open shelves age and how much upkeep they require. The best kitchen renovation outcomes come from matching the shelf material to your cooking habits and your overall kitchen design.
Wood Shelves (Warm, Versatile, Popular)
Best for: Transitional kitchens, modern organic style, farmhouse, Scandinavian, and timeless designs.
- White oak: Durable, on-trend, and hides wear well. Looks great with warm whites and greige cabinetry.
- Walnut: Rich and sophisticated; ideal for high-contrast kitchens. Costs more but reads “custom.”
- Maple: Smooth, consistent grain; good if you want a cleaner look.
Finish recommendation: Use a high-quality polyurethane or conversion varnish for kitchens. Oil-only finishes look natural but may require more frequent maintenance.
Metal Shelves (Sleek, Industrial, Easy to Wipe)
Best for: Contemporary kitchens, loft-style spaces, or homeowners who prioritize easy cleaning.
- Stainless steel: Extremely practical near cooking zones.
- Powder-coated steel: Offers color options (black, white, bronze) and resists scratches better than paint.
Tip: Pair metal shelves with warm elements (wood stools, textured backsplash tile) to keep the kitchen from feeling cold.
Stone or Porcelain Shelves (High-End, Statement-Making)
Best for: Luxury kitchens and homeowners who want continuity with countertops or backsplashes.
- Pros: Heat resistant, easy to wipe, visually striking.
- Cons: Heavier, higher install requirements, higher cost.
Glass Shelves (Light, But High Maintenance)
- Pros: Visually minimal; great in small kitchens where you want maximum openness.
- Cons: Shows dust, fingerprints, and clutter quickly; requires frequent cleaning.
Material Comparison at a Glance
- Most forgiving: White oak, matte or satin finishes
- Easiest to clean: Stainless steel, sealed stone/porcelain
- Most “custom” look: Thick walnut or oak, or stone shelves
- Most upkeep: Glass, unsealed wood, glossy finishes
Design Approaches That Look Intentional (Not Like You Ran Out of Cabinets)
1) Mix Open Shelving with Upper Cabinets
One of the most timeless kitchen design strategies is using open shelves in limited zones and keeping closed storage elsewhere. This keeps the kitchen organized while still achieving an airy, updated look.
- Use open shelves for daily dishes and display items.
- Keep pantry goods, plastics, and small appliances behind cabinet doors.
2) Frame Shelves Around a Feature (Range Hood or Window)
Open shelving looks more architectural when it’s anchored to a focal point.
- Install two shelves on each side of a range hood for symmetry.
- Use a matching backsplash behind shelves to make the area feel cohesive.
3) Create a Beverage or Breakfast Zone
Open shelving shines when it supports a routine. A coffee bar with shelves keeps mugs and supplies contained in one area, improving kitchen organization without affecting your primary prep zone.
- Top shelf: less-used glassware or serving pieces
- Lower shelf: mugs, tea, sweeteners, canisters
4) Use Open Shelving as a Transition Element
If your kitchen opens to a dining area or living space, a small section of open shelving can soften the transition and make the kitchen feel more like part of the home.
Product and Hardware Recommendations (What to Look For)
You don’t need one specific brand to get a great result, but you do need the right construction. When shopping or specifying shelves, focus on thickness, supports, and finishes that stand up to kitchen conditions.
- Shelf thickness:
- Solid wood: 1.25–2 inches looks substantial and resists warping better than thin boards.
- Engineered options: consider veneered plywood with edge banding for stability.
- Brackets:
- Choose steel brackets for strength (especially for shelves holding stacks of dishes).
- For a clean look, use hidden floating brackets rated for heavy loads.
- Finishes:
- Go with matte or satin for wood; it hides wear and fingerprints.
- Use powder-coated metal rather than painted metal when possible.
Cost Ranges and Budget Considerations
Open shelving can be budget-friendly, but costs vary widely based on materials, length, finishing, and installation complexity.
Typical Cost Ranges (Per Linear Foot)
- DIY pine or basic hardwood boards: $15–$60 per linear foot (material only)
- Mid-range hardwood (oak/maple) with brackets: $60–$150 per linear foot
- Custom walnut or thick hardwood + premium hardware: $150–$300+ per linear foot
- Stone/porcelain shelves: $200–$500+ per linear foot (often more with fabrication and structural support)
Installation Budget
- Basic install: $150–$400 for a small set (varies by region)
- Complex installs (tile backsplash, hidden supports, leveling multiple shelves): $400–$1,000+
Where to Spend vs. Save
- Spend on: brackets/supports, durable finish, and proper anchoring into studs or blocking.
- Save on: shelf length (shorter spans reduce hardware needs) and limiting open shelving to one feature area.
How to Style Open Shelves Without Creating Visual Clutter
The best-looking open shelves in kitchen design aren’t packed to the edge. They’re edited, consistent, and easy to maintain.
Use a Simple Styling Formula
- Start with function: Place daily-use plates and bowls on the most reachable shelf.
- Limit colors: Choose a tight palette (white ceramics, clear glass, warm wood accents).
- Add 1–2 textures: A small stack of linen napkins, a wood board, or a matte canister.
- Keep breathing room: Aim for 20–30% empty space on each shelf.
What Belongs on Open Shelves
- Everyday dishes (matching sets look calmer)
- Glassware and mugs
- Canisters for coffee/tea, flour/sugar (if used frequently)
- Cookbooks (a small stack, not a library)
- Neutral serving pieces
What to Keep Behind Closed Doors
- Plastic containers and mismatched lids
- Bulk pantry packaging
- Small appliances you don’t want to see daily
- Overly colorful or busy items that visually dominate the shelf
Maintenance and Cleaning: Keep Shelves Looking Sharp
Open shelving is only as enjoyable as it is maintainable. Build an easy routine so dust and grease never get ahead of you.
Weekly / Biweekly Quick Routine (5–10 Minutes)
- Wipe shelves with a microfiber cloth (dry first, then damp if needed).
- Spot-clean oily items (olive oil bottles, cooking spray) before they leave residue.
- Do a fast “reset”: return items to their designated zones.
Monthly Deep Clean
- Remove everything from one shelf at a time.
- Clean with a gentle solution:
- Wood: mild soap + water on a well-wrung cloth; dry immediately
- Metal/stone: non-abrasive cleaner; avoid harsh acids on natural stone
- Check brackets for loosening and tighten hardware as needed.
Grease Control Tips
- Invest in a strong range hood (proper CFM for your cooktop size and style).
- Prefer matte/satin finishes that disguise smudges.
- Avoid placing open shelves within 12–18 inches of an uncovered cooktop edge when possible.
Common Mistakes to Avoid
- Installing shelves too high: If everyday dishes are stored up top, you’ll need a stool constantly. Keep daily items within comfortable reach.
- Going too deep: Deep shelves collect clutter and visually protrude—especially in narrow kitchens.
- Underestimating weight: Stacks of plates are heavy. Use anchors rated for load and ideally fasten into studs or added blocking.
- Ignoring lighting: Dark shelves can look gloomy. Add under-shelf LED strips or directional ceiling lights for a polished look.
- Overstyling: Too many decor objects reduces function and looks messy quickly.
- Choosing porous or unsealed materials: Kitchens are hard on surfaces—seal wood and select wipeable finishes.
FAQ: Open Shelving in Kitchen Design
Are open shelves practical for a busy family kitchen?
Yes, when used in moderation. Keep open shelving for everyday items (plates, bowls, cups) and rely on closed cabinetry for everything else. A common approach is one open section (6–10 linear feet total) rather than replacing all uppers.
How many open shelves should I install?
Most kitchens look balanced with 1–2 shelves per section. Two shelves provide more storage, while one shelf can feel cleaner and more minimal—especially above a sink or coffee station.
Do open shelves make a kitchen look cluttered?
They can, but it’s preventable. Use matching dishware, limit the color palette, and leave intentional negative space. If you have lots of mismatched items, consider glass-front cabinets as a compromise.
What’s the best wood for kitchen open shelving?
White oak is a top choice for durability and modern warmth. Walnut looks high-end and dramatic. Whatever wood you choose, apply a kitchen-appropriate protective finish to resist moisture and stains.
Can I do open shelving instead of upper cabinets to save money?
Sometimes. Basic shelving materials may cost less than cabinetry, but custom hardwood, stone shelves, premium brackets, and professional installation can add up. Many homeowners save by replacing just one run of uppers with shelves while keeping the rest as cabinets.
How do I keep open shelves from sagging?
Use adequate thickness (often 1.25–2 inches for wood), strong brackets or floating supports rated for the load, and anchor into studs or solid blocking. Avoid extra-long spans without mid-support.
Next Steps: A Simple Plan to Get Open Shelving Right
If you’re ready to incorporate open shelving into your kitchen renovation or refresh, start with a small, high-impact zone rather than committing to an entire wall. Follow this practical checklist:
- Choose the location: coffee station, focal wall, or the end of a cabinet run.
- Measure for function: 10–12-inch depth, ~18 inches above countertops, 12–15 inches between shelves.
- Select durable materials: sealed hardwood, powder-coated steel, or wipeable stone.
- Plan what will live there: daily dishes and a few curated pieces—nothing you don’t want visible.
- Install with strength: proper anchors, stud attachment, and brackets rated for heavy loads.
- Set a maintenance rhythm: quick wipe-downs and a monthly reset keep everything looking intentional.
Open shelving can be the detail that makes a kitchen feel brighter, more personal, and easier to use—when it’s designed around real routines and timeless functionality. For more kitchen design ideas, renovation planning guides, and organization inspiration, explore the latest at thedecormag.com.
More Articles
 Best Kitchens for Functional Design: Layouts, Brands, and Ergonomic Principles That Work Every Day
 Kitchen That Inspires Cooking: Design Ideas (2026)
 Kitchen Leaded Glass Cabinet Doors - The Decor Mag
 Kitchen Slab Backsplash Seamless Look - The Decor Mag
 Best Essentials Inspiration: Building a Thoughtful, Functional, and Joyful Kitchen
 How To Clean Fluted: A Practical, Step-by-Step Guide for Stainless Steel, Copper, and Cast Iron Cookware
 Kitchen Integrated Appliance Paneling - The Decor Mag
 Kitchen Hardware and Pull Trends - The Decor Mag
 Best Kitchen Specialty Tool Organization - The Decor Mag
 Kitchen Soapstone Countertop Guide - The Decor Mag