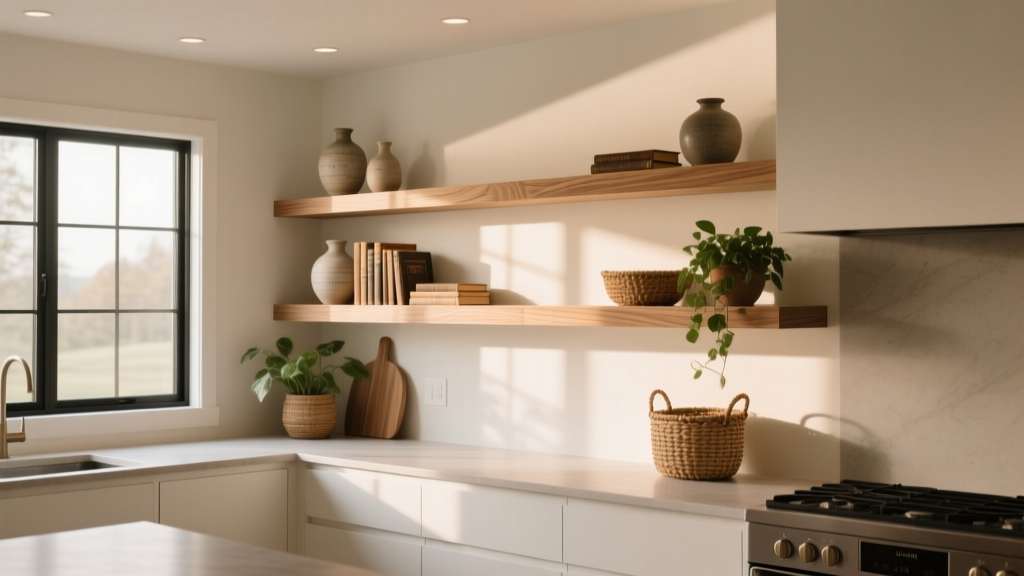
Open Shelf Kitchen Styling Tips - The Decor Mag
Open shelving has become a standout feature in modern kitchen design because it balances function and personality. For homeowners planning a kitchen renovation, open shelves can make a space feel lighter than upper cabinets, improve day-to-day access, and give you a chance to showcase beautiful everyday essentials. For anyone refreshing a kitchen without a full remodel, styling existing open shelves is one of the fastest ways to change the room’s mood—without moving plumbing or rewiring lighting.
That said, open shelf kitchen styling isn’t just about making things look pretty. A well-planned shelf layout supports workflow, keeps cooking tools within reach, and simplifies kitchen organization. Poorly planned shelves can quickly become dusty, cluttered, or impractical. The goal is a kitchen that looks curated but works hard—whether you’re cooking nightly dinners or hosting on weekends.
Below are practical, professional tips you can use to plan, style, and maintain open shelves with confidence, along with cost ranges, recommended measurements, material comparisons, and common mistakes to avoid.
Why Open Shelving Works (and When It Doesn’t)
Best scenarios for open shelves
- Smaller kitchens: Fewer visual blocks can make tight spaces feel larger.
- Homes with frequent use of dishes: Easy access to daily plates, bowls, and glassware.
- Minimalist or modern organic kitchens: Open shelves complement warm woods, soft neutrals, and natural textures—popular current kitchen design trends.
- Design-forward renovations: Great for highlighting backsplash tile, statement lighting, or a range hood.
When to consider alternatives
- High-grease cooking zones: Shelves near a powerful range can collect residue faster.
- Allergic or dust-sensitive households: More frequent cleaning may be required.
- Very busy lifestyles: If you prefer hiding visual noise, closed cabinetry may be a better fit.
Planning Your Open Shelf Layout: Measurements That Matter
Great styling starts with smart layout choices. Before buying brackets or ordering floating shelves, map how you’ll use them.
Recommended shelf dimensions
- Depth: 10–12 inches for dinner plates; 8–10 inches for spices, mugs, and smaller items. Avoid going deeper than 12 inches unless you have a clear access plan.
- Thickness: 1.5–2 inches looks substantial and resists warping (especially with wood). Sleek modern shelves can be thinner, but make sure hardware is rated for the load.
- Length: 24–48 inches is a practical range for minimizing sag. If you want longer runs, plan for additional supports.
Spacing between shelves
- 12–15 inches: General-purpose spacing for plates, bowls, and canisters.
- 15–18 inches: For taller items like pitchers, vases, and countertop appliances you want stored up high.
- 8–10 inches: For short stacks (dessert plates, shallow bowls) or a shelf dedicated to spices and oils.
Height from countertop
- 18–20 inches above countertop: A comfortable reach for most homeowners; aligns with many standard upper cabinet heights.
- 20–24 inches: Works when you need backsplash clearance for a statement tile or taller countertop items below.
Load and support basics
- Plan for at least 30–50 lbs per shelf if you’re storing dishes. Heavy stoneware stacks add up quickly.
- Use studs when possible. If not, use high-quality wall anchors rated for the load and wall type (drywall, plaster, tile).
- If shelves span more than 36 inches, add supports to reduce sag—especially with natural wood.
Material Choices: What Looks Good and Holds Up
Open shelves are both a design element and a work surface. Choose materials that match your renovation goals, cooking habits, and maintenance tolerance.
Wood shelves (white oak, walnut, maple, pine)
- Best for: Warm, timeless kitchens; modern organic and Scandinavian-inspired looks.
- Pros: Adds warmth; easy to customize; fits both contemporary and classic kitchen styles.
- Cons: Can warp if not sealed; shows grease if too close to the range.
- Maintenance: Seal with polyurethane or a hardwax oil; wipe regularly with a mild cleaner. Re-oil as needed.
Metal shelves (stainless steel, powder-coated steel)
- Best for: Industrial kitchens, modern kitchens, or households that cook heavily.
- Pros: Durable; easy to wipe down; less sensitive to heat and humidity.
- Cons: Can look harsh without warm accents; fingerprints may show on stainless.
- Maintenance: Use a non-abrasive cleaner; wipe in the grain for stainless steel.
Glass shelves
- Best for: Lighter visual footprint; smaller kitchens; displaying glassware.
- Pros: Reflects light; visually “disappears.”
- Cons: Smudges and dust are more visible; needs proper brackets and thickness for safety.
- Maintenance: Microfiber cloth and streak-free cleaner; keep weight light and evenly distributed.
Stone or engineered stone shelves
- Best for: Luxury kitchen renovations and dramatic minimalist designs.
- Pros: Premium look; very durable when properly supported.
- Cons: Heavy and typically higher cost; requires expert installation and strong wall support.
- Maintenance: Similar care to countertops; avoid harsh acidic cleaners if using natural stone.
Budget and Cost Ranges for Open Shelving
Open shelves can be budget-friendly or a high-end design feature. Costs depend on materials, hardware, length, and installation complexity.
- DIY basic wood shelves: $50–$200 per shelf (lumber + brackets + finish), depending on wood species and size.
- Mid-range floating shelves (prefab): $150–$400 per shelf, often with concealed mounting hardware.
- Custom hardwood shelves: $300–$800+ per shelf, especially for thicker slabs, premium species, or specialty stains.
- Professional installation: $200–$600+ depending on wall type, tile complexity, and number of shelves.
Where to spend vs. save
- Spend on: Proper hardware, professional installation over tile, and a durable finish if shelves sit near the cooktop.
- Save on: Styling items (use what you own), standard-depth shelves, and simple bracket systems for a timeless look.
Open Shelf Styling: A Practical Formula That Looks Curated
Open shelf kitchen styling works best when it’s rooted in everyday function. Start with what you use weekly, then layer in a few decorative pieces.
Step 1: Choose a tight color palette
Current kitchen design trends favor calm, cohesive palettes: warm whites, creamy neutrals, muted greens, and natural wood tones. A simple palette keeps shelves from looking chaotic.
- Anchor with white or off-white dishware for a clean, timeless base.
- Add contrast with one accent color (matte black, olive, terracotta, navy).
- Repeat metals already in your kitchen (brass, nickel, black) for cohesion.
Step 2: Mix heights and shapes (but keep quantities intentional)
- Stack plates and bowls to create low, stable shapes.
- Add 1–2 taller items per shelf (pitcher, vase, olive oil bottle) to break up the horizontal lines.
- Limit “tiny clutter.” Use trays or small bins for short items like spice jars to create visual blocks.
Step 3: Use the “everyday zones” approach
Assign each shelf a job based on kitchen workflow and organization needs.
- Closest to dishwasher: Plates and bowls for quick unloading.
- Near coffee station: Mugs, sugar bowl, tea canisters, small tray for spoons.
- Near prep zone: Mixing bowls, salt cellar, everyday oils in matching bottles.
- Higher shelves: Serving platters, seasonal pieces, or less-used glassware.
Step 4: Add texture for warmth
- Wood cutting boards (round and rectangular) leaned vertically against the backsplash.
- Woven baskets for napkins or snack storage (especially good for family kitchens).
- Linen tea towels folded in a neat stack for soft texture.
Step 5: Keep negative space
One of the most timeless functionality principles in open shelving is restraint. Aim to leave 20–30% of each shelf as open space so the display feels intentional and is easy to clean.
Product and Design Recommendations That Look High-End
Dishware choices that style themselves
- Matte stoneware: Modern and forgiving for daily use; hides minor scuffs better than glossy finishes.
- Rimmed white porcelain: Classic, light-reflective, and pairs with any backsplash tile.
- Glass canisters with airtight lids: Great for flour, sugar, pasta; choose matching sets for a clean look.
Hardware and bracket styles
- Minimal black brackets: Works with modern kitchens and adds subtle structure.
- Brass brackets: Warms up white kitchens and pairs well with brass faucets or cabinet pulls.
- Concealed floating hardware: Cleanest look, ideal for contemporary renovations; confirm load rating and stud placement.
Lighting that elevates open shelves
- Under-shelf LED strips: Excellent for task lighting and evening ambiance; choose warm white (2700K–3000K).
- Sconces above or beside shelves: Adds architectural interest and supports the “styled” look without clutter.
Maintenance and Cleaning: Keep Shelves Looking Fresh
Open shelves look best when they’re part of your regular kitchen rhythm. A little routine maintenance prevents the buildup that makes shelves feel “busy” or grimy.
Simple weekly routine (10 minutes)
- Quick dust with a microfiber cloth (start from top shelf down).
- Wipe shelf surface with a mild cleaner suited to the material.
- Rinse any oil bottles or syrup containers that feel tacky, then return to a tray.
Monthly reset (20–30 minutes)
- Remove everything from one shelf at a time.
- Wipe the wall area behind shelves (backsplash tile collects splatter too).
- Re-evaluate: donate duplicates, relocate rarely used items, and re-stack by frequency.
Placement tips to reduce grime
- Keep open shelves at least 18 inches away from direct cooktop heat when possible.
- Use a strong range hood (a worthwhile kitchen renovation upgrade) to reduce grease on nearby surfaces.
- Store oils and spices in sealed containers to cut down on residue and dust sticking.
Common Open Shelf Mistakes to Avoid
- Overloading shelves: Too many items make the kitchen feel cluttered and can exceed load limits. Keep heavy stacks low and centered.
- Ignoring daily workflow: If you’re styling for looks only, you’ll resent the setup. Put the most-used items at the easiest reach (roughly shoulder to waist height).
- Using too many small items: Tiny decor pieces read as clutter fast. Consolidate with trays, bins, or larger statement items.
- Unsealed wood near moisture: Steam from kettles and dishwashers can warp untreated wood. Choose a durable finish.
- Mismatch with the kitchen’s style: Ultra-rustic shelves can fight sleek cabinets, and vice versa. Tie shelves to your countertop, hardware, or flooring tones.
- Poor bracket placement: Shelves that aren’t level or properly anchored will sag and look sloppy. Measure carefully and use the right anchors for your wall type.
FAQ: Open Shelf Kitchen Styling and Renovation
Are open shelves practical for a family kitchen?
Yes, when you dedicate shelves to everyday items (kid-friendly bowls, cups, snack bins) and keep breakables higher. Use baskets or lidded containers to make organization easier and reduce visual clutter.
How do I prevent open shelves from looking messy?
Limit your palette, keep 20–30% negative space, and group items in sets (stacks of 4–8 plates, matching canisters, a tray for small jars). Avoid scattering lots of single objects.
What’s the best shelf depth for plates?
Plan for 10–12 inches of depth for standard dinner plates. If your plates are oversized (11–12 inches wide), lean toward 12 inches so they sit securely without overhang.
Do open shelves make a kitchen look cheaper?
They can if materials are flimsy, brackets are undersized, or styling feels random. Thicker shelves (around 1.5–2 inches), cohesive dishware, and quality hardware create a built-in, intentional look.
How many open shelves should I install?
For most kitchen renovations, one to two shelves per wall section is plenty. A good rule is to mix open shelves with closed storage so you have space to hide pantry items, plastics, and small appliances.
Can I put open shelves on tile backsplash?
Yes, but it’s usually best handled by a pro. Drilling into tile requires the right bits, careful layout, and correct anchors into studs or solid backing to prevent cracking and ensure safe load support.
Next Steps: Style Shelves That Support Real Life
Start by evaluating what you actually use each week—plates, bowls, mugs, and a few multipurpose serving pieces. Measure your wall space, choose a shelf depth that fits your dishware, and invest in secure hardware. Then style with a calm palette, practical zones, and just enough texture to make the kitchen feel personal.
If you’re planning a bigger kitchen renovation, consider open shelving as part of a balanced storage plan: a mix of closed cabinetry for bulk items and open shelves for the pieces that deserve to be seen and used.
For more kitchen design, renovation, and organization inspiration, explore our latest ideas and guides on thedecormag.com.
More Articles
 Best Kitchen Island Ideas for Every Size - The Decor Mag
 The Practical Kitchens Kitchen Design & Buying Guide: Space, Function, and Real-World Value
 Kitchen Island Seating Overhang: How Much? (2026)
 Kitchen Soapstone Countertop Guide - The Decor Mag
 Sustainable vs. Kitchen: Rethinking Design, Appliances, and Daily Habits for Real Environmental Impact
 Kitchen Plaster Range Hood Organic Look - The Decor Mag
 Kitchen Cabinet Interior Finish: Best Choices (2026)
 Kitchen Statement Ceiling Design Ideas - The Decor Mag
 Kitchen Layered Materials Design Guide - The Decor Mag
 Sleep FAQ Answered: Science-Backed Answers from a Kitchen Specialist and Culinary Consultant