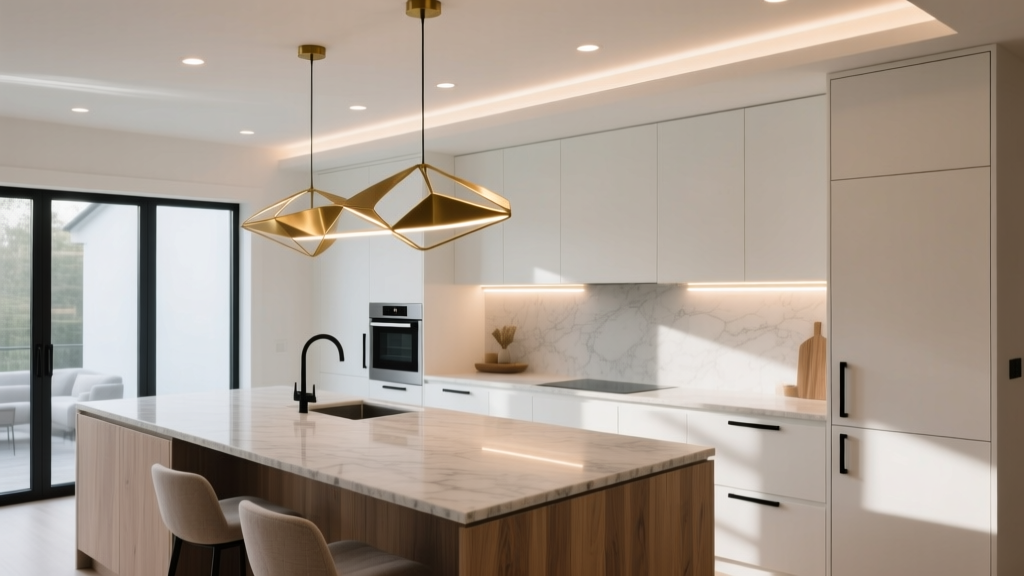
Best Kitchen Lighting for Function & Style (2026)
Your kitchen can have the most beautiful cabinets and the perfect countertop, yet still feel “off” if the lighting is wrong. Lighting is what makes a kitchen usable at 6 a.m., welcoming at dinner, and flattering when guests gather around the island. It also impacts how clean and organized the space feels—shadowy corners and harsh glare instantly make a kitchen seem cramped or chaotic.
For homeowners planning a kitchen renovation (or simply improving what you have), lighting is one of the highest-return upgrades. The right plan supports everyday tasks, highlights design details, and helps the kitchen adapt to different moments—meal prep, homework, entertaining, late-night snacking—without relying on one overly bright ceiling fixture.
This guide breaks down the best kitchen lighting for function and style, with practical measurements, product types, cost ranges, and the most common mistakes to avoid. Whether you’re working with a galley kitchen, an open-concept layout, or a spacious chef’s kitchen, a layered lighting plan will get you the best results.
Start With Layered Kitchen Lighting: Ambient, Task, and Accent
The most effective kitchen lighting plan uses three layers. Each plays a different role, and together they eliminate shadows, improve safety, and add visual depth.
1) Ambient Lighting (Overall Illumination)
Ambient lighting provides the general, comfortable level of brightness in the room. In kitchen design, ambient light typically comes from:
- Recessed ceiling lights (downlights)
- Flush-mount or semi-flush fixtures
- Large statement pendants (when properly spaced and dimmable)
- Indirect lighting such as cove lighting in a tray ceiling
2) Task Lighting (Work Zones)
Task lighting is the workhorse of functional kitchens. It focuses light exactly where you chop, mix, read recipes, or wash dishes. The best task lighting locations include:
- Under-cabinet lighting over countertops
- Pendants over an island or peninsula
- Dedicated lighting above the sink
- Range and cooktop lighting (quality hood lights matter)
3) Accent Lighting (Depth and Style)
Accent lighting elevates a kitchen from “bright” to “designed.” It adds dimension and highlights finishes, décor, and architectural details.
- In-cabinet lighting for glass-front cabinets
- Toe-kick lighting for a floating effect
- Above-cabinet uplighting (especially in taller kitchens)
- Picture lights or directional spots for artwork in open-concept kitchens
Kitchen Lighting Layout: Practical Measurements That Work
Great lighting is less about buying the most expensive fixtures and more about placing the right light in the right spot. Use these planning guidelines as a baseline, then adjust based on ceiling height, finishes, and natural light.
Recessed Lighting Spacing (Downlights)
- Spacing rule of thumb: Place recessed lights about 1/2 the ceiling height apart. For an 8-foot ceiling, that’s roughly 4 feet between fixtures.
- Distance from walls: Set lights about 24–36 inches from upper cabinets or walls to reduce scalloping shadows and to better wash vertical surfaces.
- Over counters: Avoid placing recessed lights directly behind where you stand at the counter; it can cast shadows onto your work surface. Position them slightly in front of the counter edge.
Pendants Over an Island or Peninsula
- Hang height: Bottom of pendant typically 30–36 inches above the countertop (use 36 inches if sightlines are a concern or ceilings are higher).
- Spacing between pendants: Aim for 24–30 inches between fixtures (measured from edge to edge), depending on size.
- How many pendants:
- Small islands (4–5 feet): often 2 pendants
- Medium islands (6–7 feet): 2–3 pendants
- Large islands (8+ feet): 3 pendants or a linear suspension
- Size guideline: Total pendant width should be about 1/2 to 2/3 of the island length for balanced scale.
Under-Cabinet Lighting Coverage
- Place light sources toward the front of the cabinet underside (not against the wall) to prevent shadows where you work.
- For best results, use continuous LED strips or closely spaced puck lights for even illumination.
Choosing the Right Light Quality: Color Temperature, CRI, and Dimming
When homeowners say a kitchen feels “harsh” or “dingy,” the issue is often light quality, not the fixture style. These specs make a bigger difference than most people expect.
Best Color Temperature for Kitchens
- 2700K–3000K: Warm white; inviting and flattering. Great for traditional, transitional, and cozy modern kitchens.
- 3000K–3500K: Neutral white; crisp without feeling clinical. A favorite for contemporary renovations and open-concept spaces.
- Avoid 4000K+ in most homes unless you prefer a very cool, commercial look.
CRI (Color Rendering Index)
CRI affects how accurate your countertops, backsplash tile, paint, and food look.
- Choose CRI 90+ for kitchens whenever possible.
- CRI 80 is acceptable for budget upgrades, but whites may appear flatter and wood tones less rich.
Dimmers: Non-Negotiable for Versatility
- Use dimmers on ambient and decorative fixtures to shift from prep mode to entertaining mode.
- Confirm dimmer compatibility with LEDs (and avoid flicker by choosing quality drivers and dimmers).
- Consider two to four lighting zones on separate switches: ambient, under-cabinet/task, island pendants, accent.
Best Kitchen Lighting Fixtures by Zone (With Design Recommendations)
Under-Cabinet Lighting: The Highest-Impact Upgrade
If you change one thing, change this. Under-cabinet lighting improves safety, reduces shadows, and makes countertops feel cleaner and more organized.
- Best option: LED strip lighting in an aluminum channel with a diffuser for smooth, dot-free light.
- Good option: LED puck lights (more budget-friendly, but can create bright spots).
- Wiring approach: Hardwired looks cleanest; plug-in can work for quick updates with cord management.
Material recommendations:
- Aluminum channels help manage heat and extend LED lifespan.
- Frosted diffusers reduce glare and create a premium look.
Budget range:
- DIY plug-in kits: $30–$150
- Mid-range hardwired strips and channels: $200–$600
- Custom, fully integrated systems (multiple zones, smart controls): $600–$1,500+
Recessed Lighting: Clean, Timeless, and Functional
Recessed lights provide excellent ambient coverage when properly spaced. They also suit popular kitchen design trends like minimalism, warm modern, and Scandinavian-inspired interiors.
- Choose adjustable gimbal trims if you want to highlight a feature wall, open shelving, or a statement hood.
- Pick a regressed light source (deep-set) to reduce glare, especially in kitchens with glossy cabinets or polished stone.
- Match trim color (white trims for white ceilings; black for dramatic, modern contrast).
Budget range:
- Basic LED recessed fixtures: $15–$50 each
- Higher-quality, glare-controlled or adjustable fixtures: $60–$150 each
- Installation (varies by access and wiring): often $100–$250 per light
Pendants and Statement Fixtures: Style With a Purpose
Pendants are the jewelry of the kitchen, but they must still perform. For an island used for prep, choose fixtures that direct light downward and reduce glare at eye level.
Trending (and lasting) pendant materials:
- Opal glass: Soft, even glow; timeless and easy to coordinate.
- Ribbed or fluted glass: Adds texture and a vintage-modern feel; hides bulbs slightly better.
- Metal shades (brass, bronze, matte black): Strong task lighting; great for modern kitchens.
- Natural woven shades: Warm and relaxed, ideal for coastal or organic modern styles (best with an internal diffuser to prevent visual clutter).
Budget range (each):
- Budget pendants: $40–$150
- Mid-range designer looks: $150–$500
- High-end statement pieces: $600–$2,000+
Sink and Range Lighting: Don’t Let These Zones Be an Afterthought
- Over-sink: A small pendant, mini chandelier, or recessed light centered over the basin improves visibility and adds charm.
- Over range: Prioritize a quality hood with bright, wide-coverage lights. Warm-dim LEDs can keep the cooking area from feeling stark.
Tip: If your sink sits in front of a window, add a dedicated fixture anyway—nighttime dishwashing needs direct light.
Toe-Kick and In-Cabinet Lighting: High-End Look, Everyday Ease
- Toe-kick lighting: Great for night navigation and a modern “floating cabinet” effect. Use a motion sensor for convenience.
- In-cabinet lighting: Ideal for glass-front uppers, coffee stations, or pantry cabinets. It also supports kitchen organization by making zones easier to see.
Budget range:
- Battery puck lights (temporary solution): $20–$80
- Hardwired LED strips for toe-kicks/cabinets: $200–$1,200+ depending on scope
Budget Planning: Where to Spend and Where to Save
A smart kitchen renovation budget puts money where it improves daily life the most.
- Spend on:
- Under-cabinet task lighting (biggest functional upgrade)
- High-CRI LEDs for accurate color and a premium feel
- Dimmers and proper switching (usability every day)
- Save on:
- Decorative fixtures that can be swapped later (pendants are easy to upgrade)
- Basic recessed housings if you choose good trims and bulbs/drivers
Typical project ranges:
- Quick refresh: $150–$800 (plug-in under-cabinet + new pendants)
- Moderate upgrade: $1,000–$3,500 (hardwired under-cabinet, new recessed layout, dimmers)
- Full kitchen remodel lighting: $3,500–$12,000+ (new wiring, multiple zones, statement fixtures, accent lighting, smart controls)
Common Kitchen Lighting Mistakes to Avoid
- Relying on one ceiling fixture. It creates shadows on counters and makes the room feel flat.
- Installing recessed lights in the wrong spot. Lights behind your standing position cast shadows right where you chop and prep.
- Choosing the wrong bulb color. Mixing 2700K and 4000K in one kitchen looks disjointed and can clash with cabinet finishes.
- Ignoring glare. Clear glass pendants and exposed bulbs can be uncomfortable at eye level—especially over islands.
- Skipping dimmers. A kitchen needs multiple moods; dimmers make your space feel more expensive instantly.
- Over-lighting with too many bright fixtures. More lights aren’t better if the plan lacks zones and control.
Maintenance and Longevity: Keep Your Kitchen Lighting Looking New
- Clean regularly: Grease and dust reduce light output. Wipe fixtures monthly with a microfiber cloth; use a gentle degreaser near the range.
- Protect finishes: Avoid abrasive cleaners on brass, matte black, or powder-coated metals to prevent dulling.
- Choose sealed or easy-clean options: In busy kitchens, look for fixtures with smooth surfaces or enclosed shades.
- Plan for replacement access: Make sure drivers/transformers for LED strips are reachable (inside an upper cabinet is common).
FAQ: Kitchen Lighting for Renovation and Upgrades
What is the best color temperature for kitchen lighting?
Most homeowners prefer 3000K for a balanced, clean look. Choose 2700K for warmer, cozier kitchens, and 3500K if you want a brighter, more modern feel without going too cool.
How many recessed lights does a kitchen need?
It depends on layout, ceiling height, and natural light. A practical starting point is spacing recessed lights about 4 feet apart on an 8-foot ceiling, then adding dedicated task lighting for counters, sink, and island.
Are pendant lights enough for an island?
Pendants help, but they’re rarely enough on their own. Pair pendants with under-cabinet lighting and/or well-placed recessed lights so the entire kitchen remains functional when pendants are dimmed for ambiance.
What’s better: under-cabinet puck lights or LED strip lights?
LED strips usually look more seamless and provide more even countertop coverage, especially when installed in a channel with a diffuser. Puck lights can work on a tighter budget but may create hot spots and shadows between fixtures.
Should all kitchen lights match?
They should coordinate, not necessarily match. Mixing finishes (like matte black pendants with warm brass cabinet pulls) can look intentional when repeated elsewhere. The key is keeping a consistent style direction and the same bulb color temperature throughout.
Next Steps: Build a Lighting Plan That Works Every Day
Start by mapping your kitchen into zones—sink, prep counters, cooktop, island, pantry—then choose lighting that supports each task. Add dimmers and keep your color temperature consistent for a polished result. If you’re renovating, plan wiring early so under-cabinet lighting, island pendants, and accent features are easy to integrate without costly changes later.
For more kitchen renovation ideas, organization upgrades, and timeless design guidance, explore the latest inspiration on thedecormag.com.
More Articles
 How to Choose Kitchen Cabinet Glass Type - The Decor Mag
 Minimalist Alternatives to Essential Kitchen Tools: Smart Substitutions That Reduce Clutter Without Compromising Performance
 Best Kitchen Tupperware Organization - The Decor Mag
 Best Kitchen Pot Lid Organization - The Decor Mag
 Open Concept Kitchen Renovation: Pre-Demolition Guide
 How to Choose Kitchen Countertop Thickness - The Decor Mag
 How to Design a Kitchen Work Triangle - The Decor Mag
 How To Clean Fluted: A Practical, Step-by-Step Guide for Stainless Steel, Copper, and Cast Iron Cookware
 Kitchen Terrazzo Countertop Trends - The Decor Mag
 Kitchen Textured Backsplash Tile Trends - The Decor Mag