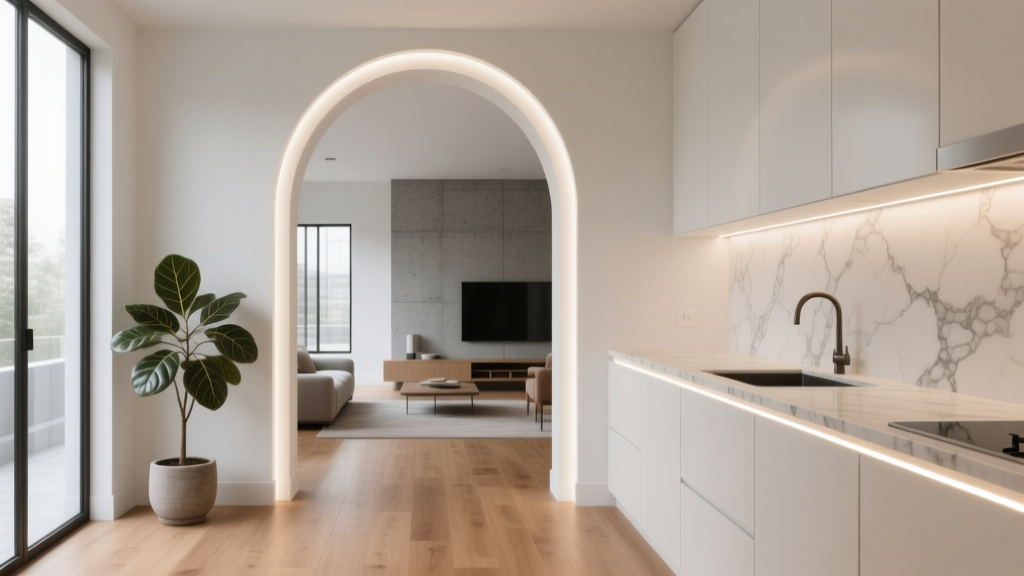
Kitchen Arched Doorway to Kitchen Design - The Decor Mag
An arched doorway does more than soften the lines of a home—it changes how a kitchen feels and functions. In renovation planning, doorways are often treated as fixed constraints. Yet an arched opening can become a strategic design tool: improving sightlines, guiding traffic flow, boosting natural light, and giving your kitchen a signature architectural moment that still works with everyday needs.
As current kitchen design trends shift toward warmer minimalism, organic shapes, and “quiet luxury,” arched doorways are showing up in everything from Mediterranean-inspired remodels to modern transitional homes. The best part: you don’t need a full historic restoration to make an arch feel authentic. With the right proportions, materials, and trim details, an arched doorway can look timeless—and it can solve common layout problems like tight entries, awkward corners, or a kitchen that feels boxed in.
This guide walks through design options, measurements, material choices, costs, and common mistakes so you can plan a kitchen arched doorway that looks intentional and supports daily cooking, storage, and organization.
Why an Arched Doorway Works So Well in Kitchen Design
Kitchens are busy zones. A straight, narrow doorway can create bottlenecks and sharp transitions between rooms. Arches soften that boundary and help connect spaces, especially in open-concept or semi-open layouts.
Benefits homeowners notice right away
- Smoother circulation: Curves visually widen an opening, helping the kitchen feel less cramped.
- Better sightlines: An arched opening frames views to dining or living spaces without a harsh, boxy cutout.
- More light bounce: Bright rooms beyond the kitchen “borrow” light through a larger, more inviting portal.
- Architectural character: Adds depth and a custom feel even in a straightforward kitchen renovation.
- Style flexibility: Works with modern, traditional, farmhouse, Spanish revival, and transitional kitchens.
Planning the Right Size: Measurements That Feel Comfortable
The best arch is the one you don’t bump into—and that doesn’t look undersized next to cabinetry. Before choosing a shape, confirm what the structure can support with a contractor or structural engineer (especially if you’re widening the opening).
Recommended doorway dimensions
- Minimum clear width: 32 inches (tight); 36 inches is the most comfortable for everyday traffic and carrying trays.
- Ideal width for two-way flow: 42–48 inches if the arch is a major passage between kitchen and dining room.
- Standard height: 80 inches is common, but arches often look better with a taller spring line (where the curve begins).
- Ceiling height guidance:
- 8-foot ceilings: aim for a spring line around 78–84 inches for a subtle curve.
- 9-foot ceilings: 84–96 inches helps the arch feel proportional and upscale.
- 10-foot+ ceilings: consider a taller, narrower arch or a more dramatic radius to avoid a “stretched” look.
Clearance rules that prevent layout headaches
- Keep 36 inches clear from the doorway edge to the nearest island overhang or peninsula corner.
- Maintain 42–48 inches between island and perimeter counters for multi-cook kitchens or heavy traffic.
- Avoid placing appliance doors (dishwasher, oven) where they swing into the main doorway path.
Choosing the Arch Shape: Which Style Fits Your Kitchen?
Not all arches read the same. The curve you choose should align with your home’s architecture and the kitchen cabinet style you’re using (Shaker, slab, inset, etc.).
Popular arched doorway styles
- Roman (semi-circular) arch: A classic half-circle; best for traditional homes and taller ceilings. Can look heavy if too small.
- Segmental arch: A gentle curve (less than a half-circle). Great for modern transitional kitchens and tighter ceiling heights.
- Tudor/pointed arch: More dramatic; works in storybook, Gothic, or European-inspired homes, but can feel theme-like if overused.
- Elliptical arch: Elongated curve; elegant and subtle in open layouts where you want softness without a “statement arch.”
Quick style pairing guide
- Modern kitchen design: segmental or elliptical arch, minimal trim, smooth drywall finish.
- Farmhouse kitchen: segmental arch with simple casing, paired with warm white paint and wood accents.
- Mediterranean/Spanish revival: deeper arch, plaster texture, warm neutrals, arched niches echoed elsewhere.
- Traditional: Roman arch with detailed casing or subtle millwork, often paired with inset cabinetry.
Materials and Finishes: Drywall, Plaster, Wood, Stone, and Tile
Material choice determines whether the arch reads crisp and modern or soft and old-world. It also affects maintenance—important in a kitchen renovation where grease, fingerprints, and scuffs are daily realities.
Material comparison (look, cost, and upkeep)
- Drywall (most common):
- Best for: clean, modern arches; budget-friendly remodels.
- Cost: typically $300–$1,200 for a non-structural arch; more if widening or adding framing.
- Maintenance: use scrubbable paint (eggshell or satin). Touch-ups are easy.
- Veneer plaster / limewash look:
- Best for: warm minimalism, organic modern, Mediterranean-inspired kitchens.
- Cost: $800–$3,000 depending on artisan finish and prep.
- Maintenance: can stain if unsealed; ask about a kitchen-safe sealer and cleaning method.
- Wood casing or millwork:
- Best for: traditional and transitional kitchens; ties into cabinetry.
- Cost: $600–$2,500 depending on profile complexity and paint/stain.
- Maintenance: durable; repainting is straightforward if you choose a trim enamel.
- Stone or brick surround:
- Best for: rustic, European country, or statement renovations.
- Cost: $2,500–$10,000+ depending on material and labor.
- Maintenance: sealing is key; plan for periodic resealing (often every 1–3 years).
- Tile-wrapped arch:
- Best for: bold, design-forward kitchens; pairs well with zellige or handmade tiles.
- Cost: $1,500–$6,000+ depending on tile selection and edge detailing.
- Maintenance: grout requires cleaning; choose stain-resistant grout and consider a grout sealer.
Product and finish recommendations that hold up in kitchens
- Paint: choose a washable interior paint in satin/eggshell for walls; use trim enamel (semi-gloss or satin) for casing.
- Corner durability: use a high-quality flexible corner bead designed for curves to reduce cracking.
- Scuff-prone areas: consider a slightly darker “shadow” tone or a durable finish if kids/pets frequently pass through.
Layout Ideas: Where an Arched Opening Makes the Biggest Impact
Arches are most effective when they improve how you move through the kitchen. The goal is not just visual charm—it’s better kitchen organization and usable space.
1) Entry from dining room: a classic upgrade
If your kitchen connects to a dining room through a standard door, converting it to an arched opening can make hosting easier and reduce doorway congestion. Consider widening to 42 inches if you often carry platters or use a bar cart.
2) Kitchen-to-pantry arch: turning storage into a design feature
An arched pantry doorway is a trend that also supports functionality. It draws attention to organization (in a good way) and can make a walk-in pantry feel like an intentional “room.”
- Tip: add interior pantry lighting on a motion sensor and use consistent containers to keep the view tidy.
- Door option: if you want concealment, consider an arched door slab or a soft-close pocket door system.
3) Arched pass-through (instead of fully open concept)
If you want separation between kitchen and living room without closing things off, a large arched pass-through can provide the best of both worlds.
- Practical add-on: include a 10–12 inch deep ledge for serving and decor, or a full counter-height opening if it works with your cabinetry layout.
4) Multiple arches: use restraint
Repeating arches can be beautiful, but only when the home architecture supports it. In most standard renovations, one strong arch (plus subtle curved echoes like arched cabinet glass, niches, or a rounded island corner) looks more elevated than three competing arches.
Budget and Cost Ranges: What to Expect
Costs vary based on whether you’re adding an arch to an existing doorway, widening a load-bearing wall, or using specialty finishes. Use these ranges as planning guidelines for a kitchen remodel budget.
- Cosmetic arch conversion (non-load-bearing, same opening size): $300–$1,200
- Widening an opening (non-load-bearing): $800–$2,500
- Load-bearing wall modification with structural beam: $3,000–$12,000+ (depends on span, permits, engineering)
- Premium finishes (plaster/stone/tile surround): add $800–$10,000+ depending on material and labor
- Permits/engineering (when required): $300–$2,000+
Budget-smart ways to get the look
- Choose a segmental arch for easier framing and drywall work.
- Use paint and lighting to emphasize the curve rather than expensive surround materials.
- If you’re already removing a wall, bundle the arch framing into that scope for labor efficiency.
Maintenance and Longevity: Keeping the Arch Looking Crisp
Kitchens produce moisture, grease, and constant contact—especially at passage points.
- Use durable paint: satin or scrub-friendly matte for the arch surface helps resist marks.
- Clean gently: microfiber cloth with mild soap; avoid abrasive sponges on plaster finishes.
- Watch for hairline cracks: minor cracking can happen where new work meets old drywall. Ask for proper taping and a short “settling” period before final touch-up.
- Protect corners: if the arch leads into a high-traffic zone, consider subtle casing or a tougher finish to prevent dings.
Common Mistakes to Avoid
- Choosing an arch that fights the home’s architecture: A dramatic Roman arch in a very modern boxy condo can feel forced unless the rest of the design supports it.
- Making the opening too narrow: A 28–30 inch clear width can feel claustrophobic and impractical during cooking or entertaining.
- Ignoring traffic flow: Don’t place an island corner or barstool seating where it pinches the doorway path.
- Over-trimming the curve: Heavy, ornate casing can make an arch look smaller and dated. Match trim weight to your cabinet style and ceiling height.
- Poor curve geometry: A lumpy or inconsistent curve reads as “DIY gone wrong.” Use templates or a skilled finisher.
- Skipping structural advice: If you’re altering a load-bearing wall, get engineering guidance and permits as required—this is not a guess-and-check phase of a kitchen renovation.
Design Tips to Make an Arched Doorway Feel Intentional
- Echo the curve once or twice: arched cabinet glass, a rounded hood detail, a curved open shelf bracket, or a radius island corner.
- Use lighting to highlight the opening: a ceiling downlight near the arch or a picture light in the next room can create a subtle “frame.”
- Mind the transitions: match flooring heights carefully at the threshold to avoid awkward steps or thick reducers.
- Keep sightlines tidy: if the arch opens to a pantry or mudroom, plan closed storage so the view stays clean.
FAQ: Kitchen Arched Doorways
Does an arched doorway make a kitchen look bigger?
Often, yes. Arches visually soften boundaries and can make the opening feel wider, especially compared to a narrow, squared doorway. Pair it with good lighting and a clear 36–42 inch opening for the best effect.
Can I add an arch to a load-bearing wall opening?
You can, but it typically requires structural planning. Load-bearing changes may need a beam, engineering calculations, and permits. The arch shape is usually decorative around a properly supported opening.
What’s the most budget-friendly way to get the arched look?
A drywall segmental arch over an existing non-load-bearing doorway is usually the most cost-effective approach. Keep the same opening width and focus on a clean finish and durable paint.
Are arched doorways still in style for kitchen renovations?
Yes—arched openings align with current trends like organic modern, warm minimalism, and Mediterranean-inspired design. They also have a timeless history, which helps them age better than many short-lived kitchen trends.
Should I add a door or keep it open?
Open arches improve flow and light. Add a door if you need odor control (heavy frying), noise reduction, or visual concealment for a pantry. Pocket or swing doors can work, but confirm clearance so door swings don’t conflict with appliances.
What finish is easiest to maintain in a high-traffic kitchen entry?
Smooth drywall with satin washable paint is typically the easiest. If you love plaster, ask for a sealed finish suitable for kitchens and follow the recommended cleaning method.
Next Steps: How to Move from Idea to Plan
Start by measuring your current opening (clear width and height), then map the traffic path from the kitchen entry to the sink, fridge, and range. If widening is on your wish list, confirm whether the wall is load-bearing before finalizing your kitchen layout. From there, choose an arch style that fits your home’s architecture, select a finish that matches your maintenance comfort level, and coordinate trim details with your cabinetry and hardware.
For more kitchen renovation ideas, layout guidance, and kitchen organization upgrades, explore the latest inspiration and expert tips on thedecormag.com.
More Articles
 Kitchen Soapstone Countertop Guide - The Decor Mag
 Farmhouse Kitchen Decor Inspiration - The Decor Mag
 Kitchen Wood Beams Ceiling Design - The Decor Mag
 Personality in Kitchen Design: Ideas for 2026
 Kitchen Statement Stone Slab Island - The Decor Mag
 10 Sustainable Kitchen Swaps for 2026
 Best Kitchen Cleaning Supply Storage - The Decor Mag
 Kitchen Leaded Glass Cabinet Doors - The Decor Mag
 How to Design a Kitchen for Multiple Cooks - The Decor Mag
 Kitchen Brass Hardware Renaissance - The Decor Mag