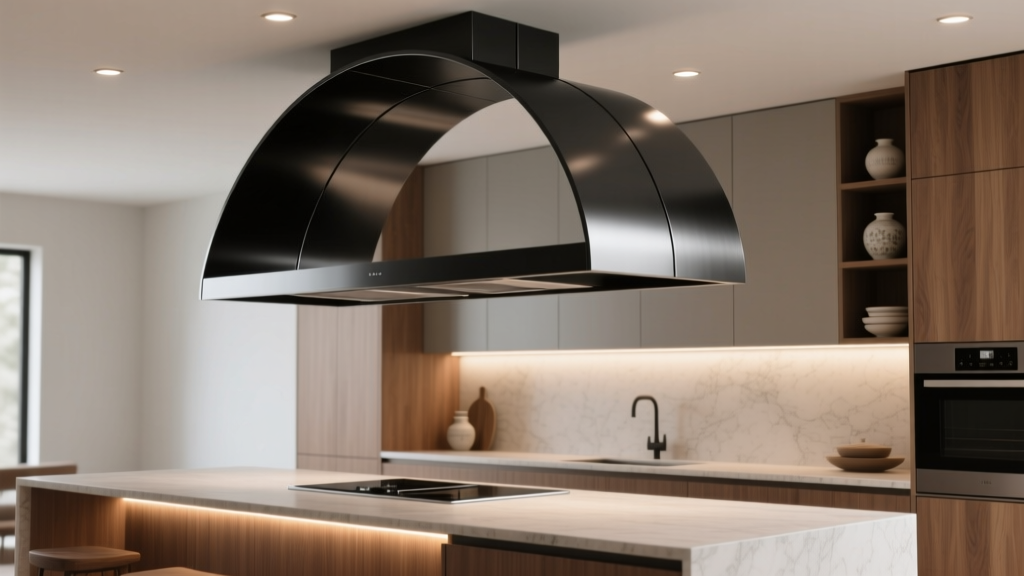
Kitchen Arched Range Hood Design Ideas - The Decor Mag
An arched range hood can be the detail that turns a standard kitchen renovation into a finished, custom-looking space. The curved silhouette softens hard lines from cabinets and countertops, creates a natural focal point, and—when planned correctly—still delivers the ventilation performance a busy home kitchen needs. Whether you’re remodeling a small galley kitchen or building a large open-concept space, an arched hood helps bridge classic style and current kitchen design trends.
Homeowners are also choosing statement range hoods more than ever because kitchens are increasingly visible from living and dining areas. A well-proportioned arch brings architectural character without the heaviness of some boxy hood designs. The best results come from matching the hood’s form to your layout, cooking habits, and materials—then making sure the specs (size, CFM, ducting) support real-world functionality.
Why Arched Range Hoods Work in Modern Kitchen Design
Arched range hoods blend timeless curves with clean-lined cabinetry, making them a strong fit for transitional kitchens, modern farmhouse updates, and even minimalist spaces when the materials are kept simple.
- Visual balance: The arch breaks up long cabinet runs and draws the eye upward, especially in kitchens with 8–10 ft ceilings.
- Softens geometry: Curves complement hard surfaces like quartz, porcelain slab backsplashes, and flat-panel doors.
- Design flexibility: An arch can be rustic (plaster), refined (stone), sleek (metal), or warm (wood).
- Value signal: Custom-style hoods read as “built-in” and high-end, boosting perceived quality in a renovation.
Getting the Basics Right: Sizing, Clearance, and Ventilation
Range Hood Width: The Key Measurement
For both performance and looks, your hood should be as wide as the cooktop or range, and often a bit wider.
- Minimum: Hood width = cooktop width (e.g., 30" range → 30" hood)
- Recommended for better capture: 3" wider on each side when possible (e.g., 30" range → 36" hood)
- Common sizes: 30", 36", 42", 48"
Mounting Height Above the Cooktop
Most manufacturers specify a range, but these guidelines work well for planning:
- Electric/induction: 24"–30" above the cooking surface
- Gas: 27"–36" above the cooking surface (often 30" is a sweet spot)
Higher mounting looks lighter and more architectural, but capture performance can drop. If you want a taller, more dramatic arch, consider increasing hood depth and/or CFM to compensate.
Ventilation Power (CFM) and Ducting
For a practical kitchen renovation, performance matters as much as style. Typical recommendations:
- 30" range: 300–600 CFM
- 36" range: 600–900 CFM (especially for gas or frequent high-heat cooking)
- 48" range or heavy cooking: 900–1,200+ CFM
Tip: If your hood is recirculating (ductless), choose a model with high-quality charcoal filters and plan on replacing them regularly. For most homeowners, vented-to-outside is the best long-term solution for odor and moisture control.
Makeup air: Many areas require a makeup air system when hood power exceeds 400 CFM. Confirm local code early—this can affect both cost and design.
Arched Range Hood Styles That Fit Today’s Kitchens
1) Plaster or Venetian Plaster Arches (Organic and Custom)
Plaster hoods are a major kitchen design trend because they feel architectural and softly textured—ideal with warm whites, creamy paint colors, and natural stone backsplashes.
Best for: Mediterranean, modern organic, transitional, modern farmhouse
Design approach:
- Keep the arch broad and simple for a clean look.
- Pair with a full-height slab backsplash for a seamless focal wall.
- Choose a durable, wipeable finish (sealed plaster or limewash-style finishes designed for kitchens).
Cost range: $2,500–$8,000+ (framing + insert + plaster finish; custom work can exceed this)
Maintenance: Use a mild, non-abrasive cleaner; re-seal as recommended by the finisher, especially near the cookline.
2) Wood-Clad Arched Hoods (Warm and Timeless)
Wood brings warmth and contrast, especially in kitchens with painted cabinets. This is a classic strategy in kitchen decor: one standout natural element to prevent the space from feeling flat.
Best for: modern farmhouse, rustic modern, Scandinavian-inspired, traditional
Recommended woods/finishes:
- White oak: pairs with quartz and brass; looks current
- Walnut: richer, more mid-century leaning
- Painted wood: if you want the arch shape without a contrasting material
Practical tip: Choose a finish rated for kitchen moisture and grease. A matte look is popular, but it should still be cleanable.
Cost range: $1,800–$6,500 (depending on custom millwork and insert)
Maintenance: Wipe frequently with a gentle degreaser; avoid soaking seams; touch up finish if edges dull over time.
3) Metal Arched Hoods (Statement-Making and Easy to Clean)
Metal hoods—stainless steel, blackened steel, zinc, brass accents, or powder-coated finishes—offer a crisp, durable focal point. They also complement trending elements like mixed metals and industrial-modern lighting.
Best for: contemporary, industrial, transitional, professional-style kitchens
Material comparison:
- Stainless steel: durable, widely available, easiest to match with appliances
- Powder-coated steel: matte black/white looks; hides fingerprints better than stainless
- Zinc: develops patina; soft, old-world feel
- Brass/copper: bold focal point; expect patina and higher cost
Cost range: $900–$5,000+ (prefab stainless to custom artisan metalwork)
Maintenance: Use stainless cleaner with the grain; for patina metals, follow maker guidance and avoid harsh acids.
4) Stone or Porcelain-Slab Wrapped Arches (High-End and Seamless)
Wrapping a hood in the same stone as your backsplash or countertops creates a clean, integrated look. Porcelain slabs are increasingly popular because they’re lighter than many stones, highly stain-resistant, and available in dramatic veining.
Best for: luxury modern, transitional, minimalist kitchens
Practical notes:
- Ensure the framing can support the weight (especially with natural stone).
- Plan seams where they’re least visible—inside returns or along natural veining.
- Use a heat-resistant substrate and adhesives rated for hood surrounds.
Cost range: $3,500–$12,000+ (slab material + fabrication + installation + insert)
Maintenance: Porcelain is easy-care; natural stone may require sealing and stain awareness near cooking oils.
Layout Ideas: Where an Arched Hood Looks Best
Centered Over a Range Wall (The Classic Focal Point)
This is the most common and often most effective layout: the hood anchors the cooking zone, with symmetry from cabinets or open shelves.
- Use the arch to frame a full-height backsplash.
- Keep upper cabinets minimal or skip them to let the arch shine.
- Consider 12"–15" hood depth for better capture, especially on gas ranges.
Over a Kitchen Island (Open-Concept Drama)
An island hood is visible from many angles, so proportions matter even more.
- Choose a hood that’s not too bulky—arched metal or slim wood designs often work well.
- Increase capture: island installations benefit from higher CFM and sometimes a slightly larger hood.
- Plan lighting: add recessed lights or pendants that don’t compete with the arch.
Between Tall Cabinets (Built-In Custom Look)
Framing the arch between tall pantry cabinets creates a “furniture wall” effect—great for kitchen organization and storage.
- Match the hood width to the cabinet bay for clean lines.
- Use shallow spice pull-outs or tray storage near the range for function.
- Maintain clearances so doors and hardware don’t interfere with hood edges.
Product and Design Approach Recommendations
Pick the Right Hood Insert (The Hidden Workhorse)
Many arched hoods use a liner/insert concealed inside a custom shell. When shopping, prioritize:
- Capture area: deeper inserts capture better (especially for front burners)
- Quiet performance: look at sones ratings; remote blowers can reduce noise
- Baffle filters: stainless baffles are durable and dishwasher-friendly
- Lighting: LED, ideally with adjustable color temperature (2700K–3000K is warm and flattering)
Backsplash Pairings That Elevate the Arch
- Full-height slab (stone or porcelain): seamless, high-end, easy to wipe
- Zellige-style tile: soft texture that complements plaster and wood arches
- Vertical stacked tile: modern, makes ceilings feel taller
- Plaster backsplash + plaster hood: tonal, sculptural, very current
Color and Finish Strategies
- Tone-on-tone: hood color close to cabinet color for a calm, cohesive renovation
- Contrast hood: wood hood with white cabinets; black hood with light stone; brass accents for warmth
- Repeat materials: if your hood is oak, repeat oak in floating shelves or stools for continuity
Budget Planning: Typical Cost Ranges
Arched hoods range from accessible to fully custom. Use these brackets to set expectations:
- Budget-friendly ($600–$1,500): prefab arched stainless or painted metal hood, basic ducting, standard install
- Mid-range ($1,500–$4,500): higher-quality insert + custom wood or simple plaster surround, upgraded lighting, better filters
- High-end ($4,500–$12,000+): custom plaster/stone/metal fabrication, remote blower, makeup air, slab backsplash integration
Plan for extras: Ductwork changes ($300–$1,500), electrical updates ($200–$800), makeup air ($1,500–$6,000+), and finish carpentry or patching ($300–$2,000).
Common Mistakes to Avoid
- Choosing shape over performance: An arch that’s too shallow or too narrow won’t capture smoke and grease effectively.
- Mounting too high: A dramatic look can backfire if the hood doesn’t vent well. Stay within manufacturer specs.
- Ignoring code and makeup air: This can create surprise costs late in a kitchen renovation.
- Undersized ducting: Long duct runs and tight elbows reduce airflow. Use the duct size recommended by the hood manufacturer.
- Forgetting cleaning access: Make sure filters are easy to remove and the interior can be wiped down.
- Mismatch with cabinet scale: A petite arch can look lost between tall cabinets; an oversized hood can overwhelm a small kitchen.
Maintenance and Longevity Tips
- Clean filters regularly: Every 2–4 weeks for frequent cooking; baffle filters often go in the dishwasher.
- Wipe the hood surface weekly: Especially around the lower edge where grease collects.
- Use the hood correctly: Turn it on a few minutes before cooking and leave it running 5–10 minutes after.
- Protect porous finishes: Seal natural stone or specialty plaster finishes as recommended.
- Check duct performance: If you notice lingering odors or moisture, confirm the exterior vent flap is operating and ducts aren’t obstructed.
FAQ: Kitchen Arched Range Hoods
What kitchen styles work best with an arched range hood?
Arched hoods work in transitional, modern farmhouse, Mediterranean, and modern organic kitchens. Material choice sets the tone: plaster feels soft and architectural, wood feels warm and timeless, and metal reads sleek and contemporary.
Should my hood be wider than my range?
Yes when possible. A hood that’s 6" wider than the range (3" extra per side) typically improves capture and reduces lingering cooking smells, especially on gas ranges.
Is a ductless (recirculating) arched hood a good idea?
Ductless can work in condos or situations where exterior venting isn’t possible, but it’s less effective at removing moisture and strong odors. Choose high-quality filters and expect ongoing replacement costs.
How do I choose the right CFM for my kitchen renovation?
For many homes, 600–900 CFM is a practical range for 36" gas cooking. Your best number depends on cooking style, hood depth, and duct layout. Also check local requirements for makeup air if you exceed 400 CFM.
Are plaster range hoods hard to keep clean?
They can be easy to maintain if properly sealed and finished for kitchen use. Wipe with gentle cleaners and avoid abrasive scrubbing. If you cook frequently with high heat, consider a smoother, more wipeable finish.
What backsplash looks best with an arched hood?
Full-height slab backsplashes (stone or porcelain) and handcrafted-look tiles are popular choices. Slab creates a seamless, high-end look; textured tile adds depth and complements the curve of the arch.
Next Steps: Plan Your Arched Hood Like a Pro
Start by measuring your range, confirming the best hood width, and deciding whether you can vent to the exterior. From there, choose a material that fits your lifestyle (easy-clean metal, warm wood, sculptural plaster, or seamless slab) and make sure the hood insert is powerful enough for how you actually cook. When the technical pieces and proportions are right, the arch becomes both a showpiece and a workhorse.
For more kitchen renovation tips, range hood inspiration, and smart kitchen organization ideas, explore the latest features at thedecormag.com.
More Articles
 Best Kitchen Pot Lid Organization - The Decor Mag
 Kitchen Natural Light Design Tips (2026)
 Best Kitchen Appliance Cord Management - The Decor Mag
 How to Plan a Kitchen Renovation on a Budget - The Decor Mag
 Safety vs. Bedside: Why Kitchen Layout Decisions Must Prioritize Human Factors Over Aesthetic Convenience
 Small Kitchen Storage Hacks That Work (2026)
 Kitchen Fluted Range Hood Cover Ideas - The Decor Mag
 Coffee Station Ideas for Kitchens (2026)
 Kitchen Cabinet Finish Durability (2026)
 Kitchen Terrazzo Countertop Trends - The Decor Mag