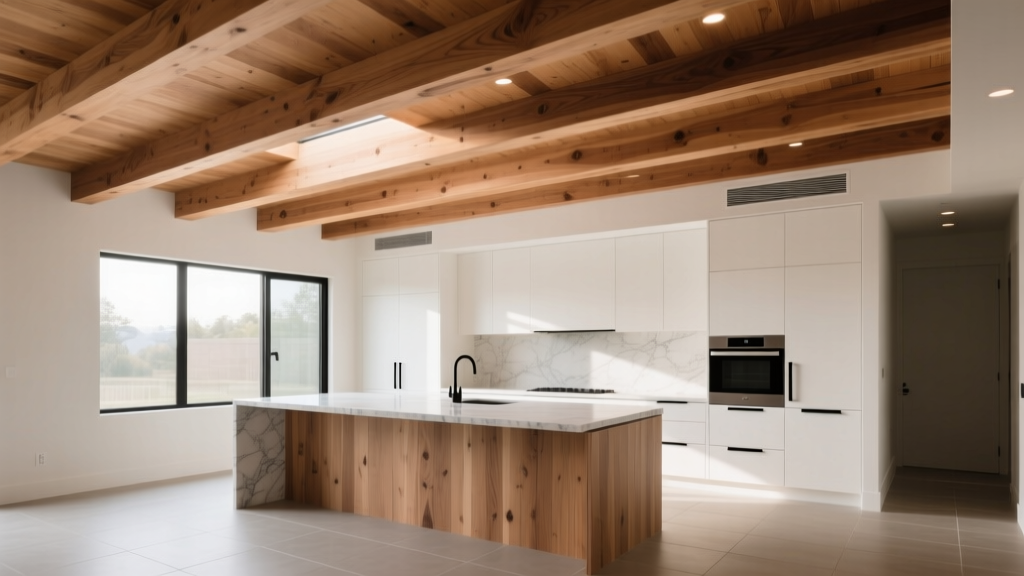
Kitchen Wood Beams Ceiling Design - The Decor Mag
Few kitchen upgrades change the feel of a space as instantly as a wood beam ceiling. Beams add architectural structure, create visual rhythm, and bring a natural warmth that balances modern appliances and sleek finishes. Whether your style leans farmhouse, modern rustic, transitional, or Scandinavian, the right ceiling beam design can make a kitchen feel more intentional—like it was planned, not patched together over time.
Wood beams also solve common renovation challenges. They can help define zones in open-concept layouts, visually “lower” ceilings that feel cavernous, and provide a strong design anchor for lighting. With today’s range of materials—solid wood, reclaimed timber, faux wood polyurethane, and wood-wrapped boxes—beam ceilings are available at multiple budget levels and weight requirements.
This guide breaks down beam styles, layout strategies, materials, costs, measurements, and maintenance so you can plan a ceiling that looks beautiful and functions well for daily cooking, entertaining, and long-term home value.
Why Wood Beams Work So Well in Kitchen Design
Kitchens are visually busy: cabinets, counters, backsplash tile, appliances, and hardware compete for attention. A beam ceiling adds a calming, cohesive element overhead, drawing the eye up and creating a finished look.
- Adds character without sacrificing functionality: Beams don’t take up floor space, yet they transform the room.
- Improves proportion: In tall kitchens (9–12 ft ceilings), beams can make the space feel grounded.
- Supports trending styles: Natural materials and warm wood tones are strong current kitchen design trends.
- Pairs with timeless principles: Symmetry, rhythm, and clear focal points are always in style.
Beam Styles: Choose the Look That Fits Your Kitchen
1) Solid Structural Beams
These are true load-bearing or structural members. They’re common in older homes or new builds designed with exposed framing.
- Best for: Major renovations, vaulted ceilings, timber-frame looks
- Pros: Authentic, long-lasting, adds real architectural value
- Cons: Higher cost, engineering may be required, heavy installation
2) Box Beams (Wood-Wrapped or Hollow Beams)
Box beams are three- or four-sided “sleeves” installed over blocking. They can be made from real wood, MDF, or plywood with veneer.
- Best for: Most kitchen renovations, especially when you want a real-wood look without the weight
- Pros: Lighter, easier to run wiring, flexible sizing, cost-effective compared to solid timber
- Cons: Seams must be done well; moisture protection matters in kitchens
3) Faux Wood Beams (Polyurethane)
High-quality faux beams mimic real grain and come in many finishes. They’re lightweight and popular for DIY-friendly upgrades.
- Best for: Budget-conscious projects, condos, low-ceiling kitchens where weight is a concern
- Pros: Light, consistent appearance, quick install, often pre-finished
- Cons: Can look artificial if texture/finish is low quality; heat and sunlight resistance varies by brand
4) Reclaimed Wood Beams
Reclaimed beams offer unmatched patina—tool marks, knots, and aged color variation. They’re perfect for rustic kitchens and modern farmhouse interiors.
- Best for: Farmhouse, rustic, industrial, heritage-style renovations
- Pros: One-of-a-kind character, eco-friendly, hides minor wear beautifully
- Cons: Must be kiln-dried or treated to reduce pests; can be costly and inconsistent in size
Kitchen Beam Layout Ideas (with Practical Measurements)
Parallel Beams for Clean, Modern Rhythm
Parallel beams running the length of the kitchen create a sleek, ordered look that suits modern, transitional, and Scandinavian spaces.
- Spacing guideline: Typically 3–6 ft apart, depending on ceiling size and beam scale.
- Beam size guideline: For 9 ft ceilings, a common visual sweet spot is 6–8 inches tall; for 10–12 ft ceilings, 8–12 inches tall reads more proportional.
- Best pairing: Minimal pendant lights, slab or shaker cabinets, quartz countertops.
Grid (Coffered-Beam Look) for Statement Ceilings
A beam grid forms rectangles or squares—ideal for larger kitchens and open-concept great rooms where you want the kitchen to feel “anchored.”
- Recommended module size: 3x3 ft to 4x6 ft rectangles are common; keep the layout symmetrical around islands or key sightlines.
- Tip: Use fewer, larger bays in smaller kitchens to avoid a busy ceiling.
Single Center Beam to Define the Space
A single beam running over an island or along the kitchen’s central axis is a subtle, budget-friendly approach.
- Placement tip: Align the beam with the island centerline, range hood center, or main lighting row.
- Lighting tip: Consider shallow-mount fixtures or track lighting that follows the beam line.
Beams with Vaulted or Cathedral Ceilings
In vaulted kitchens, beams emphasize height while adding structure to expansive planes.
- Proportion tip: Thicker beams (8–12+ inches tall) typically look more authentic in tall vaults.
- Finish tip: Slightly lighter stains help avoid a heavy look overhead.
Material and Finish Recommendations
Best Wood Species for Kitchens
- White oak: Durable, timeless grain, works with warm modern and classic designs.
- Douglas fir: Strong linear grain; great for rustic and craftsman styles.
- Hemlock or pine: Budget-friendly, stains well; dents more easily (fine for ceilings).
- Walnut: Rich, upscale tone; best as an accent in contemporary kitchens.
Reclaimed vs. New Wood: Quick Comparison
- Reclaimed: More variation, higher character, may require extra prep (cleaning, sealing, pest treatment).
- New wood: Predictable dimensions, easier matching, often lower labor cost.
Finish Options That Hold Up in a Kitchen
Kitchens have moisture, grease, and temperature swings. Protect your beams with finishes designed for real life.
- Water-based polyurethane (matte or satin): Low odor, clear finish, resists yellowing.
- Hardwax oil: Natural look and feel; easier spot repairs; may need periodic reapplication.
- Stain + topcoat: Best for matching floors or cabinetry while maintaining protection.
Color trend watch: Warm, mid-tone woods (think honey oak, natural oak, and light walnut) are resurging as homeowners move away from stark gray interiors. Pair warm beams with creamy whites, greige cabinets, or muted greens for a current but timeless look.
How to Coordinate Beams with Cabinets, Flooring, and Lighting
Matching vs. Contrasting Wood Tones
- Match (cohesive): Beam stain close to floor tone for a seamless, calming palette.
- Contrast (architectural): Dark beams with light cabinets create definition; light beams brighten kitchens with dark cabinetry.
Lighting Placement Tips
- Plan lighting before beams are installed: Decide on recessed lights, pendants, and under-cabinet lighting early.
- Maintain clear spacing: Keep recessed lights 12–18 inches away from beam edges to prevent shadows and “scalloping.”
- Use beams to hide wiring: Box beams are excellent for running cables to pendants over an island.
Range Hood and Ventilation Considerations
If you’re installing a statement range hood, align beam layout so it doesn’t visually “cut” into the hood area. For kitchens with high output cooking, make sure the hood duct route is planned around beam locations—especially with low ceilings.
Cost Ranges and Budget Planning
Costs vary widely by material, ceiling complexity, and labor rates. Use these ranges for early planning.
- Faux wood beams (polyurethane): $10–$30 per linear foot for product; installed often $25–$60 per linear foot.
- Wood box beams (custom built): $20–$60 per linear foot materials; installed typically $50–$150 per linear foot depending on finish and ceiling access.
- Solid wood beams (new timber): Often $60–$200+ per linear foot installed; higher with structural engineering or special rigging.
- Reclaimed beams: $80–$250+ per linear foot installed, depending on sourcing, prep, and authenticity.
Budget reality check: A typical kitchen might use 30–80 linear feet of beams depending on layout. A simple single-beam upgrade can be a few hundred to a few thousand dollars; a full grid ceiling can become a major line item in a kitchen renovation.
Where to Spend and Where to Save
- Spend on: Correct scale, quality finish/sealant, skilled installation (especially visible seams and mitered corners).
- Save on: Using box beams instead of solid timber; limiting the design to one focal beam; choosing a standard stain rather than custom matching.
Product and Design Approach Recommendations
- For a high-end look with manageable weight: Custom box beams with real wood veneer and a matte protective topcoat.
- For quick upgrades: Pre-finished faux beams with realistic grain texture; choose a brand with consistent color lots if ordering multiple pieces.
- For modern kitchens: Clean-edged box beams (minimal distressing), lighter oak stains, and simple spacing.
- For farmhouse kitchens: Reclaimed or distressed beams, paired with shaker cabinets and vintage-inspired pendants.
Maintenance and Cleaning Advice (Kitchen-Specific)
Ceilings collect dust and, in kitchens, airborne grease. A little prevention keeps beams looking fresh.
- Monthly: Dust with a microfiber duster or vacuum brush attachment.
- As needed: Spot-clean with a lightly damp cloth and mild soap; dry immediately.
- Avoid: Harsh degreasers or abrasive pads that can dull the sheen or strip wax/oil finishes.
- Ventilation matters: A properly sized range hood reduces grease accumulation on ceilings and beams.
Finish refresh timeline: Polyurethane-coated beams may go many years without attention. Hardwax oil may need a light refresh every 2–5 years depending on cooking habits and ventilation.
Common Mistakes to Avoid
- Choosing the wrong scale: Beams that are too small look like trim, not architecture. Use ceiling height and room width to guide thickness.
- Overcrowding the ceiling: Too many beams can make a kitchen feel lower, darker, and visually busy—especially with patterned tile or dramatic countertops.
- Ignoring lighting conflicts: Placing beams after recessed lighting is laid out can lead to awkward fixtures too close to beam edges.
- Skipping moisture and stain testing: Always test stain and topcoat on a sample board under your kitchen lighting (day and night) before committing.
- Misaligned focal points: A beam grid that doesn’t align with an island, range, or main window can look accidental.
- DIY installs without proper anchoring: Beams must be secured to ceiling joists or blocking, not just drywall.
FAQ: Kitchen Wood Beams Ceiling Design
Do wood beams make a kitchen look smaller?
They can if the beams are too dark, too thick for the ceiling height, or spaced too tightly. In most kitchens, a lighter stain, fewer beams, and thoughtful lighting keep the space open while still adding character.
Are faux wood beams a good choice for kitchens?
Yes—especially for renovation budgets or ceilings that can’t support heavy materials. Choose high-quality faux beams with realistic grain and a finish rated for indoor use where heat and humidity fluctuate.
How far apart should ceiling beams be in a kitchen?
A common range is 3 to 6 feet on center. Smaller kitchens often look best with wider spacing (fewer beams), while larger open-concept kitchens can handle tighter spacing or a grid layout.
Can I install beams if I have recessed lights?
Often yes, but the beam plan should be designed around the lighting plan. You may need to relocate a few cans or choose slimmer beam dimensions. Keep recessed lights about 12–18 inches from beam edges for cleaner light spread.
What’s the best finish for wood beams in a cooking-heavy kitchen?
A matte or satin water-based polyurethane offers strong protection and easy cleaning while keeping the wood looking natural. If you prefer hardwax oil, plan on occasional maintenance and prioritize good ventilation.
Will wood beams increase home value?
They can, especially when the design looks intentional and complements the home’s architecture. A well-executed beam ceiling is a desirable feature in many real estate markets because it adds warmth and a custom feel.
Next Steps: How to Plan Your Beam Ceiling with Confidence
- Measure your kitchen: Note ceiling height, room width, and key focal points (island, hood, windows).
- Pick a beam type: Faux, box beam, reclaimed, or solid—based on budget, ceiling structure, and the look you want.
- Map lighting and ventilation first: Confirm recessed lights, pendant locations, and duct routes before finalizing beam placement.
- Order samples: Test stain and topcoat under your actual kitchen lighting.
- Hire the right help if needed: For structural changes, vaulted ceilings, or complex grids, consult a contractor (and an engineer when required).
Wood beams bring warmth, depth, and architectural intention to kitchen design—whether you’re doing a full renovation or upgrading one feature at a time. For more practical renovation guidance, layout ideas, and on-trend finishes, explore more kitchen inspiration and home decor articles on thedecormag.com.
More Articles
 How to Style a Kitchen Open Shelf Display - The Decor Mag
 Best Kitchen Specialty Pan Storage - The Decor Mag
 Best Kitchen Specialty Tool Organization - The Decor Mag
 Best Kitchen Spice Drawer Inserts - The Decor Mag
 Best Kitchen Specialty Ingredient Storage - The Decor Mag
 Kitchen Soapstone Countertop Guide - The Decor Mag
 Kitchen Statement Stone Slab Island - The Decor Mag
 Kitchen Island Size: Choose Right for Your Space (2026)
 Kitchen Sink Styles and Materials Compared - The Decor Mag
 Best Kitchen Lighting for Function & Style (2026)