Kitchen Limewash Wall Treatment Guide - The Decor Mag
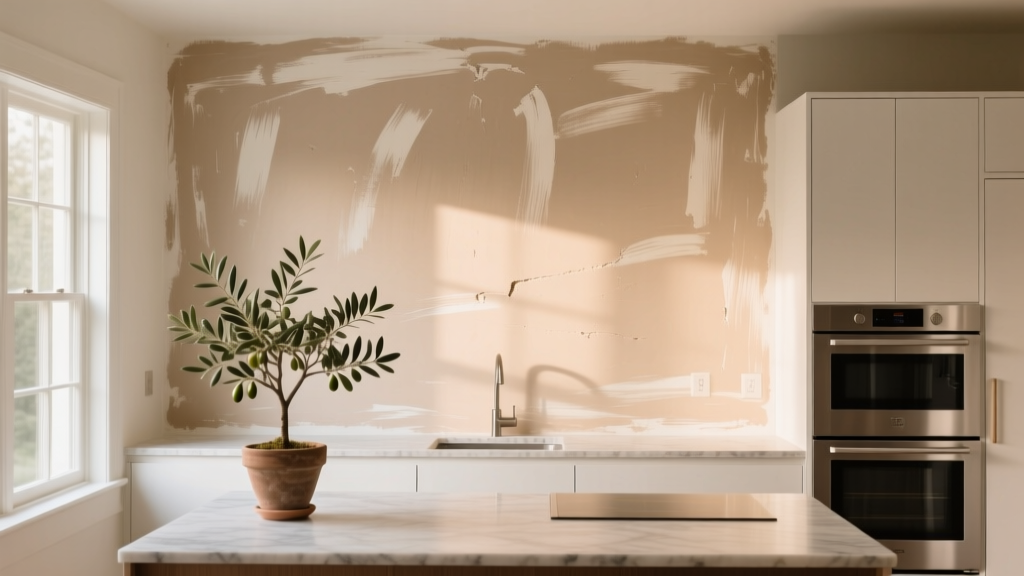
Limewash is having a major moment in kitchen design—and for good reason. Homeowners renovating kitchens want spaces that feel layered, warm, and personal rather than flat and factory-perfect. A limewashed wall brings that soft, velvety depth that pairs beautifully with today’s most popular choices: natural wood cabinetry, honed stone countertops, aged brass hardware, and earthy neutrals.
Unlike standard paint, limewash shifts subtly throughout the day as light changes, helping kitchens feel calmer and more architectural. It also aligns with timeless functionality principles: kitchens work hard, and finishes should age gracefully. A well-applied limewash can hide minor wall imperfections, add character to remodels, and elevate even a simple layout without the cost of major construction.
This guide breaks down where limewash works best in a kitchen, how to choose materials and colors, what it costs, and how to get a durable finish you can live with—plus common mistakes to avoid.
What Limewash Is (and Why It Looks Different Than Paint)
Limewash is a mineral-based wall treatment made primarily from crushed limestone that’s been mixed with water (and sometimes natural pigments). It cures by carbonating—essentially bonding with the surface as it dries—creating a matte, chalky finish with soft movement and tonal variation.
Limewash vs. Paint vs. Plaster: Quick Comparison
- Limewash: Cloudy, brush-stroked variation; breathable; naturally matte; best on mineral surfaces; can be sealed for kitchens.
- Standard interior paint: Uniform color; easy wipe-down; more sheen options; less depth; may highlight wall flaws.
- Venetian plaster / lime plaster: More labor-intensive; can be polished or matte; very durable when done right; higher cost; often best left to pros.
If you love the look of plaster but want a more approachable DIY path, limewash is often the sweet spot.
Where Limewash Works Best in a Kitchen (and Where to Be Cautious)
Kitchens are moisture, grease, and splash zones—so placement matters. Limewash can absolutely belong in a kitchen renovation plan, but it’s smartest when used strategically.
Best Places to Limewash
- Dining nook walls or a breakfast banquette backdrop
- Accent walls away from the stove and sink
- Kitchen perimeter walls behind open shelving (with a protective sealer)
- Ceilings for a cocooning, European-style kitchen feel (especially in smaller rooms)
- Pantry entry walls or a butler’s pantry for subtle drama
Use Extra Protection (or Avoid) in These Zones
- Behind the cooktop: Use tile, slab stone, or a full-height backsplash. Limewash here is high-risk unless fully protected and kept well away from direct splatter.
- Behind the sink: Water spray and cleaners can wear the finish without a durable topcoat.
- Directly above countertops: Consider a backsplash return of at least 18 inches (standard backsplash height) or full-height coverage in heavy-use areas.
Design trend callout: A popular 2025 kitchen trend is the “warm minimal” palette—creamy off-whites, greiges, and clay tones—paired with textured walls. Limewash fits perfectly when balanced with durable, wipeable surfaces in the work zones.
Choosing the Right Limewash Look for Your Kitchen Style
The most successful limewash kitchens have a clear intention: add softness, highlight architecture, and complement cabinetry and countertops—not compete with them.
Color Recommendations That Work with Common Kitchen Finishes
- Warm white / bone: Great with oak, walnut, or rift-sawn cabinetry; pairs with brass and natural stone.
- Soft greige: Bridges cool countertops (marble-look quartz, stainless) with warmer floors.
- Clay / terracotta wash: Ideal for Mediterranean, Spanish revival, or organic modern kitchens.
- Muted olive / sage: Strong with cream cabinetry, black hardware, and soapstone-inspired counters.
- Charcoal / smoked umber: Best as a single accent wall; looks elevated with white oak and minimal open shelving.
Finish Intensity: Subtle vs. High Movement
Limewash can range from barely-there variation to dramatic clouding. In most kitchen renovations, subtle movement reads more timeless and keeps the room from feeling busy (especially if you have veined countertops or patterned tile).
Proportion tip: If your kitchen already has 2–3 “statement” elements (bold backsplash, veined counters, strong cabinet color), keep limewash quiet. If your kitchen is simple and monochromatic, you can push limewash contrast a bit more.
Materials and Product Options: What to Buy
Limewash products vary by surface compatibility and ease of use. Before you buy, determine whether you’re working with drywall, plaster, brick, or masonry.
Common Limewash Options
- Traditional limewash (powder mixed with water): Most authentic look; requires more prep and practice; often best for masonry or plaster.
- Pre-mixed limewash paint: More consistent and beginner-friendly; good for drywall with the right primer.
- Mineral silicate paint (alternative): Similar matte mineral look; can be more durable; often excellent for kitchens wanting a limewash-like aesthetic with improved washability.
Recommended Accessories and Tools
- Masonry brush (4–6 inches wide) for texture and natural variation
- Angled sash brush (2–2.5 inches) for corners and trim lines
- Microfiber roller (optional) for base coat on large areas, followed by brushing for movement
- Painter’s tape (low tack) and drop cloths
- Primer appropriate for your wall type (especially drywall)
- Sealer/topcoat rated for matte mineral finishes (kitchen-friendly)
Primer and Sealer: The Kitchen Durability Upgrade
If you want limewash walls in a kitchen that actually functions, plan for sealing.
- Drywall: Use a mineral-compatible primer recommended by the limewash manufacturer; avoid glossy primers that can prevent bonding.
- High-splash areas: Apply a matte, breathable sealer designed for limewash or mineral paint. This can reduce staining and make gentle cleaning possible.
Maintenance mindset: A sealed limewash is more wipeable, but it won’t behave exactly like semi-gloss enamel. Think “durable enough for real life,” not “scrub like a hospital wall.”
Planning Placement: Layout and Design Approaches That Feel Intentional
Limewash looks best when it has room to be seen. Treat it like a design feature, not an afterthought.
Smart Layout Ideas
- Accent wall behind a kitchen table: Frames the dining zone in open-plan kitchens.
- Whole-room limewash with hard-working backsplash zones: Limewash everywhere except tile or slab behind sink/cooktop.
- Limewash above wainscot or paneling: A timeless approach that adds washability below and texture above.
- Ceiling limewash: Visually lowers tall ceilings and makes kitchens feel warmer—especially with recessed lighting and minimal trim.
Measurements to Keep the Finish Practical
- Backsplash height: Plan 18 inches minimum above countertops, more in heavy cooking zones.
- Range clearance: If you insist on limewash near a range, keep it at least 12–18 inches away from direct splatter areas and protect with an appropriate sealer—tile is still the safer choice.
- Open shelving: Leave 14–18 inches between shelves and countertops; limewash behind shelves looks best when not overly crowded.
Step-by-Step: How to Apply Limewash in a Kitchen
Always follow your specific product’s instructions, but this workflow suits most limewash wall treatments.
1) Prep Like a Pro
- Clean walls: Remove grease film with a degreasing cleaner (especially near cooking areas). Rinse and let dry.
- Repair: Patch holes and sand smooth. Limewash hides minor texture, not bad repairs.
- Protect: Cover countertops, floors, and cabinets carefully. Limewash splatter can be stubborn on porous surfaces.
- Prime if needed: Most drywall needs primer; masonry may not.
2) Apply in Thin Coats
- Stir thoroughly: Pigment settles fast.
- First coat: Use a large masonry brush in crisscross strokes. Keep a wet edge.
- Dry time: Often 4–8 hours (varies by brand, humidity, and surface).
- Second coat: Repeat brushing for depth. Two coats is typical; some looks need three.
3) Seal for Kitchen Use (If Recommended)
- Wait the manufacturer’s cure window (commonly 24–72 hours before sealing).
- Apply sealer in thin, even layers. Some sealers slightly deepen color—test first.
Visual tip: Limewash often looks patchy while drying. The finish evens out as it cures, then gains depth over the next few days.
Cost Ranges and Budget Considerations
A limewash kitchen upgrade can be relatively affordable compared to tile or slab backsplash expansions—especially if you DIY.
Typical Cost Ranges (USD)
- DIY materials: $150–$450 for a small kitchen wall project (limewash + primer + sealer + brushes)
- Mid-size kitchen (multiple walls): $400–$1,200 in materials depending on product and number of coats
- Professional application: $8–$20 per sq ft (higher in major metros or for complex prep)
Budget-Smart Tips
- Use limewash as a feature (one wall or ceiling) and paint the rest in a coordinating matte.
- Invest in prep and sealing rather than extra coats. Durability is the kitchen priority.
- Sample first: Buy test pots/samples and view them under morning, afternoon, and evening lighting.
Maintenance and Cleaning: Keep Limewash Looking Beautiful
Limewash is lower maintenance than it looks, but it needs the right care—especially in a hardworking kitchen.
- Routine dusting: Use a microfiber cloth or soft brush attachment.
- Spot cleaning: For sealed walls, use a damp cloth with mild soap. Avoid abrasive pads.
- Avoid harsh cleaners: Degreasers, bleach, and vinegar can etch mineral finishes.
- Touch-ups: Keep leftover product. Limewash touch-ups can blend well if feathered out; expect slight variation (often a plus aesthetically).
Real-life kitchen tip: If you have young kids, heavy frying, or frequent splatters, place limewash away from the messiest zones and lean on backsplash materials (tile, stone, stainless) where you need true scrub-ability.
Common Mistakes to Avoid
- Skipping degreasing: Kitchens build invisible residue that can prevent adhesion.
- Using the wrong primer: A slick or glossy base can lead to peeling or uneven absorption.
- Expecting uniform color: Limewash is meant to be softly varied—embrace movement.
- Overworking the brush: Too many passes as it dries can create harsh lines and dragged texture.
- Not testing with your lighting: Warm LEDs can turn greige too yellow; cool daylight can make warm whites look dull.
- Skipping sealer in high-use kitchens: The look may be right, but durability will disappoint.
FAQ: Kitchen Limewash Wall Treatments
Can you limewash over drywall in a kitchen?
Yes, but drywall typically needs a compatible primer first. For kitchens, a protective sealer is strongly recommended to improve stain resistance and wipeability.
Is limewash durable enough for a busy family kitchen?
It can be when placed thoughtfully (away from heavy splash zones) and sealed. If your kitchen sees frequent grease and spills, prioritize tile or slab surfaces near the cooktop and sink and use limewash elsewhere.
Does limewash work with modern kitchen design?
Absolutely. Limewash is a favorite in organic modern and warm minimal kitchens because it softens sleek cabinetry lines and complements natural materials like wood, stone, and brushed metal finishes.
Will limewash make my kitchen look darker?
Not necessarily, but the matte finish absorbs more light than satin paint. If you’re concerned, choose a lighter shade and pair it with layered lighting: under-cabinet LEDs, ceiling ambient lighting, and warm task lighting (2700K–3000K).
Can I use limewash as a backsplash?
It’s not the best choice for true backsplash duty behind a sink or cooktop. Even sealed, it won’t match tile or slab stone for daily scrubbing. A better approach is a standard backsplash height (18 inches) and limewash above it.
How many coats of limewash do I need?
Most kitchens need two coats for an even, dimensional look. Highly porous surfaces or deeper colors may need three. Always sample first because absorption varies widely by wall condition and primer.
Next Steps: How to Plan Your Limewash Kitchen Upgrade
- Choose placement: Identify walls that add impact without taking on constant splashes.
- Pick a palette: Match limewash undertones to cabinetry, countertops, and flooring.
- Order samples: Test at least two shades and view them for 48 hours in your kitchen lighting.
- Decide DIY vs. pro: DIY is realistic for confident homeowners; hire a pro if walls are in rough shape or you want a flawless, controlled finish.
- Plan protection: Confirm primer and sealer systems before you start, especially for renovation timelines.
When done thoughtfully, a limewash wall treatment brings that sought-after blend of trend-forward texture and timeless warmth—making your kitchen feel both designed and lived-in.
Explore more kitchen renovation ideas, layouts, and finish guides on thedecormag.com.
More Articles
 How to Choose Kitchen Cabinet Door Styles - The Decor Mag
 Kitchen Honed Finish Countertop Appeal - The Decor Mag
 Kitchen Cabinet Interior Finish: Best Choices (2026)
 Coffee Station Ideas for Kitchens (2026)
 Wall Trends 2026: Material Innovation, Adaptive Surfaces, and Human-Centered Design in Residential Kitchens
 Best Kitchen Serving Tray Storage - The Decor Mag
 How to Choose Kitchen Counter Depth - The Decor Mag
 Kitchen Style & Function: Design Tips (2026)
 Best Kitchen Ladder for High Shelf Access - The Decor Mag
 Kitchen Drawer Organization That Lasts (2026)