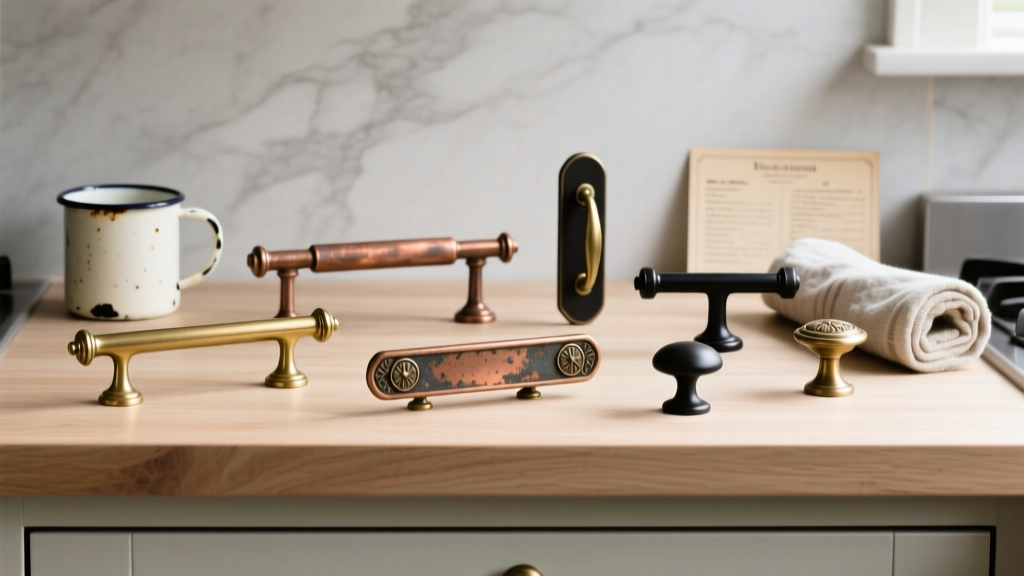
Kitchen Vintage Inspired Hardware Guide - The Decor Mag
Kitchen hardware is one of the smallest line items in a renovation budget—and one of the most visible. Swap a set of knobs and pulls, and suddenly your cabinets look custom, your island feels anchored, and even a basic builder-grade kitchen reads more intentional. Vintage inspired hardware has a special advantage: it delivers character without requiring a full historic remodel.
For homeowners planning a kitchen renovation (or simply refreshing a tired space), vintage style cabinet hardware offers a practical way to bridge today’s popular design trends—like warm metals, layered textures, and softer silhouettes—with timeless functionality. The right choices also improve everyday use: better grip, smoother operation, and fewer fingerprints on high-touch surfaces.
This guide walks through the most flattering vintage-inspired hardware styles, how to size and place them correctly, what materials perform best in a working kitchen, and how to budget wisely—so your updated kitchen looks curated, not costume.
What “Vintage Inspired” Kitchen Hardware Really Means
Vintage inspired hardware isn’t necessarily antique. It’s newly made hardware designed to echo classic eras—often with updated finishes and mounting standards. It pairs well with both traditional and modern kitchens because it introduces history through shape and material rather than heavy ornament.
Most popular vintage style references
- Late 1800s–early 1900s: bin pulls, simple knobs, unlacquered brass, porcelain accents
- 1920s–1940s: stepped details, Art Deco backplates, streamlined pulls
- 1950s–1960s: chrome, simple arcs, playful porcelain, mid-century proportions
- European farmhouse: iron latches, hammered textures, aged patinas
Why it works in today’s kitchen design trends
- Warm metal finishes are trending: aged brass, bronze, copper, and mixed metals
- Softened modern spaces need contrast: vintage pieces add depth to flat-panel cabinetry
- “Quiet luxury” favors quality details: substantial knobs, real metal, and patina over glossy novelty
Choose Your Vintage Hardware Style (and Where Each Shines)
1) Cup pulls (bin pulls)
Instantly classic, cup pulls look right at home on Shaker cabinets, inset doors, and painted finishes. They’re also comfortable for daily use on drawers.
- Best for: drawer fronts, pantry drawers, trash pull-outs
- Great pairings: round knobs on doors + cup pulls on drawers
- Watch for: finger clearance—some shallow cups feel tight on thick drawer faces
2) Bridge pulls
Bridge pulls are a traditional favorite with a graceful arched silhouette. They feel “period-correct” without being fussy, especially in polished nickel, aged brass, or oil-rubbed bronze.
- Best for: doors and medium to wide drawers
- Design tip: choose a slightly thicker bar for a more authentic, substantial look
3) Knobs: round, mushroom, and fluted
Knobs are the most budget-friendly way to introduce vintage character. Mushroom knobs and simple rounds read classic; fluted or reeded knobs nod to traditional millwork.
- Best for: cabinet doors, smaller drawers, appliance garages
- Comfort tip: if you have arthritis or limited grip strength, choose a knob with a wider face (1 1/4"–1 1/2" diameter) for easier grasping
4) Backplates and latches
Backplates can make inexpensive cabinetry feel more architectural, and they’re helpful when covering old hardware holes during a refresh.
- Best for: vintage-inspired renovations, inset cabinetry, furniture-style islands
- Practical win: backplates protect painted doors from rings and wear around the handle
5) Glass and porcelain knobs
Glass and porcelain knobs are classic in cottage kitchens and period homes. They also bring contrast to dark cabinetry and add sparkle to muted palettes.
- Best for: uppers, hutches, butler’s pantries, baking zones
- Maintenance note: wipe gently—abrasive cleaners can scratch glass or dull printed porcelain details
Materials & Finishes: What Holds Up in a Working Kitchen
Vintage inspired hardware looks best when it also feels good in the hand. Material quality affects weight, durability, finish wear, and how it ages over time.
Material comparison (performance + look)
- Solid brass: premium feel; can be polished, lacquered, or unlacquered. Ages beautifully and resists corrosion well. Ideal for a long-term kitchen renovation.
- Zinc alloy (die-cast): affordable and widely available. Can chip if the finish is thin; look for reputable brands and a thicker, smoother coating.
- Stainless steel: durable, modern-leaning, and great for busy family kitchens. Less “vintage” in shape unless paired with classic silhouettes.
- Iron/steel with patina: strong and authentic for farmhouse styles. Needs occasional care to prevent rust if the coating is thin or damaged.
- Glass/porcelain accents: charming and period-appropriate; best in lower-impact areas or paired with sturdy metal bases.
Finish choices that feel vintage (without looking dated)
- Unlacquered brass: living finish that darkens and softens with time; ideal for a collected look.
- Aged brass / antique brass: controlled patina, less maintenance than unlacquered.
- Polished nickel: classic and brighter than chrome; pairs beautifully with marble, quartz, and white tile.
- Antique pewter: understated, hides fingerprints, great for warm wood tones.
- Oil-rubbed bronze (or “aged bronze”): timeless in traditional kitchens; use thoughtfully to avoid a heavy look.
Fingerprints, water spots, and real-life maintenance
- Most forgiving: aged brass, antique pewter, brushed finishes, textured/hammered metals
- Most high-maintenance: polished chrome, polished brass (shows smudges and water spots)
- Cleaning routine: mild dish soap + warm water on a microfiber cloth; dry immediately
- Avoid: bleach sprays, abrasive powders, and ammonia cleaners (can strip patina and cloud finishes)
Sizing & Placement: Measurements That Make Hardware Look Custom
Correct sizing is where vintage inspired hardware can look high-end instead of haphazard. These guidelines work for most cabinet layouts and help keep your kitchen functional.
Knob sizing guidelines
- Standard knob diameter: 1 1/4" to 1 3/8" for most cabinet doors
- Oversized knobs: 1 1/2" to 1 3/4" for pantries, tall doors, or a bolder vintage statement
- Projection (how far it sticks out): aim for 1"–1 1/4" so it’s easy to grasp without catching on clothing
Pull length guidelines (a practical starting point)
- Drawers under 18" wide: 3"–5" pulls or cup pulls
- 18"–30" drawers: 5"–8" pulls (or longer bridge pulls)
- 30"–36" drawers: 8"–12" pulls for a balanced look
- 36"+ wide drawers: 12"+ pulls or two pulls spaced evenly
Placement rules that prevent “almost right” results
- Upper cabinet doors: place knobs/pulls 2 1/2"–3" from the bottom corner on the latch side
- Lower cabinet doors: place knobs/pulls 2 1/2"–3" from the top corner on the latch side
- Drawer pulls: center horizontally; vertically, place 1 1/2"–2 1/2" from the top edge (or centered on the drawer face for a more traditional look)
Pro move: Before drilling, tape paper templates to doors and drawers and test “grab comfort” for a few days—especially on trash pull-outs and heavily used drawers.
Design Approaches That Look Collected, Not Themed
Mix knobs and pulls the right way
Mixing is a classic kitchen design strategy and a current trend—when it’s consistent. The simplest formula:
- Knobs on doors (uppers + lowers)
- Pulls or cup pulls on drawers
- Match the finish family (all warm metals or all cool metals), even if sheens vary
Layer finishes intentionally (especially in open-concept homes)
Vintage inspired hardware pairs beautifully with mixed metal kitchens. Keep it cohesive with a “two-finish” plan:
- Choose a primary hardware finish (about 70–80% of visible metal): aged brass, polished nickel, pewter
- Add a secondary finish in lighting or faucet (about 20–30%): matte black, bronze, chrome
Where to add true vintage flair
- Island cabinets: use slightly larger pulls or backplates for a furniture-like centerpiece
- Pantry doors: consider latch-style hardware or taller pulls for drama and function
- Butler’s pantry: porcelain or glass knobs add charm in a smaller zone
Product & Shopping Recommendations (What to Look For)
Rather than chasing a single “best” brand, shop by construction and specs—those determine how the hardware performs over years of use.
Features worth paying for
- Solid brass or heavier-weight pieces (they feel better and tend to wear more gracefully)
- Consistent finish matching across knobs, pulls, and accessories
- Multiple screw lengths included (common cabinet door thickness is 3/4", but drawers and specialty fronts vary)
- Comfortable edges (avoid sharp corners that snag towels or feel rough on hands)
Smart add-ons that elevate a renovation
- Matching appliance pulls for panel-ready refrigerators and dishwashers (helps a kitchen look built-in)
- Coordinated bin pulls for drawer stacks to reinforce the vintage look
- Backplates for repaint projects or to disguise old hole placement
Cost Ranges & Budget Planning
Hardware pricing varies widely based on material, finish, and brand. Use these ranges to plan a realistic kitchen renovation budget.
Typical costs (per piece)
- Budget: $3–$10 per knob, $6–$18 per pull (usually zinc alloy)
- Mid-range: $10–$25 per knob, $18–$45 per pull (better plating, heavier weight, more finish options)
- Premium: $25–$60+ per knob, $45–$150+ per pull (often solid brass, specialty finishes like unlacquered brass)
- Appliance pulls: $80–$300+ each depending on length and material
Example budget for an average kitchen
For a kitchen with 25–35 hardware pieces (a common range for standard cabinet layouts):
- Budget total: $200–$700
- Mid-range total: $500–$1,600
- Premium total: $1,200–$4,000+
Where to splurge vs. save
- Splurge: most-used drawers (utensils, trash/recycling, pots/pans), island hardware, appliance pulls
- Save: upper cabinets used less often, secondary pantry zones, laundry-adjacent cabinetry
Common Mistakes to Avoid
- Choosing style first and ignoring feel: a gorgeous pull that’s uncomfortable will annoy you daily. Always test grip and clearance.
- Going too small on wide drawers: undersized hardware looks “floating” and can twist over time with heavy use.
- Mixing too many finishes: more than two metal finishes in one open kitchen can look cluttered.
- Forgetting hole spacing (center-to-center): when replacing pulls, measure the existing C-C spacing (common sizes include 3", 3 3/4", 5", 6 5/16", 7 9/16"). Mismatched spacing means patching and repainting.
- Installing without a jig/template: even minor alignment errors are obvious across a run of cabinets. Use a cabinet hardware jig or a drilled template.
- Not coordinating with hinges and faucets: you don’t need an exact match, but undertones should relate (warm with warm, cool with cool).
Care & Maintenance: Keep Vintage Inspired Hardware Looking Its Best
Day-to-day cleaning
- Wipe weekly with a microfiber cloth and warm water (add a drop of dish soap for grease).
- Dry immediately to prevent water spotting, especially on polished finishes.
Finish-specific advice
- Unlacquered brass: allow natural patina for the most authentic look; if you want it brighter, polish lightly and evenly (spot-polishing can look blotchy).
- Oil-rubbed/aged finishes: avoid harsh cleaners; they can strip the darker topcoat.
- Glass/porcelain: use non-abrasive cleaner and soft cloth; check occasionally that screws remain snug.
Installation tip that prevents loosening
If pulls loosen over time, remove them and reinstall with a tiny dab of removable thread locker (blue). Avoid permanent formulas—you may want to replace hardware later.
FAQ: Vintage Inspired Kitchen Hardware
Should kitchen cabinet hardware match the faucet?
Not necessarily. Matching can look clean, but mixing is common in current kitchen design trends. Keep undertones consistent (warm with warm, cool with cool) and repeat each finish at least twice (hardware + lighting, or faucet + accessories) for a cohesive look.
What’s the most timeless vintage inspired finish?
Polished nickel and aged brass are both long-lasting choices. Polished nickel feels classic and bright; aged brass brings warmth and hides fingerprints better.
Can I use cup pulls on cabinet doors?
It’s possible, but cup pulls are usually more ergonomic on drawers. On doors they can feel awkward, especially near corners. A better vintage pairing is cup pulls on drawers and round knobs on doors.
How do I replace pulls without drilling new holes?
Measure the existing center-to-center hole spacing and buy new pulls with the same measurement. If you want a different look, consider adding backplates to cover old holes or switching to knobs (with patching and touch-up paint as needed).
Is unlacquered brass too hard to maintain in a kitchen?
It’s low-maintenance if you like patina. It becomes higher-maintenance only if you want it to stay shiny. For a similar warm look with less change over time, choose aged brass.
What hardware looks best on Shaker cabinets?
Shaker cabinets are extremely flexible. Classic options include mushroom knobs, simple round knobs, cup pulls on drawers, and bridge pulls in polished nickel, aged brass, or antique pewter.
Next Steps: A Simple Plan for Choosing Vintage Inspired Hardware
- Take inventory: count doors/drawers and measure existing hole spacing (if replacing).
- Pick a style direction: cup pulls + knobs, bridge pulls + knobs, or all pulls for a more streamlined look.
- Select a finish family: warm or cool, then confirm it works with your faucet, lighting, and cabinet color.
- Order 2–3 samples: test in your kitchen lighting and with daily use before committing.
- Install with a jig: consistent placement is what makes hardware look professional and “original.”
Vintage inspired hardware is one of the quickest ways to make a kitchen renovation feel finished—and one of the easiest upgrades for improving kitchen organization and daily flow. For more cabinet hardware ideas, layout tips, and kitchen design inspiration, explore the latest guides at thedecormag.com.
More Articles
 Industrial Kitchen Design Inspiration - The Decor Mag
 Best Kitchen Herb Garden Window Ideas - The Decor Mag
 Personality in Kitchen Design: Ideas for 2026
 Kitchen Appliances Compared on a Budget: Smart, Reliable Choices Under $300
 Kitchen Countertop Seam Placement: Pro Tips (2026)
 Kitchen Integrated Drainboard Sink Guide - The Decor Mag
 Kitchen Butlers Pantry Design Guide - The Decor Mag
 Best Kitchen Dutch Oven Storage Ideas - The Decor Mag
 Kitchen Statement Stone Slab Island - The Decor Mag
 Kitchen Leathered Finish Granite Guide - The Decor Mag